I planted the rows a bit too close together. This made it hard to weed between the rows, and I think the weeds competed for water and held the corn back a bit. Doing this again I’d make every second or third row wide enough to comfortably walk between so that I could reach in and weed. I think this would increase yield quite a lot.
Similarly we had a heat wave while the cobs were growing and I think the soil dried out a bit. It seems like corn really likes water, so it’s worth making sure you have a good sprinkler setup.
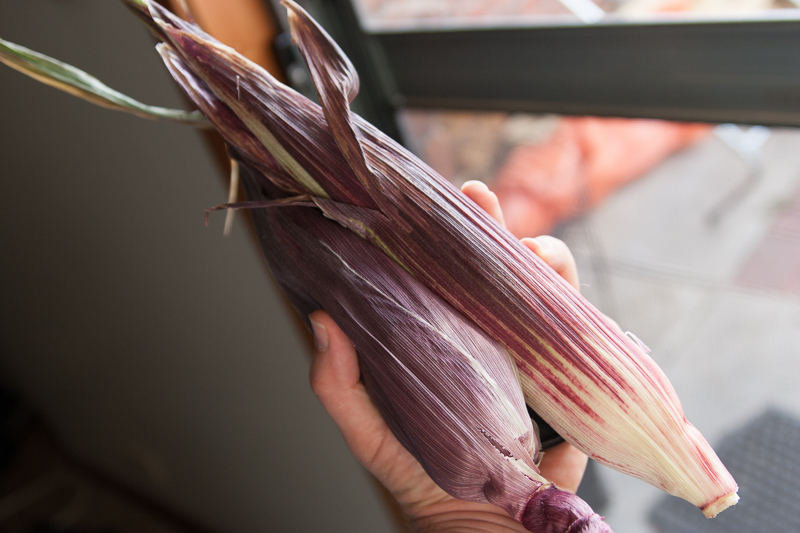
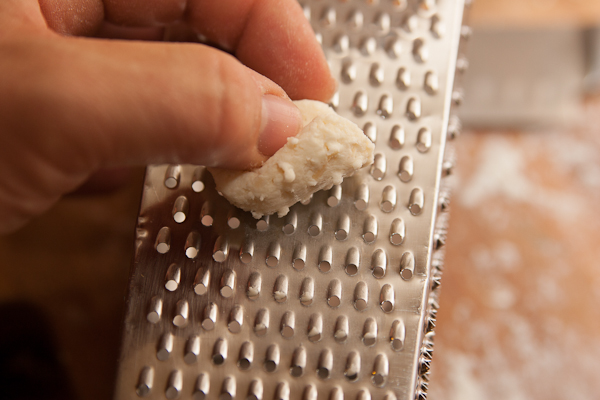
I picked the corn when the beards were starting to look dry. I shucked it and laid the cobs out to dry on a cloth in the garage. After about a week the kernels felt quite hard. It was fairly easy at that point to detach the kernels from the cobs. What worked best was to remove one kernel, then work along in rows by pushing the next kernel down into the empty space with fingertips. I understand that you can also get devices designed to do this, like a metal ring that you grip in your hand, but I didn’t find it necessary.
The final yield was about 2kg/4lb of dried corn from a 2×4 meter patch.
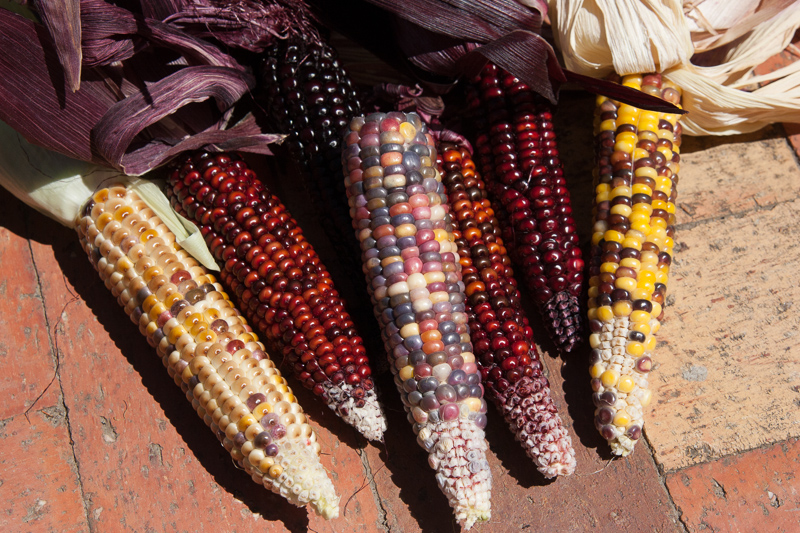
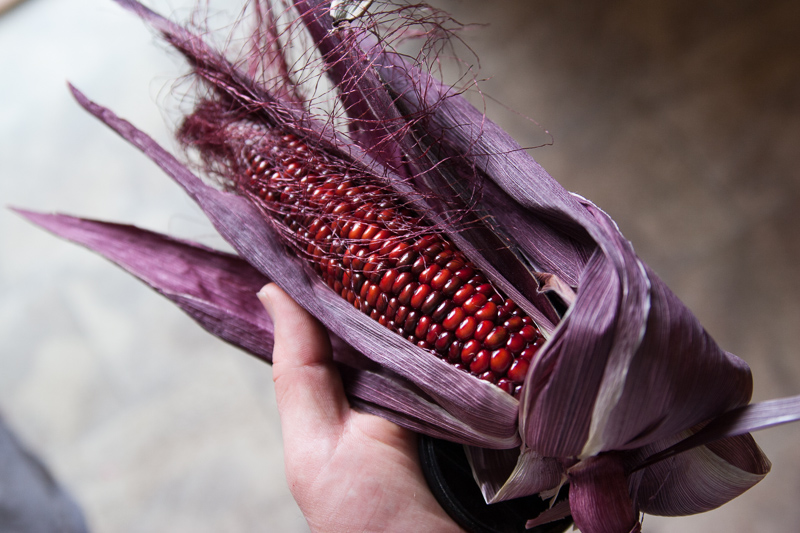
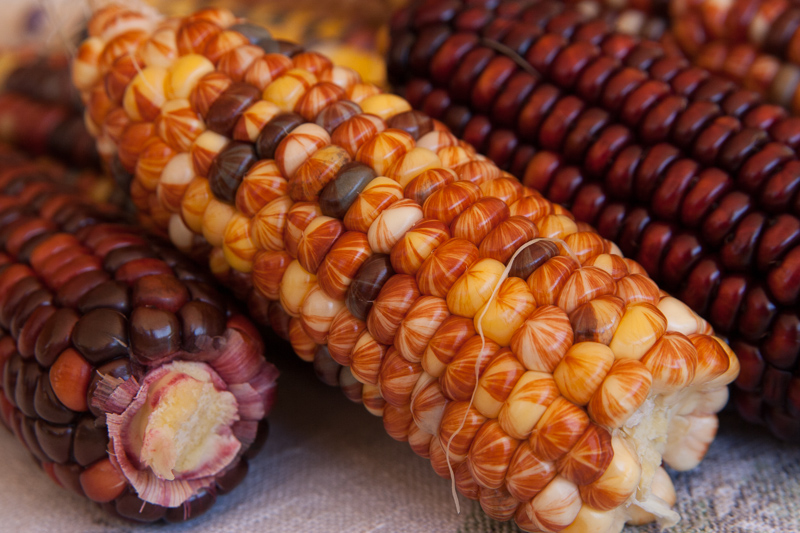
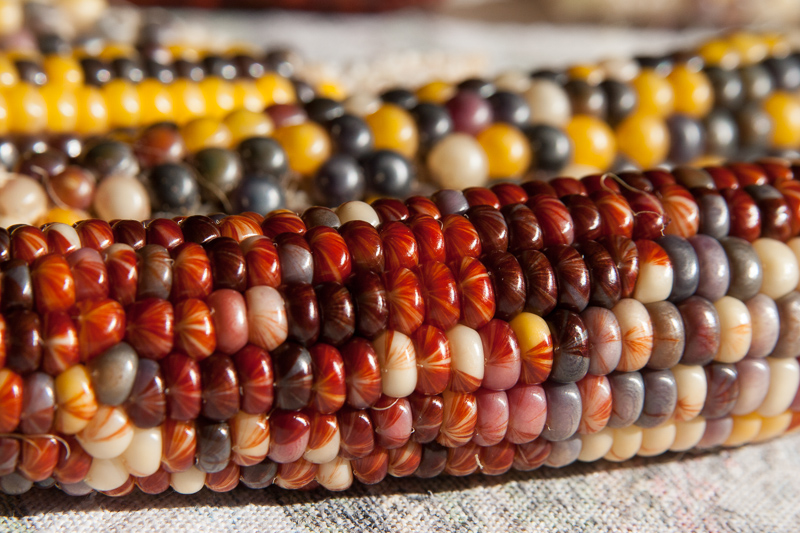
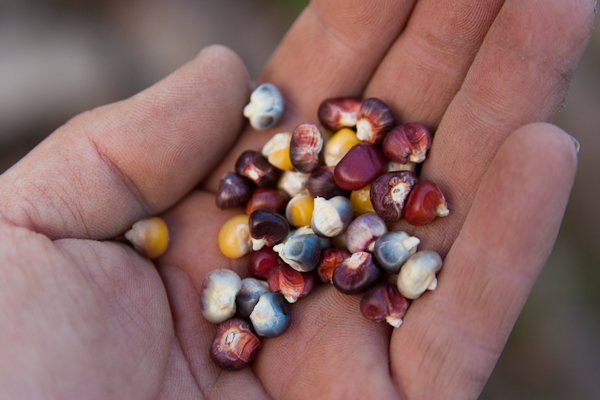
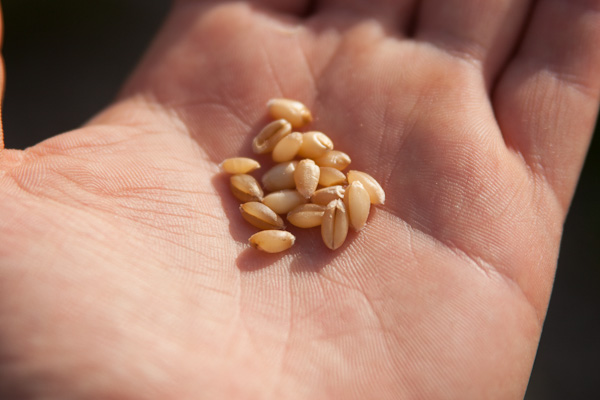
But now the interesting part – the pictures! I was really stunned how lovely this corn looks. It is easily the most impressive thing I have grown. Some ears were deep ruby red through to black, some were speckled with flecks of red, orange and yellow, some had random blue and white kernels. My favourite were the pale yellow, blue and white ones with a pearl-like sheen.
In the mood for an xmas treat, I just invented this cocktail and it is good enough to tell you about. I call it… Santapants.
1 shot brandy
2 shots port
1 heaped teaspoon cream*
1 teaspoon brown sugar
generous half teaspoon of mixed spice (cinnamon, allspice, nutmeg type of thing)
1 pinch dried ginger powder
*It isn’t the type of thing I’d usually buy but I found buttterscotch cream and had to use it in this cocktail.
Shake all ingredients vigorously on ice in a cocktail shaker and serve in a chilled martini glass. If I had some I would garnish this with candied orange too.
Here’s some exciting news: I just spent a morning harvesting our first patch of wheat! Sweat, itch, straw and dust aside I am pretty excited to make the first loaf. At a very rough estimate I think we might have a yield around 1kg wheat per square meter so the 40m2 patch might have produced enough grain to make a years worth of bread. I’ll update this when the final count is in.
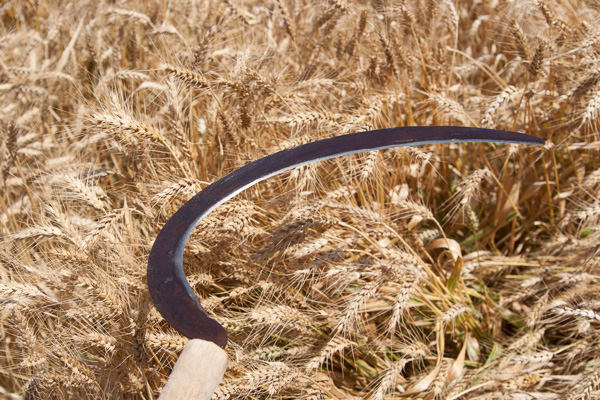
I used a beastly sharp sickle, and good gloves. I can see this thing lopping a finger right off.
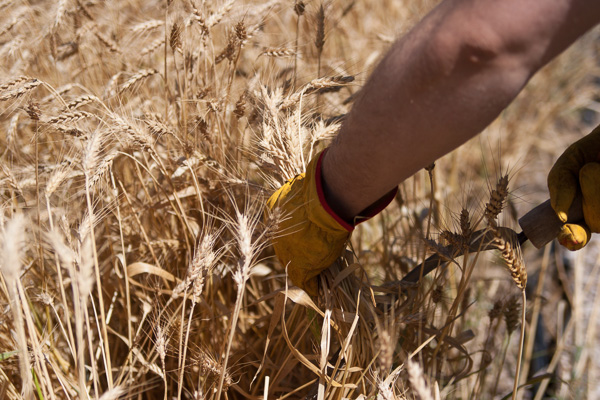
First I tried cutting quite high to just get the heads but there was a lot of variation in the height of each stalk so I soon started just cutting at the base, grabbing bundles and sawing through them.
I laid down armfuls as I went, then gathered them into stooks at the end. The stooks were just to be romantic, I just chucked most of it on a tarp under cover. I’ll let it dry for a week before the next step.
Next is threshing, then winnowing. Threshing just means smacking the wheat, straw and all until the grain comes loose. Winnowing is separating the grain from the chaff, straw, bits of earwig and so on. There’s still work to do figuring out the best method for this! I did a small batch just to test by filling a feed bag and smacking it into the wall, then pouring the contents back and forth between two buckets so the wind carried chaff away. After doing this manually I firmly believe that growing and processing grains is the reason mankind invented machinery.
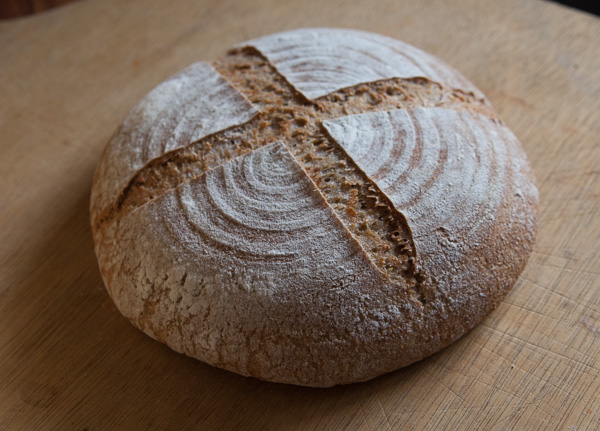
Finally, here it is – my very first loaf made from home grown wheat. Tastes delicious and feels very satisfying.
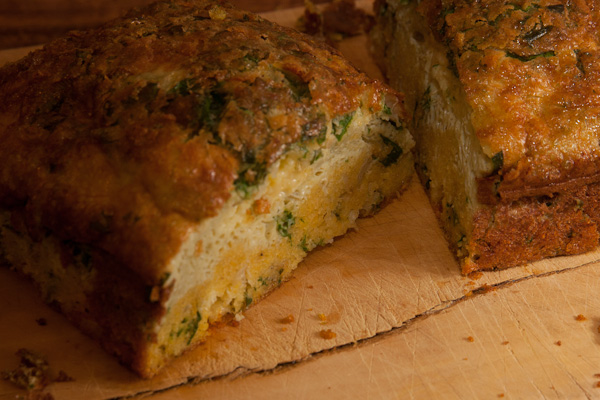
After reading about the benefits of getting more calories from good oils and protein and eating less carbs I came up with this recipe for polenta quiche, which has about 300 calories per serve, half from fat, and with 20g of carbs. I’m making up large batches and freezing slices so I have healthy tasty breakfasts on hand for the morning rush. It’s interesting to see how it comes out of the oven – the recipe is easy to make because you really just mix and bake and the heavier polenta settles to the bottom forming a crust on its own. Like any quiche recipe you can vary the fillings a lot – I like using some corn kernels and a rasher of bacon diced and fried up with the onion. Add some butter for a richer quiche.
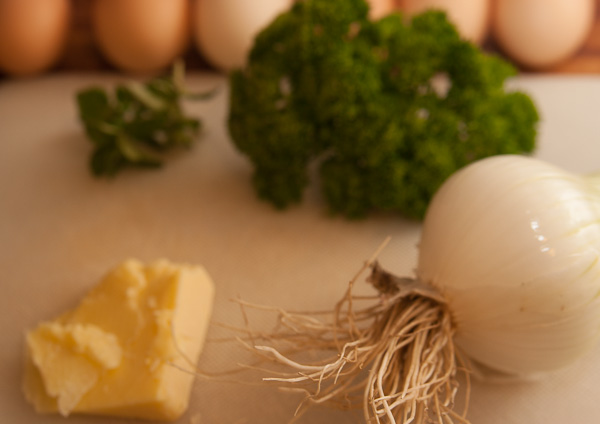
Ingredients
6 Eggs
1 Tbsp Rice flour (or wheat flour if not making gluten free)
1/2 onion, diced fine
1 Spring onion, sliced
2 Tbsp Olive Oil
1 Tbsp diced tasty cheese
1 Sprig parsley, sliced
1/2 Cup Polenta
2/3 Cup milk
1/2 Tsp baking powder (use gluten free if required)
Other fresh herbs if liked
1 Clove garlic, chopped fine
Pinch each salt & pepper
Saute the onion in 1 tbsp of olive oil over medium heat until clear.
Mix all ingredients together and stir very well.
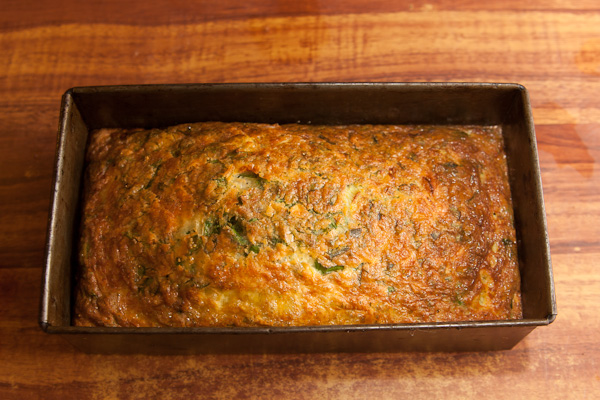
Tip into a greased pan – I use a loaf tin but a round quiche/pie dish could also work.
Bake in a medium oven – (I used 180C/350F fan forced) until brown and no longer wobbling.
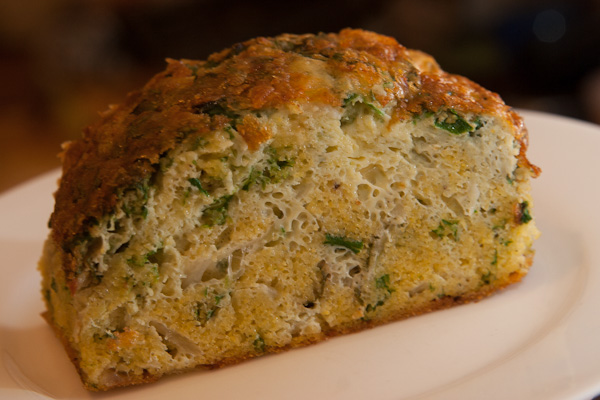
Here you see the polenta has settled somewhat, making the bottom more like a crust while the top half is light and fluffy!
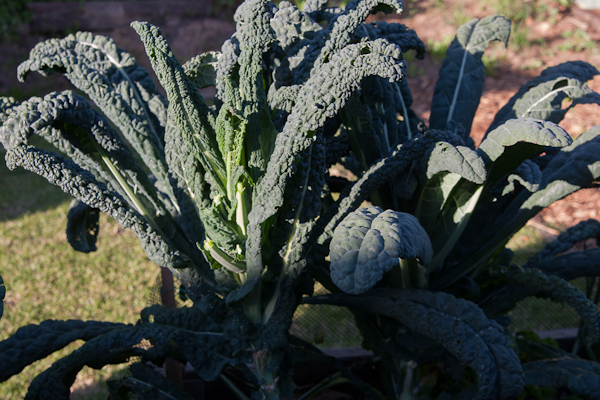
The price of Kale in my local shops is surprisingly high given how easy it is to grow – in the garden it doesn’t seem to need as much water as some things once it is established, and produces lots of leaves over a month or more. I find Kale seductively beautiful with its chunky dark green leaves and strong flavour.
Here is my little Kale patch – nearly time to plant some more.
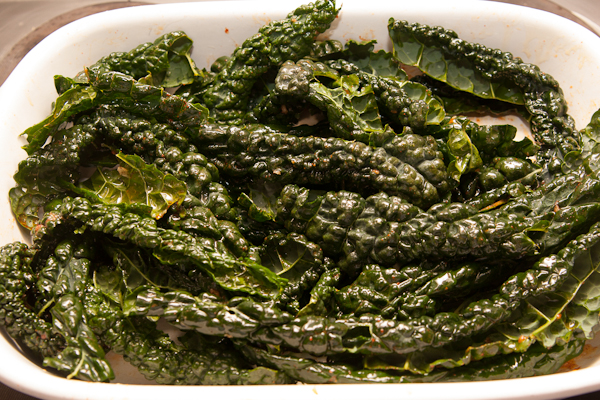
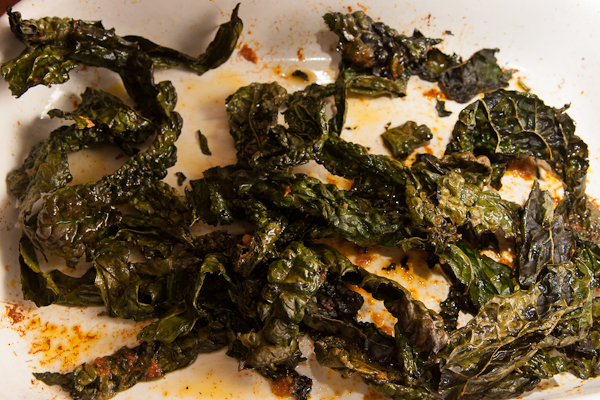
I often make quiche or bean & Kale stews but I’d never heard of Kale chips until I found a bag for sale at a health food store. Unfortunately the bag I bought tasted a bit like garden mulch so I was interested to see if they tasted any better home made. The result really surprised me – these babies are not just delicious “for Kale”, they are delicious full stop! My first tray full hardly made it out of the oven.
Isn’t this a handsome veggie?
Method
Cut or tear the large central stems out of each leaf. You can just squeeze the central stem and run your fingers down it to tear it out easily.
Wash the leaves and dry them well – I used my salad spinner.
Mix a few glugs of olive oil with any seasonings – I used salt, paprika and a clove of mashed garlic.
Toss and turn the leaves in the oil until well coated.
In a low oven, bake in a single layer on a baking tray until the leaves are completely crispy. I went with 160C for about 20 minutes, turning part way through.
They shrivel a fair bit but because Kale is quite chunky they still have some volume.
I’ve come to realise that I’m in love with polenta (which if you don’t know, is a kind of porridge or paste made from cooked corn meal). It is good for you, delicious, texturally satisfying, and goes in a surprising range of dishes – from appetisers to desserts. So when I coincidentally read mister meatballs post about growing your own, then the salt’s writeup about the flavour of heritage varieties, I knew I had to try growing it myself.
The first step in any new project is to read up, so here’s what I learned before putting anything into practice!
Yield
It’s always hard to estimate how much of a crop you’ll get when most figures give bushels per acre and assume farm equipment and so on but from some internet searches I think it’s possible I’ll get 2kg of dried corn from my 8-10 square meter patch. I could be waaaay off so it will be interesting to see how much I get and how long it lasts. It seems like you need a little more space than the typical suburban garden if you want to grow a whole years supply but I will update here when the harvest is in.
Varieties
There are a number of types of corn but the varieties that I’ve seen sold so far can be divided into sweet corn, popping corn, flint corn and dent corn. Dent corn (or field corn) is used to make softer flours for things like tortillas and fine cornflour. Flint corn seems to be the variety most often used for polenta. Sweet corn and popping corn are used as the name suggests – sweet corn is the variety that we eat fresh on the cob. Sweet and popping corn are said not to be as good for making flour although my dad tried making tortillas using popping corn for the masa and was happy with the results. Of course, within these varieties are lots of different types. Floriania Red is said over at Mother Earth News to be good for polenta but after I saw photos of Painted Mountain corn at Easy Living The Hard Way, I had to get some. If you’re in the US, Amazon stock this variety.It isn’t exactly easy to find the seeds in Australia so please share any sources you might have!
Growing
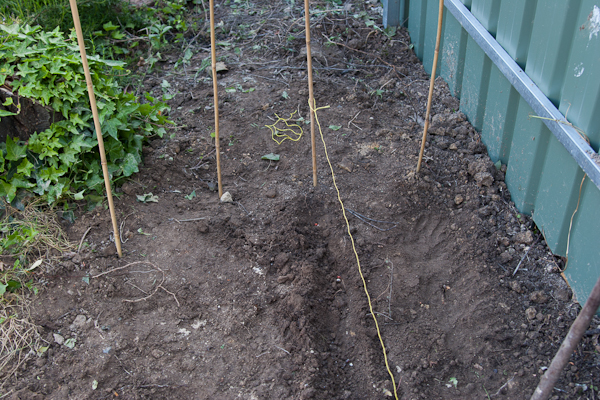
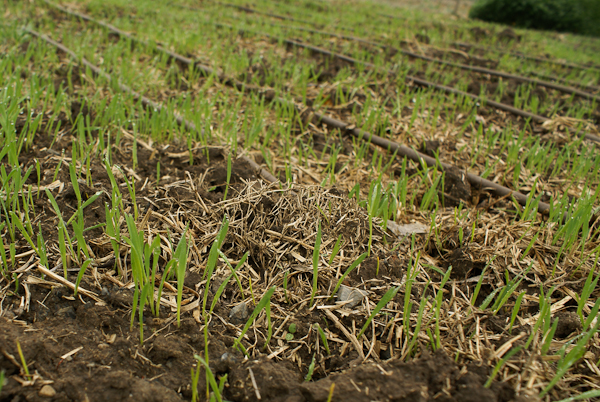
Corn is usually planted in spring but check the recommendations & conditions for your local area. Here in South Australia we are still getting a bit of rain but a warm spring overall so I decided to start planting! The first step was preparing a garden bed to grow the corn. Corn likes rich, loose soil so I turned the dirt over with a mattock, then sprinkled over some gypsum to improve drainage as the patch had a little clay. I also added some organic fertiliser with added potash, then raked the beds level and worked the fertiliser in. Corn is pollinated by the wind transferring pollen between plants, so it is best planted in multiple rows fairly close together. The usual recommendation seems to be 30cm (1 foot) between rows and 10cm (4in) between plants in the row. The rows will be thinned later to 20cm between plants (8in). The initial double spacing is to allow for some seeds not sprouting.
I tapped in a stake at each end of the row, and used a string line to get the spacing right. I dug a furrow about 2cm (4/5 in) deep with a hoe and dropped the seeds into the furrow, then filled it and patted down. After sowing the seed I gave the patch a long water – the soil will need to stay damp constantly until the seeds sprout (then watered regularly afterwards too). I read one recommendation to soak the seeds overnight before planting but to be frank I was impatient! We’ll see how it works out.
Here’s my stakes and string line, with the second row underway
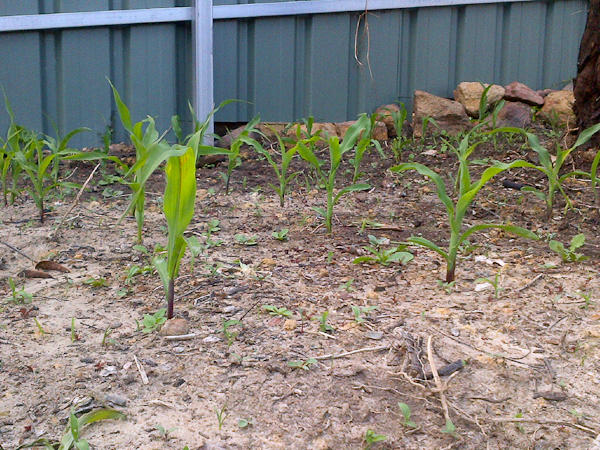
Week 1
The corn started to sprout after about 10 days. I scattered around some organic snail pellets as I’ve been told those new green shoots are very tempting for slugs and snails.
Week 3
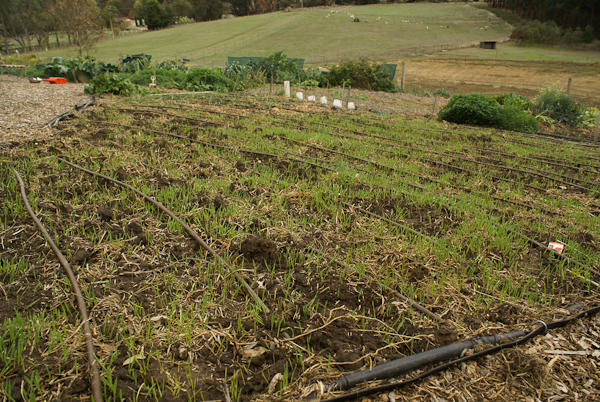
Here we are 3 weeks after planting. The corn is rocketing along, maybe a hand width high. I thinned out the rows today – I couldn’t bring myself to kill all the babies so I tried transplanting a few of the small shoots to the end of the rows where they had more room – a few days on and they seem to be doing fine! Time will tell if they end up as healthy as the others.
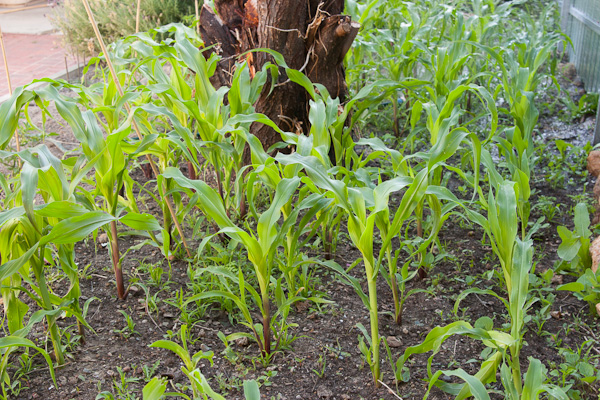
Week 7
The corn is is probably a bit slower than expected at this point because we’ve had quite a few unusually cold spells, but when the sun is out it shoots up noticeably. It I have given it a drink of liquid fertiliser and a sprinkle of an organic fertiliser pellet. It’s hard getting between the rows to weed!
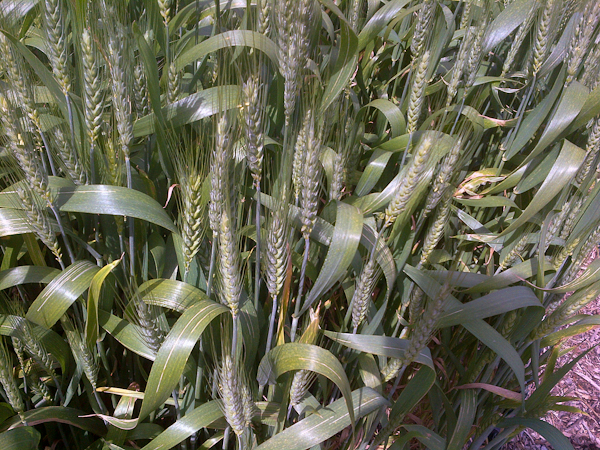
Week 10
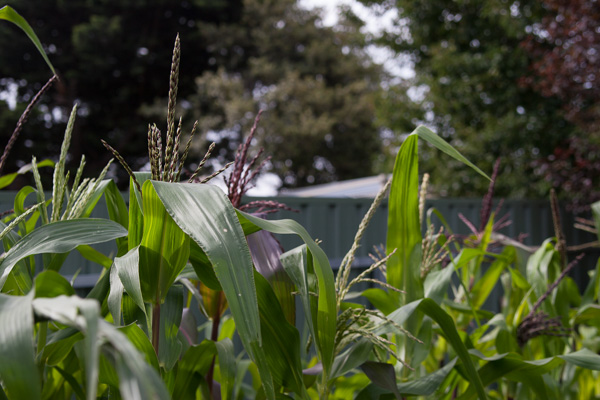
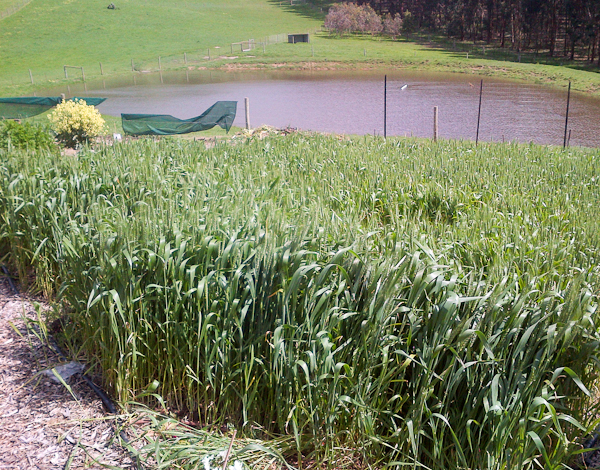
Seriously rocketing up over the last few weeks, my corn has now flowered and is developing ears. The flowers are on top while the ears start showing up as tufts of ‘beard’ along the stalks. A common recomendation is to tap the stals at this stage to make sure pollen drifts down to pollinate the ears.
I’ve been interested in growing wheat for a long time – it just seems to be something you should do if you’re into baking and doing things ‘from scratch’ so with winter rains here and the offer of a spare patch in my mums veggie garden if I helped clear it, I have just sown my first crop! As you’ll see, this is just a test patch for now with perhaps 20 square meters of land. If it works out, I can use a much larger patch for planting. We just scattered the wheat by hand (broadcasting) so it isn’t in nice neat rows or anything and we just used whatever variety the local health food shop sold for sprouting.
I have a lot to learn but here’s a few useful facts I’ve uncovered:
Wheat yield per acre varies a lot depending on irrigation, variety, soil, climate etc but can be in the order of 1.5t per acre which is around 370g (2/3lb) per square meter. Depending on usage, a person might need 20kg (40lb) of grain for a years supply. This means to be completely self sufficient you’d want around 55 square meters sown with wheat per person in the household. Ideally wheat should be rotated instead of planting the same patch every year, so you’d want to either use the patch for something else the year after or have several patches you plant out in turn. Of course you don’t have to grow your own entire years supply – I’m going to be happy if I get enough for some loaves and pizzas out of our first harvest.
I found suggestions that it is good to plant multiple varieties together. If some varieties are less resistant to certain pests or diseases there’s a reduced risk of losing a whole crop.
Seeds should be sown about 5cm (2in) deep. You can scatter the seeds over raked soil, then fork or rake them in to around that depth. They need water straight away, then at least once per month if it isn’t raining.
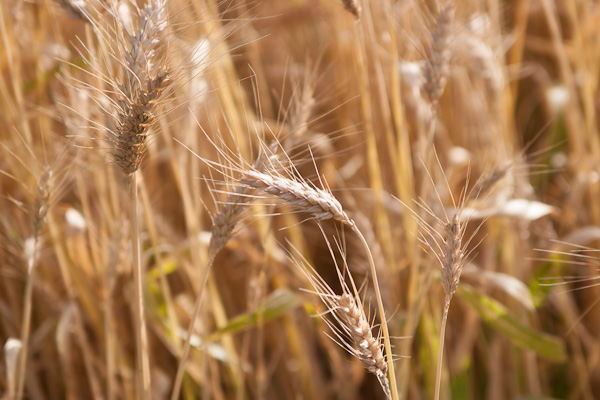
Wheat germinates in around a week and is ready to harvest after 5-6 months. It’s ready to harvest when the grains are hard.
Different wheat varieties, surprisingly called spring or winter wheat, are be sown in winter or spring. Winter wheat needs a cold period to germinate properly. Winter wheat has more gluten than spring wheat, so it would make stretchier doughs that hold their shape and rise more.
There are also ‘red’ or ‘white’ varieties, red varieties apparently having a more prominent ‘whole grain’ taste than white varieties which are more mild in flavour.
4 months later
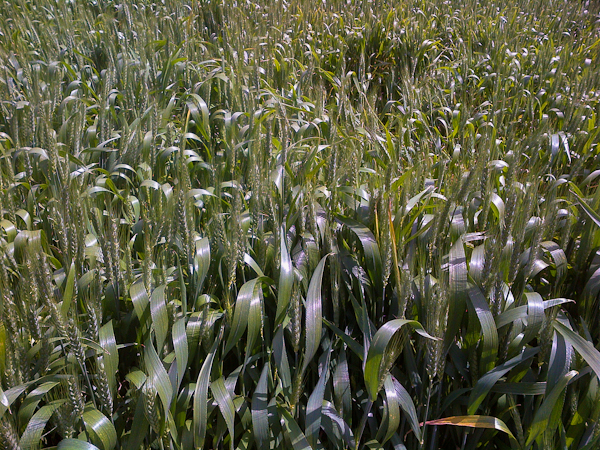
The wheat has grown well through winter and now has lots of decent sized ears! I expected it to be a bit taller but as can be seen, most plants are only knee height. Maybe this is the variety we bought, or maybe it will continue to grow?
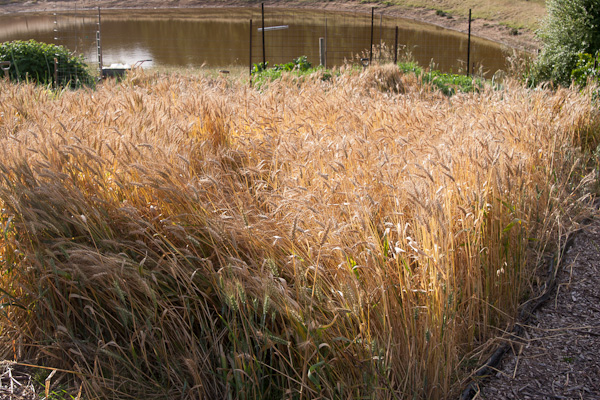
6 months later
The wheat has started to dry out! The ears are starting to sag and the grains are almost crunchy when you bite into them (and they taste great). We are harvesting next weekend.
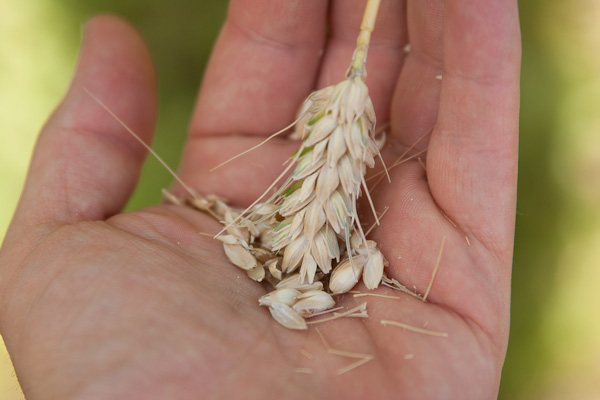
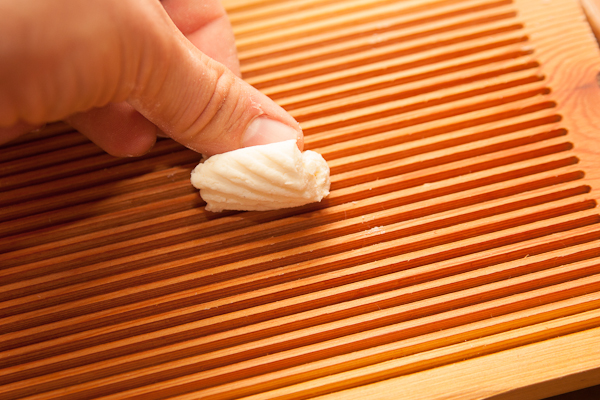
To test a few grains, you grind the wheat head first into your handThen gently blow away the husksVoila!
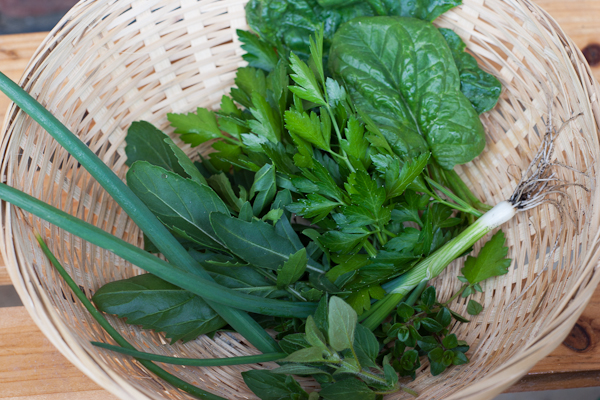
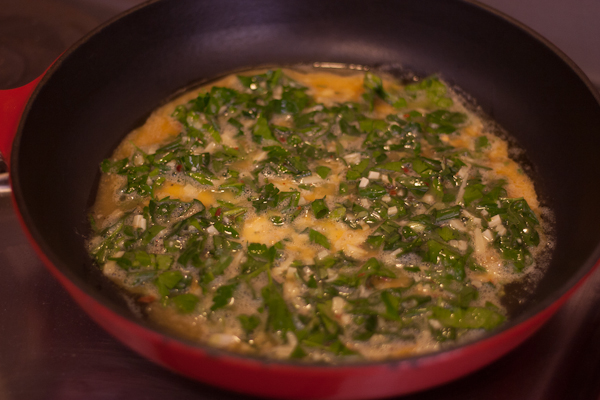
I am writing down this recipe to share the enjoyment of picking fresh garden greens on a sunny spring morning – there is something very satisfying about cooking like this. The only remaining piece of the puzzle is to get our own chickens for really fresh eggs!
I vary this recipe depending on what is in the garden, today it is rocket (arugula), flat leaf parsley, thyme, oregano, spring onion and a little new spinach.
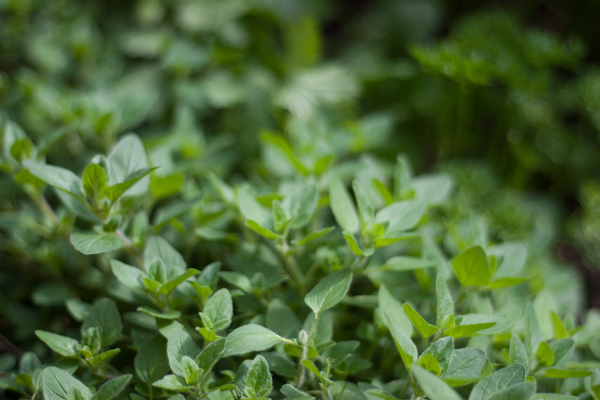
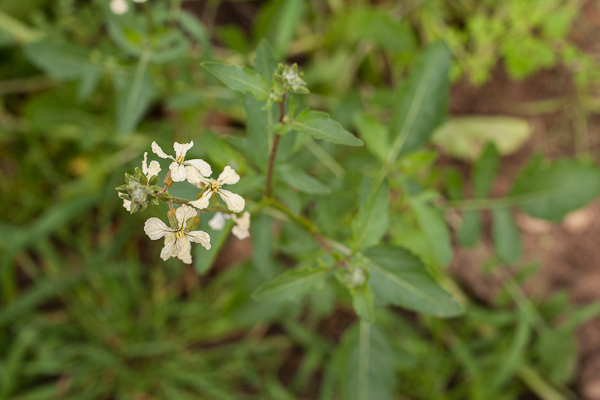
Here is part of the oregano jungleMy rocket is going to seed – but it still tastes good!
Ingredients
2-3 eggs
About 1 cup of mixed herbs and greens – spinach, spring onions, chard, oregano, whatever is good!
1 Tbsp of diced or grated parmesan
A grind of black pepper and a pinch of salt
A pinch of dried garlic powder or a clove of fresh garlic, chopped
Optionally a pinch of red chilli flakes
Method
Dice greens roughly and herbs fine.
Mix all ingredients in a bowl and stir together with a fork.
I think eggs overcooked are ruined, so I cook them over low-medium heat until just done. Heat a skillet and add a nice piece of good butter (go on, you’re about to work it off in the garden anyway aren’t you?) and a glug of olive oil.
Tip the egg mixture into the pan and cook until it starts to look cooked all the way through – a few minutes. Then carefully flip and cook the other side for a minute. It might help to carefully loosen all around the edges with an egg flip before flipping.
Not quite ready to flip
Eggs and chilli are a really yummy combination so I eat omelette with a dab of a delicious Harissa (chilli paste) from My Country Kitchen (I can’t find a website for them but bought at the Willunga markets). That plus a nice espresso = the breakfast of champions!
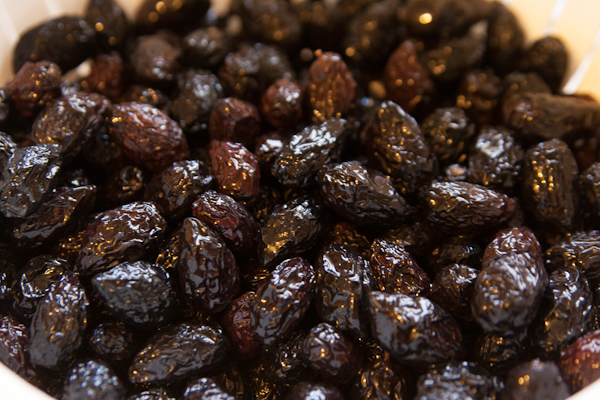
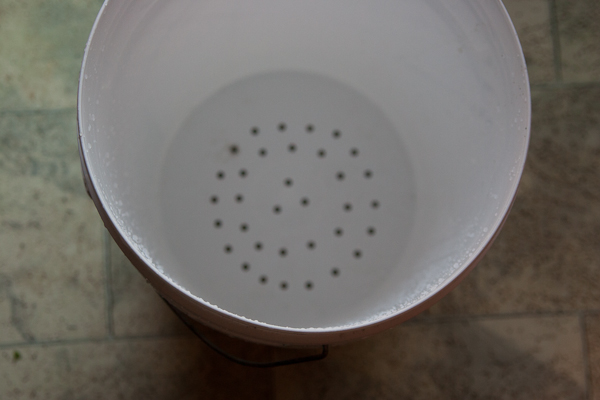
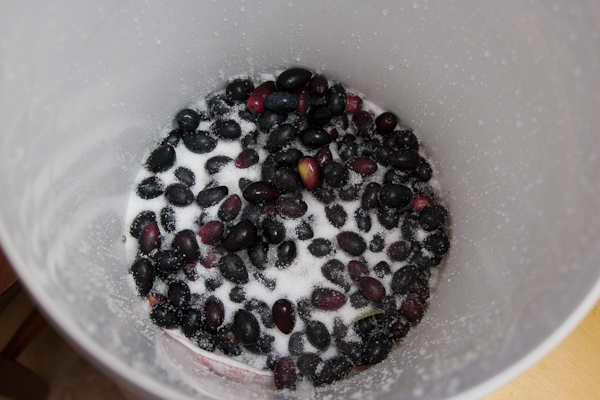
I love having lots of homemade olives around but I have to confess that sometimes I’m a bit slack with changing pickling liquid every day. Luckily there’s a method that suits my temperament very well – just chuck the olives and dry salt into a bucket and stir once a week. You don’t have to slit each olive or change the water or anything like that and best of all I think these are my favourite tasting olives too – they are kind of leathery and wrinkly, surprisingly they don’t actually taste all that salty though! Most of the salt draws liquid out of the olives and then runs away. Theres a really noticeable flavour of olive oil that I don’t get from brined olives. The method & equipment I’m using for this years batch is below. I bought 2 large plastic buckets with lids, and drilled holes in the bottom of one. The olives and salt go in the bucket with holes, which sits inside the other bucket to catch the juice. In previous years I’ve used a colander, anything that holds the olives and lets a bit of liquid drain out is fine.
Dry Salt Cured Olives – The method
1. Use bucket (or a large colander, large basket etc) with holes in the bottom so liquid can drain out. I sat a clean tea in the bottom of the olive bucket to stop too much salt falling out. Set the bucket over another bucket or tub to catch the juice.
2. Layer olives with salt in the bucket – about twice the weight of olives to salt. A 20 liter bucket holds up to 10kg olives with 5kg salt. Cover all of the top with a layer of salt.
3. Stir the olives around once a week so that they all contact salt evenly – it’s easiest to empty the outer tub of liquid, tip the olives into it then back into the strainer, and finally add a fresh layer of salt on top.
4. After a few weeks, start tasting. Continue the cure until bitterness is gone. This might take from 4-6 weeks, depending on the olives. When they are ready, remove olives from salt – I shook them through a big colander. Then rinse off remaining salt and let them dry.
Voila!
The cured olives can be stored in a 3% salt brine, or brine+vinegar but I like them best just kept in olive oil in jars or vacuum sealed bags. This year I mixed up chilli, garlic powder, fennel seeds and paprika to marinate the olives that were then vac-packed in serve-sized bags. They keep pretty well but I’ve seen recommendations to freeze them when vac packed to keep them fresh for even longer.
Rye bread is one of my favourite things to eat so recently I have been learning more about making my own. Rye is a bit tricky to handle compared to wheat flour because of its natural stickiness and lack of gluten but once you get the hang of it the reward is a spicy more-ish flavour with a moist dense crumb. Of course I can’t experiment with an ingredient without seeing if it can make a pizza and rye pizza dough seemed like something I had to try. Here it is, ready to eat! This was a good pizza, my favourite of the night.
Rye pizza dough ingredients – makes two small-medium pizza bases
300g Rye flour (around 2 cups but weigh it if possible). I used whole rye flour which is also called dark rye flour. Light rye is the equivalent of ‘white’ flour made from rye, with bran sifted out. Either should work but the amount of water needed might be different for light rye.
6g salt (1 teaspoon)
3g Instant dry yeast (1 teaspoon)
220ml water ( a bit more than 4/5 cup)
Stir the dry ingredients together in a mixing bowl, then add most of the water and stir well. Continue to add water until a workable dough is formed – it will be more like a putty than wheat based doughs. I use around 70% hydration for whole rye doughs, it would be interesting to try a wetter dough but frankly this dough is already hard to handle!
Cover the bowl and set aside for 10 minutes before kneading. Rye is challenging to work with and will stick like glue to your hands. There’s not that much you can do about it (wear gloves? Use an electric mixer?). Knead for a few minutes, then divide into 2 balls and set aside, covered, to rise for at least 2 hours. As always the dough will be better if it is left in the fridge overnight and removed a few hours before use.
Because this dough is so sticky, I recommend assembling the pizza on a sheet of baking paper. You can shape the base, top it, and slide it paper and all onto a preheated pizza stone. Remove the paper after a few minutes of cooking. When shaping the base I aimed for a thickness of about 3mm (3/32 in). It is a bit harder to pick up and stretch a rye dough because it doesn’t have as much gluten as wheat so handle it gently.
Smoked Salmon & Caper topping
Rye can handle bold flavour matchups. I was thinking of a smoky bacon/mettwurst/tomato combo but settled on smoked salmon, capers and cream cheese which is a pretty classic combo with rye bread. I didn’t think it would need any tomato sauce. Cream cheese is great on pizza, just use teaspoon sized blobs and they’ll crisp up on the outside and be light but gooey inside. I laid a few slices of mozzarella underneath to help it all stick and finished with a drizzle of olive oil.
Assembled on baking paper, ready to bake
As can be seen from this last sorry slice the base is not as dense as might be expected.
Conclusions – I’ll be making this again but be warned that it’s a very different thing than wheat based pizza. The rye is fairly dense and not as chewy – I think of it as more of a topped flatbread than a pizza although of course those things are pretty similar. If you give it a go, let me know what you think!
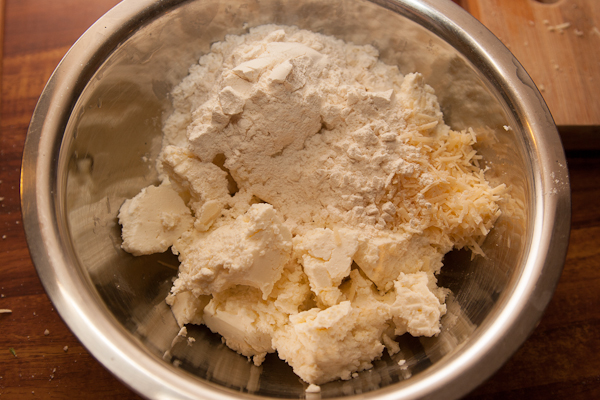
Soft fluffy gnocchi are one of my favourite comfort foods so when I heard they can be made with ricotta instead of potato I couldn’t wait to try it. The principle is the same and if anything this recipe is more forgiving than potato gnocchi because the ricotta cheese seems to help bind up the gnocchi when they are cooked. I served my first batch tossed through some fresh basil pesto but next time I’m going to try a simple tomato sauce – I think they needed a bit more zing. I’ve also seen these made as spinach and ricotta gnocchi with the addition of some chopped blanched or frozen spinach to the dough.
Ingredients
500g/1lb ricotta cheese. Look for the stuff that comes by the wedge or wheel instead of the gluggy stuff you sometimes get in a tub. The gluggy stuff works but needs more flour added, so the gnocchi will be a little chewier.
1 tbsp grated parmesan
about 1/2 cup plain flour
a grind of salt and pepper
optionally, a pinch of garlic powder
Method
Mix cheeses and seasoning together in a bowl.
Add just enough flour so that the dough can be worked easily and be formed into shapes. It should be smooth but not dry. For the drained ricotta I found, 1/2 cup of flour was about right for half a kilo of ricotta.
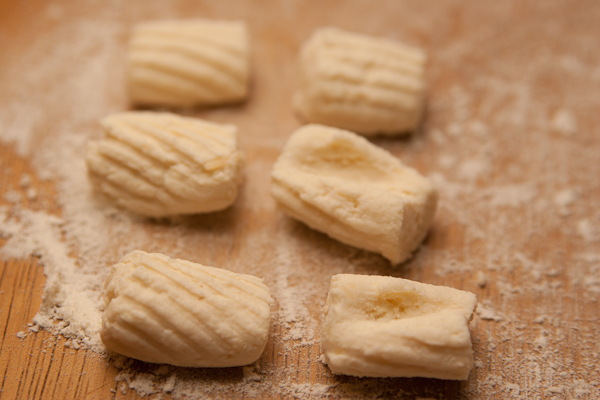
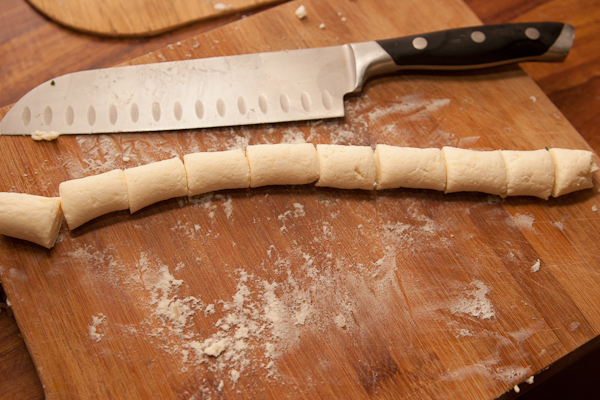
Roll pieces of dough into a snake about the thickness of your finger. Cut each snake into lengths about twice that width.
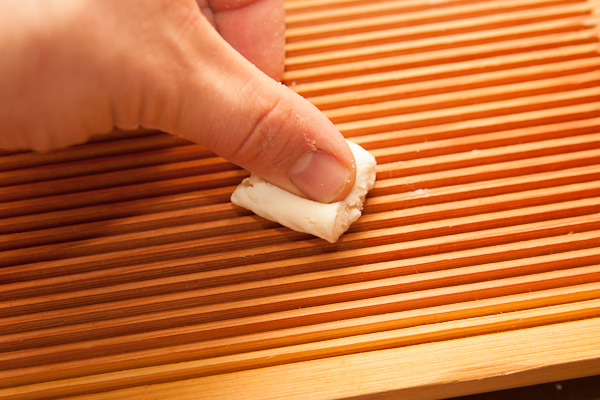
The pieces can be cooked now, but it helps sauce stick to the gnocchi if they are given some texture. This is traditionally done by rolling each piece over a ridged board with your thumb. The result is a slightly hollow shell with lines around the outside. I use a ridged gnocchi board like these ones on Amazon. Alternatives are to use the back of a fork, or a cheese grater – all work well.
Using a gnocchi board, push away with your thumb
The gnocchi curls around your thumb, creating a depression and ridges for the sauce to cling to!Instead of a gnocchi board, a cheese grater works…
…or the tines of a fork.
To cook, bring a big pan of water to the boil with a good dash of salt. Cook batches of as many as will fit in the pan in a layer. Cook for a minute or so after they bob to the surface before removing with a strainer. If moving to a dish to serve I find it best to drizzle some oil or butter into the dish first to stop the gnocchi sticking together.
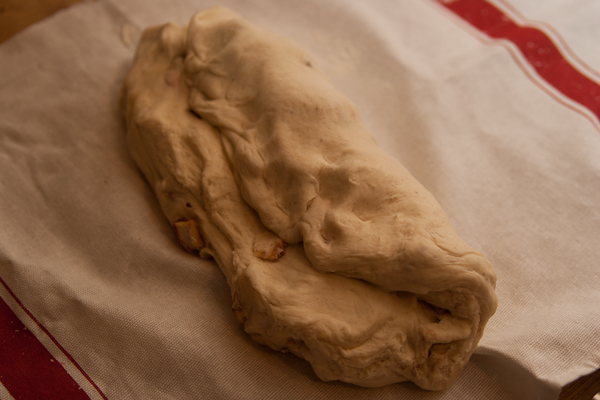
The apple season has just finished where I live. To preserve some of the fruit my parents made a big solar drier and have dried a lot of apples from their orchard. I was thinking about warm bread last night while I looked at a stack of these dried apples and had a lightbulb moment – apple sourdough!
Fruit sourdough is delicious with the contrast between tangy bread and sweet fruit, and I added just a touch of spice. Although I used dried apple any fruit would work. I submitted this recipe to the yeastspotting blog too – check it out, plenty of inspiration there if you need some.
Ingredients
400g (about 3 1/2 cups) white flour
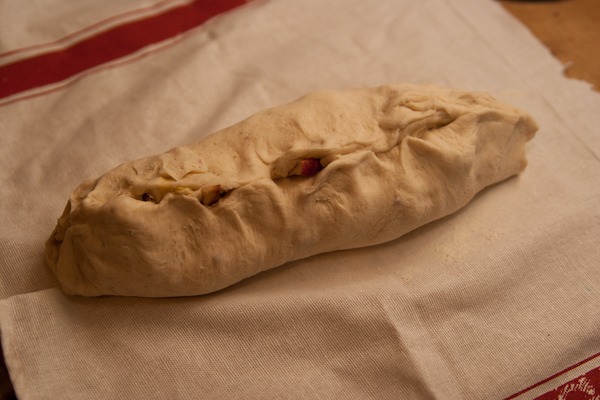
1 handful of dried apples (or other fruits) cut into in smallish pieces
Mix all dry ingredients together. Add sourdough starter and honey and stir in. Add most of the water and mix well. Continue adding water until the dough is workable and not too sticky. Allow to rest for 10 minutes, then knead for a few minutes or until smooth. For more detail, see my post on making a sourdough loaf.
Leave until well risen – mine took overnight.
Shape into a loaf by flattening out the dough into a sheet about 2-3cm (1 inch) thick and longer that it is wide.
Fold one third of the dough over itself.
Then fold over the other third to make a cylinder. Pinch shut along the seam. Turn the loaf over so the seam is on the bottom. This folding gives the dough some internal structure that helps stop it sagging as it rises.
Set the loaf aside, covered with a lightly floured cloth until it has risen noticeably again – mine took another 2 hours.
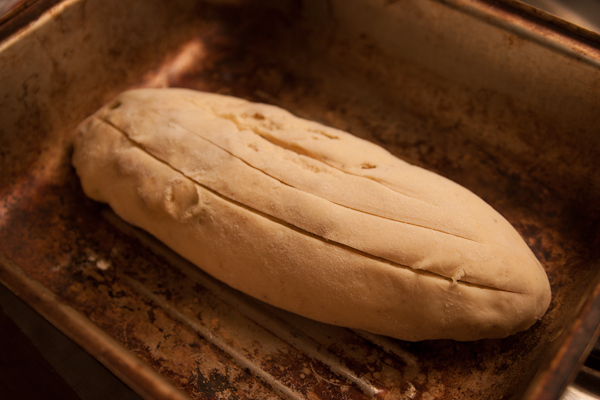
I bake bread in an old aluminium roasting pan. I cooked with the lid on for 30 minutes at 230C (450F) for 30 minutes, then took the lid off and baked another 15 minutes to let it brown up.
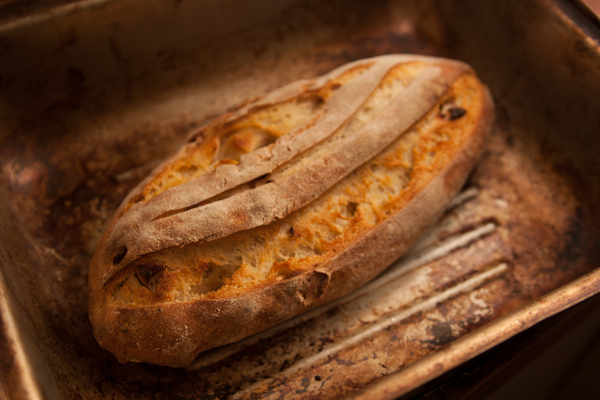
Slathered with good butter, this bread was a success! The apple rehydrated slightly but still gave a concentrated hit of tart/sweet flavour that worked with the sourdough.
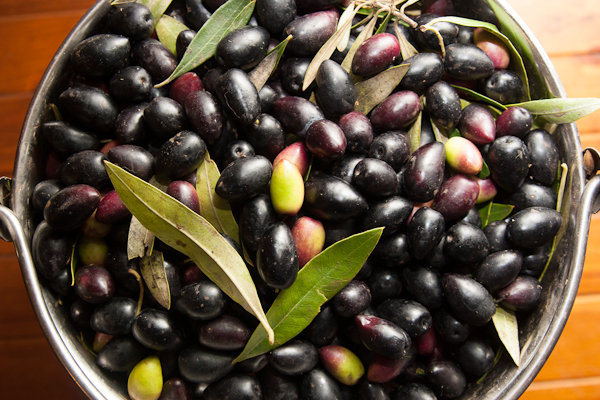
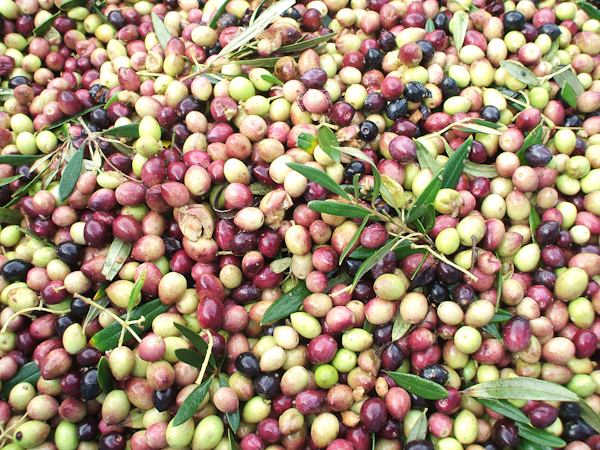
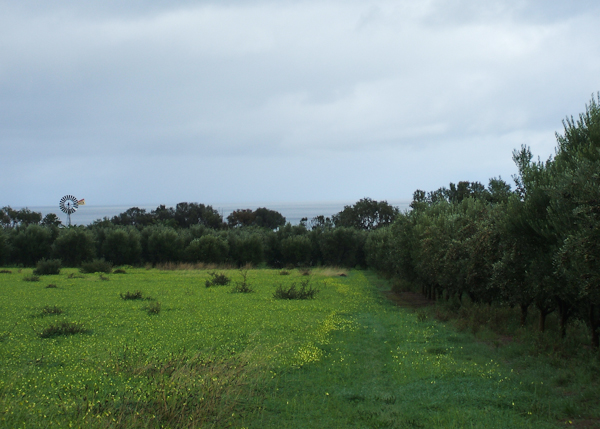
I spent a day recently with a few eager family members picking olives for oil, and a few for eating. This might sound a little sadistic but I really like picking olives. It’s a much easier job than picking grapes and you end up with nice soft skin at the end of the day because of all the oil that rubs off. It was a good day, sunny bar a few heavy showers that had us sheltering in the car. Peter, the farmer who sold us the olives, had a refreshing outlook on life. He said he does what he does because he loves it – the growing, picking, pruning, and of course fishing on the beach that is visible from his olive grove. “You don’t need money to be happy.” Not a new sentiment maybe but Its rare to hear someone say it and so obviously mean it.
We ended up with 500kg of olives – looking forwards to getting oil back from the press this week! I posted about the general method for picking olives last time and nothing new to report – a few nice big bits of shade cloth spread out under trees to catch the olives, and little rakes to strip the branches. The rakes are sold by Italian stores like Gaganis Bros and Constante Imports in Adelaide and Melbourne respectively if you’re looking (I know Constante ship interstate, not sure about Gaganis).
Last time I cured some olives for eating, the dry salt cured were the most delicious so I’ve made a much larger batch this year – Now that they are ready to eat, I’ve written up the whole method here.
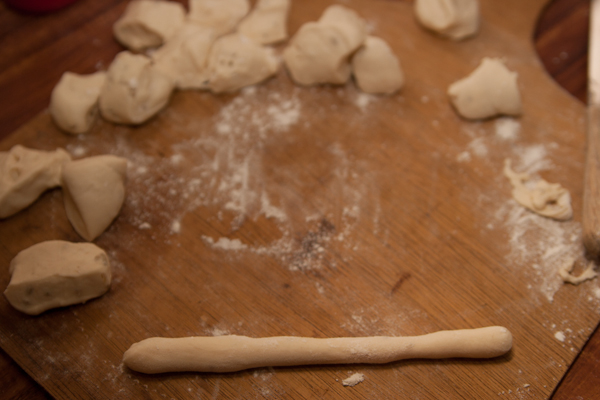
Taralli are one of those snacks that sound simple but deliver so much flavour that you can’t stop till you’ve eaten way more than you should. They are basically ring shaped bread sticks, often made with fennel seeds but also other flavours like chilli flakes or herbs. They are shaped, briefly boiled to give them a nice smooth skin, then baked until crispy. Yesterday I had some spare sourdough starter to use so I made a sourdough batch. If you don’t have sourdough handy just use a 1/4 teaspoon of yeast.
Ingredients
2 cups plain white flour
1/4 cup sourdough starter
level tsp salt
1/2 cup water + a little more for adjusting the dough
1 tbsp whole fennel seeds, or any other flavours. Oregano flakes or chilli flakes are nice. I think you could use grated parmesan too but I haven’t tried it yet. You can also make them plain.
Method
Mix all ingredients together. Add more water, 1 tablespoon at a time until the mixture is smooth but not too sticky. Turn out onto a board or clean benchtop and knead for a minute until smooth.
Put the dough in a covered bowl and leave until it has risen noticeably but not significantly. With my sourdough starter this was 4-5 hours. If you’re using instant dried yeast 2 hours will likely be long enough.
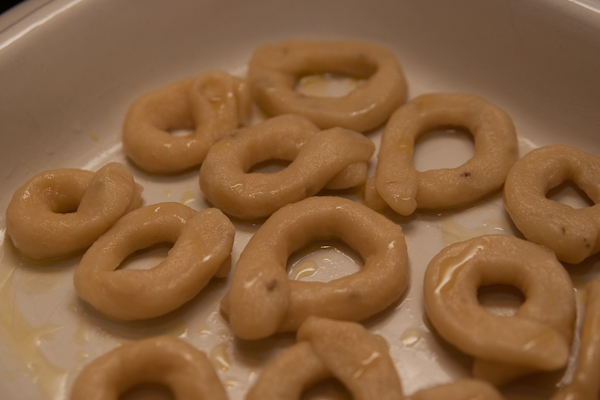
Bring a pot full of water to a simmer; drizzle a little olive oil into a large baking tray.
Divide the dough into pieces about the size of a large grape, eg about a heaped teaspoon.
Roll each piece between your hands to make a snake about 10cm /4 inches long and 1cm / 2/5 of an inch thick.
Make a ring out of the snake and give the ends a squeeze so they stick together. Each ring needs to be boiled for about a minute, until it floats, then scooped out with a slotted spoon and transferred to the oiled tray. If you work fast you can drop them into the water as you go – otherwise add them in batches.
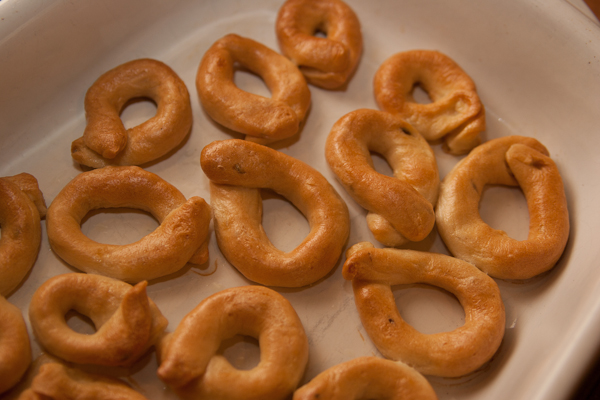
When all of the Taralli have been boiled put the tray into a medium oven, about 180C/350F for an hour. Check them now and then; if they are getting too dark reduce the heat a little. After an hour carefully prod a few to see if they’re cooked – they should all be hard and crispy.
If they are still soft cook a little longer. When done, eat one as soon as you can without getting burnt and let the rest cool down on a rack.
Store in an air tight jar or snap lock bag.
You may choose to have the ends cross over a bit. My missus says they look like a dog poo that way though.
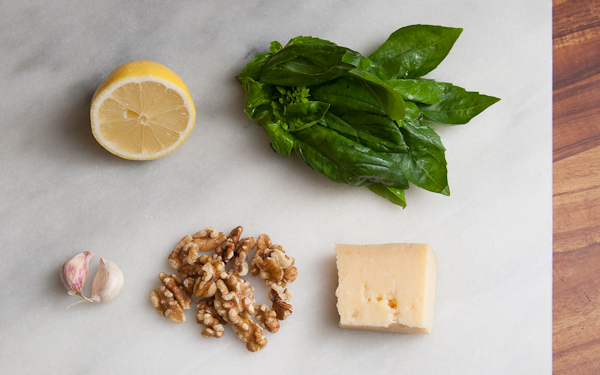
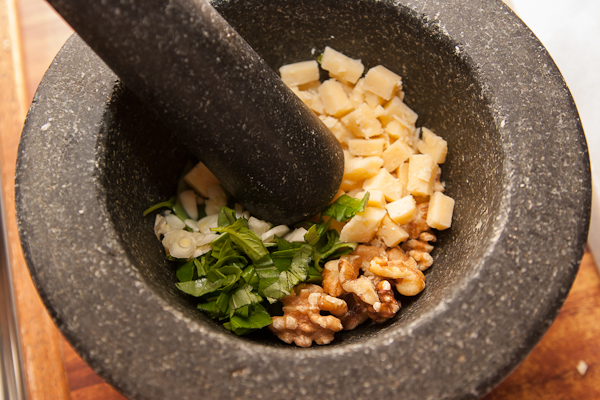
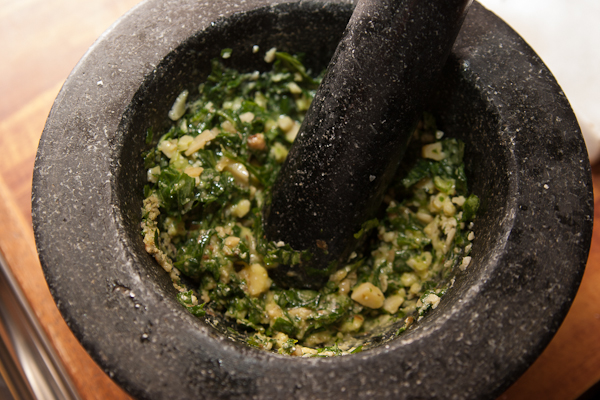
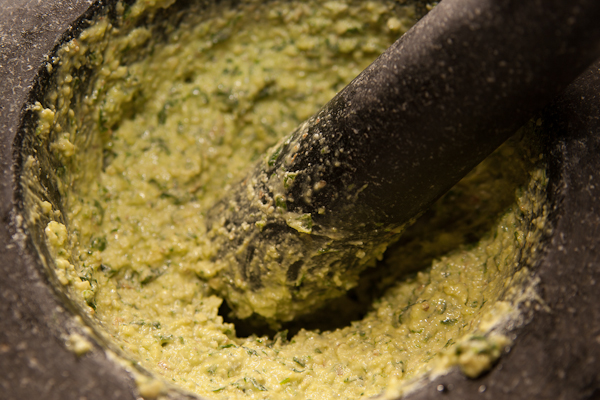
Pesto is a beautiful sauce combining fresh basil, garlic and parmesan with a base of nuts and oil. Tangy and flavourful, if you need an excuse to grow some basil plants this is it! Pesto goes well on pizza or pasta and makes a great dip to serve with cheese and crackers. I use walnuts here but any nut can be used really – pine nuts are used in a lot of traditional recipes. Lightly toast the nuts first by tossing them in a pan over low-medium heat until just starting to change colour. Pine nuts burn very easily and taste awful when burnt, so keep an eye on them. A food processor works well but I like using a mortar and pestle – after all the words pesto and pestle share a root word. If a food processor is used I suggest blending cheese and nuts first until the consistency of bread crumbs, then adding oil and lemon juice and finally the basil, pulsing until the basil is in small pieces – don’t take it so far that there’s no specks of basil left.
Depending on the ingredients on hand flat leaf parsley can also be added. Lemon is not completely traditional but I like the extra kick of flavour, and it makes up for not using as much raw garlic as some recipes.
Ingredients
1-3 cloves of garlic, to taste
1 chunk of parmesan or grana padano cheese, around 50g/2 oz
a handful of toasted walnuts, pine nuts or other neutral flavoured nuts.
1/3 cup good olive oil
juice of half a lemon
1 good bunch of fresh basil
salt
Method
Pick basil leaves off any large stems. Dice or grate the cheese. Add a pinch of salt, nuts, garlic, cheese and basil to a large mortar.
Start pounding and stirring until the ingredients are fairly well broken down and mixed together.
Add olive oil and lemon juice and continue to mix. until the mixture is fairly smooth.
Following from my post about making your own sourdough starter from scratch, here’s how to make a basic but delicious sourdough bread! There’s a lot of bread recipes on the internet and most of the serious ones will give ingredient weights. It is considered important to weigh ingredients because volume measurements for flour are very inaccurate – a cup of flour can weight more or less if it is humid or dry, densely packed or loosely packed, rye vs white vs wholemeal and so on. That said the more I bake the less I weigh ingredients. Once you learn what dough should feel like it’s pretty easy to start with about the right amounts, then adjust with a little more flour or water as needed. So here’s how I make a basic loaf of sourdough, without weighing. Depending on how active the starter is, a loaf can take a day or more to rise. In cold weather, leave it to rest in the warmest spot in the house (but not hot). For a stronger ‘sourdough’ flavour the dough can be left in the fridge overnight and taken out to rise the following day – the bacteria that give the sour flavour are still active in the cold while the yeasts that make dough rise are not.
Mixing
Pour 1/4 cup or so of active sourdough starter into a large mixing bowl. I use big plastic tubs which are large enough to knead the dough in, saves a lot of mess.
Glooop
Add 3.5 cups of flour (OK here’s one weight measurement – 3.5 cups of flour should weigh around 500g / 1lb which will make one standard sized loaf). I like to use a mixture of whole grain and white flours but you can use any flour: rye, wholemeal or white in different combinations.
Add 2 scant tsp salt and briefly mix the ingredients together .
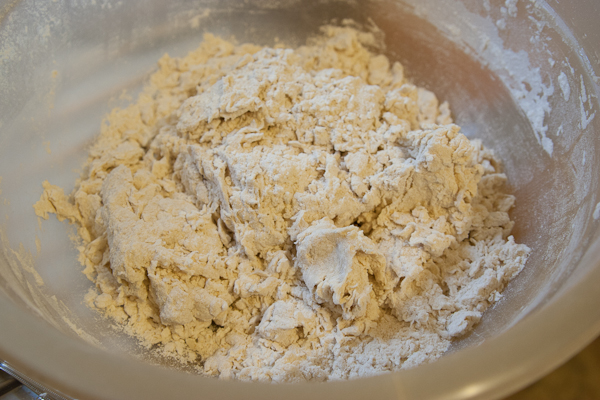
Now I add 1 cup of water. It’s pretty important to use filtered, spring or rain water when making sourdough as chlorinated tap water can stunt or kill friendly wild yeasts. I use a spoon (or a fork, for some reason I always like using a normal dinner fork for mixing dough) to stir the water into the flour mixture. It will probably look like a mix of rough clumps with some scattered crumbs at this point.
1 cup of water – not enough
Now I start adding just a 1/5 of a cup, or a few tablespoons of water at a time. After each addition of water I use my hands to fold and stir the clumps together. I pay attention to how the dough feels – it has enough water when it comes together in a single workable lump. Usually this is in the ballpark of 1.5 cups of water. The dough will be sticky on the outside and bits stick to my hands but I can feel that it has some substance when it is kneaded – it isn’t loose or runny. If I’ve added too much water, I knead in 1 tbsp flour at a time to bring it back.
1.2 cups water – getting there1.4 and a dash – just right
Once the the dough is a single lump, I cover it up and leave it alone for a while. Half an hour is enough, longer is fine too. This rest lets the water soak properly into the flour and the gluten will start to develop on its own, strengthening the dough.
Kneading
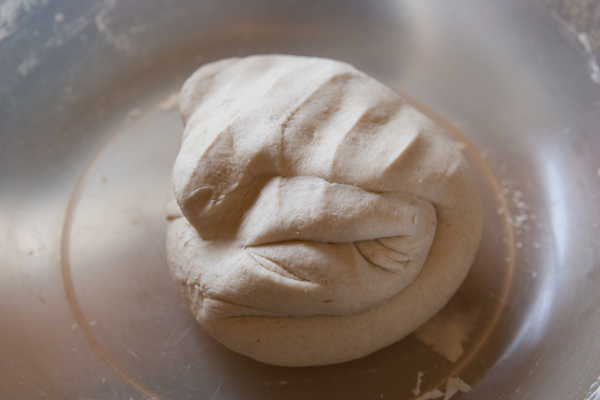
I knead the dough again by repeatedly folding it in half and squashing it flat. After its rest it should be much less sticky on the outside and should be knead-able without sticking to my hands. If it is still a little sticky I dust it with flour as I knead. After a minute or so of kneading it will be quite smooth – the outside will probably tear a little in places. At this point it can have a longer rest.
After a short rest and a quick knead
After some hours I knead the dough for another minute. Now it should be very smooth – depending on what flours where used it should make a smooth ball without any tearing.
After a longer rest and another knead – quite smooth now
At this point it needs to be left alone until it has risen noticeably – around 1.5 times bigger than it was when first kneaded.
Shaping
Once risen I gently shape the dough into a boulé (ball shape) by folding the dough in halves or quarters to make a squarish lump then stretching the outside of the dough around itself and pinching underneath – just like making a big pizza dough ball. Here’s a good video I found, although I treat sourdough a bit more gently than this if it has been slow to rise.
After folding into a lump, I use the edges of my hands to stretch the top of the dough around to the bottom, creating a tight ballThen flip it over and pinch the bottom shut
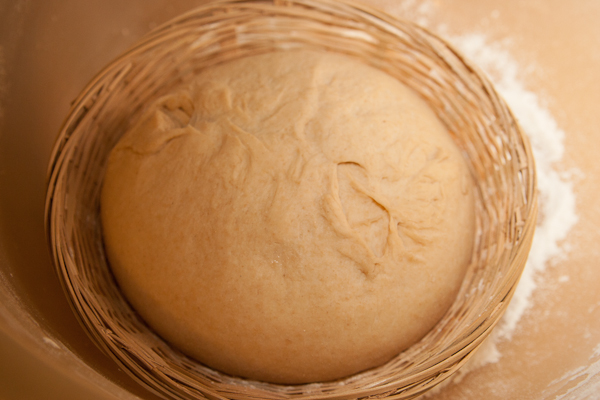
The shaped loaf is now left to rise again, often in a special proofing basket called a banneton. The basket helps the boulé hold its shape and lets the skin dry a little so it doesn’t stick. I use normal round cane baskets, sprinkled with flour but the boulé can just be left on a benchtop covered with a clean floured tea towel too.
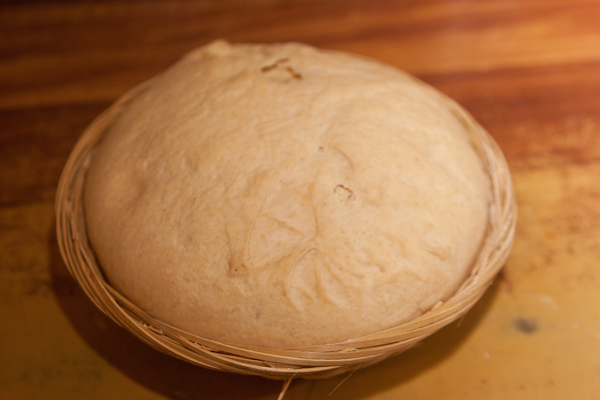
Left to rise in a basket, which holds the ball shape. Sprinkle generously with flour and don’t wash the basket afterwards – it build up a nice coating of flour eventually.A couple of hours later, it had risen well
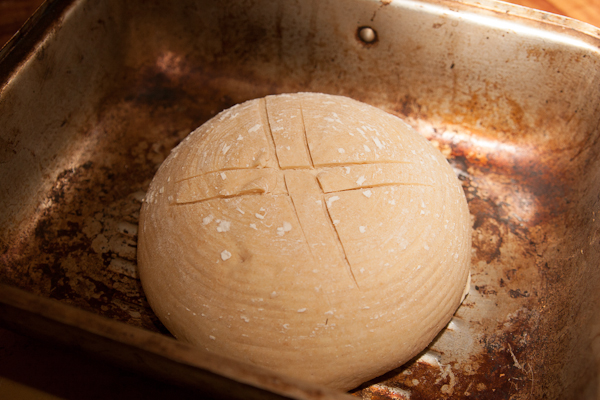
Just before baking I use a lamé – like a razor blade in a holder – to score the loaf on top – a finely serrated knife also works. Scoring helps the loaf expand as it cooks (and looks great too, it’s fun coming up with your signature score pattern).
This score pattern did not work that well, as you’ll see…
Baking
For best results bread should be baked in a moist environment. This stops the crust from hardening too quickly and lets the loaf grow more in the oven. To achieve this I bake in a large (and well used) metal roasting tray with a lid – the moisture in the dough is trapped inside the pan. Alternatives are any large casserole or dutch oven with a lid. Some people also use a tray of water in the oven but the sealed smaller container works better for me. If baked ‘naked’ in the oven loaves should be cooked directly on a preheated pizza stone. The loaf can be transferred to where it will cook by carefully picking up or by sliding on/off a floured pizza peel or chopping board.
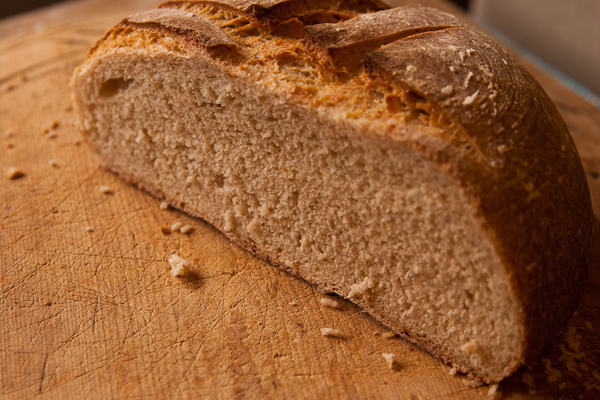
I cook at 230C/450F for 30 minutes with the lid on, then carefully remove the lid and bake for another 15-20 minutes or until cooked. The loaf is done when it’s nice and golden outside and sounds kind of hollow when tapped. I recommend getting a little probe thermometer though as this is the best way to know for sure – it’s properly cooked when it reaches 80C / 180F inside. Let it cool on a cake rack for a while before cutting.
A single + shaped score works better than the # I did here……but it tastes great regardless!
Here’s a few useful bread baking accessories & resources:
You can get pizza stones on Amazon but they break easily – if it’s going to be shipped around the world I suggest checking local kitchenware stores instead.
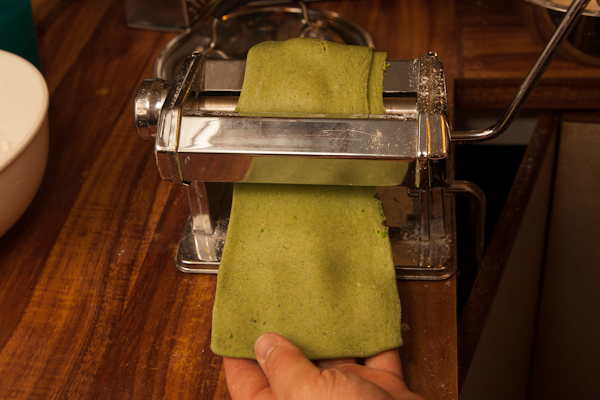
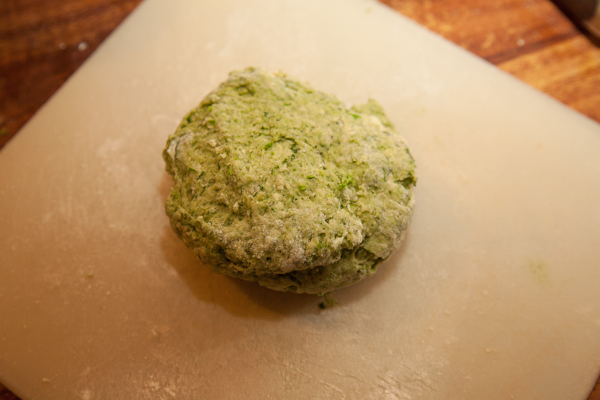
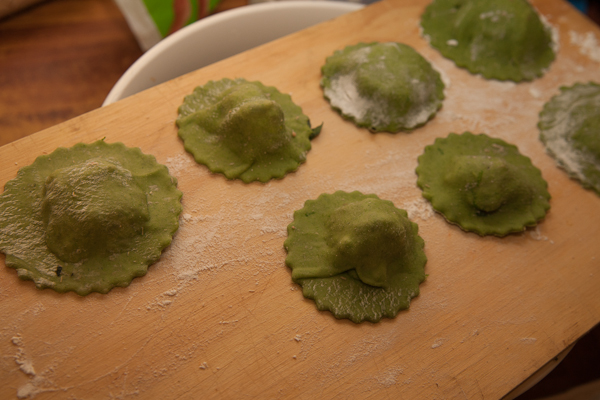
After making nettle pizza I had some blanched nettles left over, so nettle pasta seemed like the natural thing to do. I’ve used spinach to make a green pasta dough before but the nettles gave a much more vivid green colour so this is a trick worth remembering! I used the dough to make ravioli, stuffed with cheese, chard and more leftover nettles. I also made a little batch of fettucine – both dishes were lovely. And very green.
Nettle Ravioli with olive oil, pepper and parmesan
Ingredients
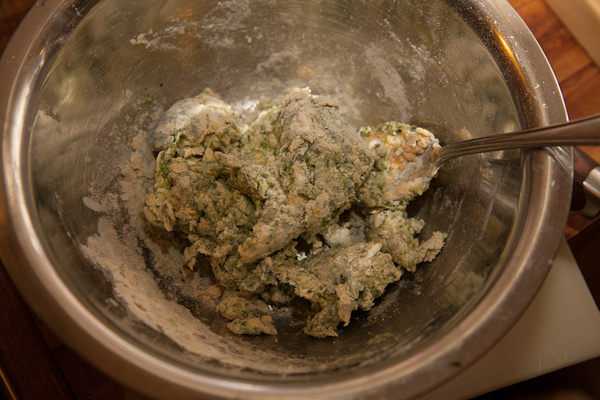
2 eggs
1 tbsp blanched nettles, very finely chopped
cups plain white flour.
Method
Mix all ingredients in a large bowl. If the mixture is very sticky, mix in 1 tbsp more flour at a time until no longer too sticky to handle. If the mixture is to stiff to work with mix in 1 tsp more water at a time.
Allow the mixture to rest for 10 minutes, then tip out onto a board and knead for a few minutes, until smooth.
Press the dough as flat as possible and pass through the widest setting of a pasta machine, or roll by hand. Fold the strip in half and put it through the machine again. Repeat this step 8-10 times. Then roll through progressively narrower settings until the thickness is right.
Ravioli Filling
3 large leaves of chard or silverbeet, blanched and chopped fine
2 tbsp breadcrumbs, preferable made from stale bread with crusts removed and whizzed in a food processor.
2 tbsp grated parmesan
1/2 cup ricotta
small pinch grated nutmeg
For ravioli lie the dough on a well floured board or clean tea towel and blob on teaspoons of filling, leaving plenty of space between . Top with a second sheet of dough and press down well all around the filling. Use a cookie cutter or pastry wheel to cut out ravioli. Cook in boiling water for a few minutes. Dress with something light like oil and parmesan so the subtle flavours shine through.
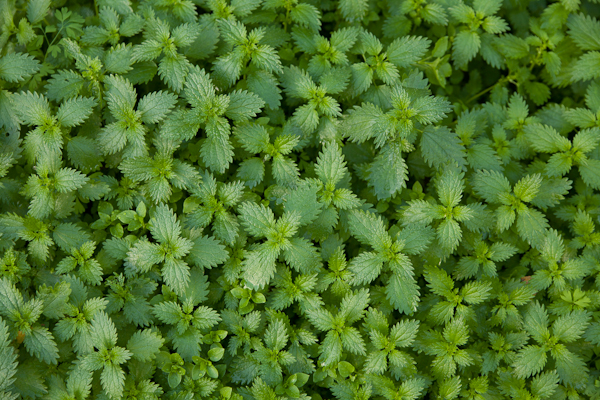
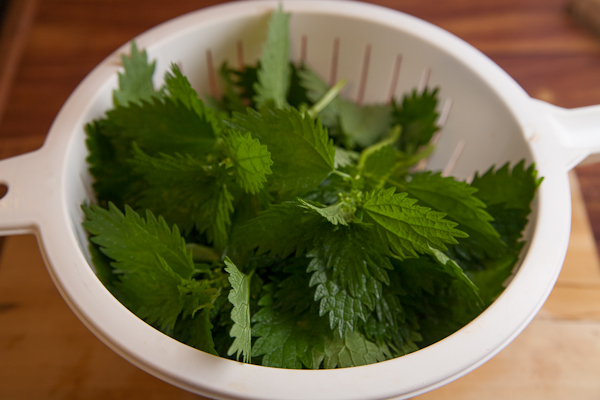
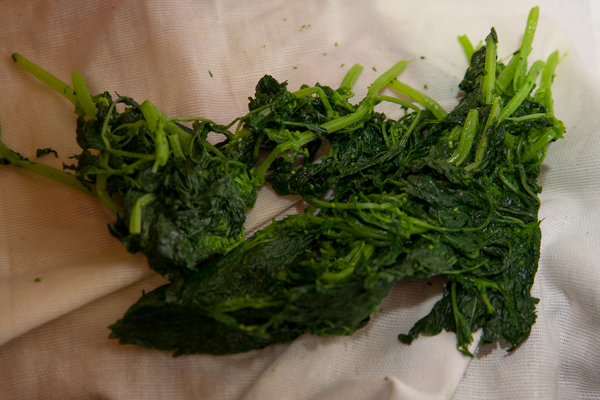
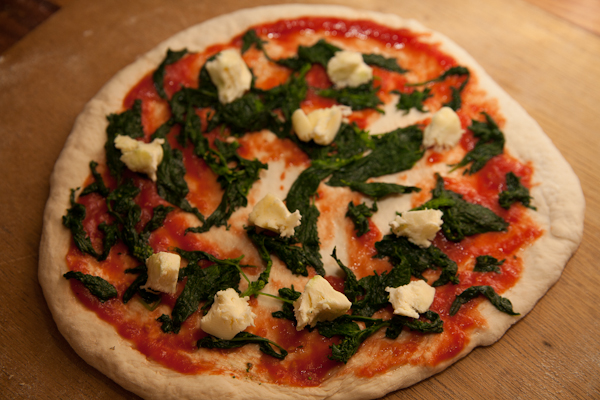
Every year I look at the nettles growing in the weedier bits of my back yard and vaguely think about eating them. I’ve seen them used in different dishes in some of my cookbooks, usually in the same kind of place you might use spinach. I know it sounds weird but apparently cooking removes the sting completely and this year we have had a bumper crop so I bit the bullet, gloved up and brought in a bagful. The first dish I cooked was (of course) a nettle pizza. I usually match spinach with salty/sharp flavours, so I decided to combine nettle, bacon and fetta with a little fresh tomato. For a more subtle flavour you could use ricotta instead of fetta and in hindsight you could skip the tomato and let the nettles shine through a little more but the whole family enjoyed how the pizza came out. Verdict: Would eat again.
First, blanch the nettles. Bring a pot of water to a boil and drop them in. You might find it easier to remove any thicker stems first. Allow to boil briefly, then remove with a sieve or slotted spoon and dunk in cold water to stop them cooking. The nettles need to be squeezed dry before use so they don’t make the pizza soggy – wrap in a clean tea towel or kitchen cloth and press down on a board or bench.
Stretch out the base and flop it onto a floured peel. Smear over a little tomato sauce, then blanched nettles and a few pieces of torn mozzarella. Save some mozz for the top. This is far from my best base ever by the way!
Scatter with bacon, tomato and pieces of fetta, then a few more chunks of mozzarella. Slide onto a preheated pizza stone with the oven as hot as it gets. Cook until browned on top – 7-8 minutes if the oven is nice and hot.
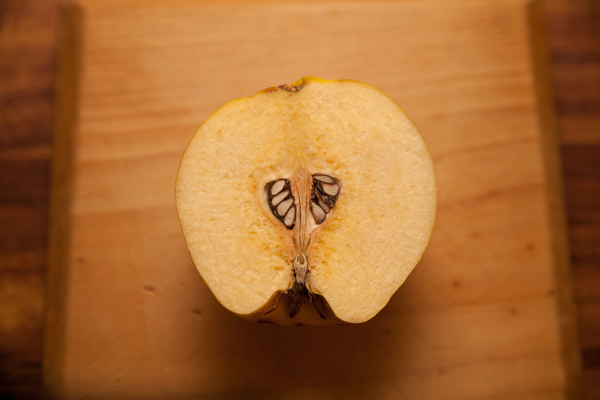
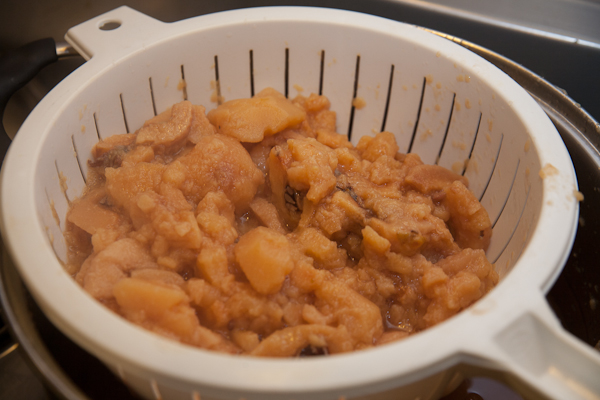
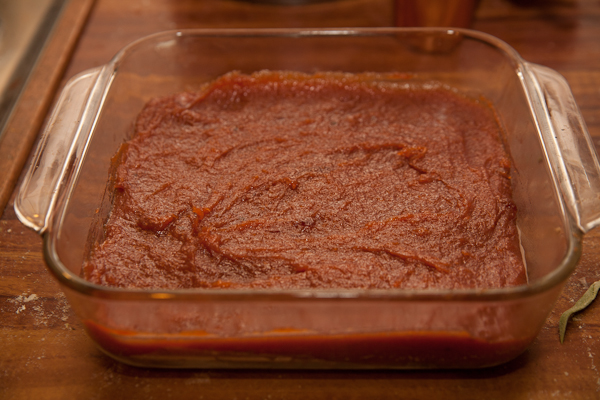
With their rich perfume and deep red colour when cooked, quinces are one of my favourite fruit. They are fantastic simply stewed and served with thick cream, or in a crumble or pie, but the bulk of the roadside quinces we pick every autumn go to making quince paste. Quince paste (Membrillo in Spain or Cotagnata in Italy) is a ruby red slab of stewed, pureed and dried out quinces that is absolute heaven paired with any cheese with attitude – like parmesan, gorgonzola or goat cheese. It costs an arm and a leg for just a little chunk in the shops so the few hours spent simmering and stirring pay off quickly.
Quince paste sets primarily because of its high pectin content. Pectin forms a gel when cooked with sugar and acid (lemon juice here) and if you get it just right, the paste will set as soon as it cools. If it doesn’t set quite right, simply drying out the paste helps it become stiff enough to slice. Drying can be accomplished by leaving the paste in the oven on the lowest setting overnight, door open a crack, or leaving it anywhere warm like a car until dry enough.
Ingredients
8-10 medium quinces, peeled and cored. The apple peeler I described here works surprisingly well. Just a note – in On Food and Cooking, Harold McGee says the skin can be left on for more aroma. I haven’t tried this yet so proceed with caution as quince skin can be furry. I’d scrub it well at least.
Raw or white granulated sugar
Juice of 1.5 lemons
Method
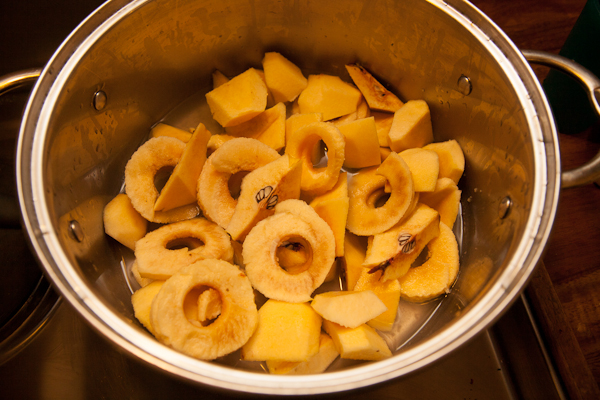
Roughly dice the peeled and cored quinces. Add to a large saucepan with 2 cups water. Adding half the cores can help the paste set even better, but you have to either pick them out or ignore the odd grainy bit in the finished paste (not objectionable). Bring to the boil and simmer for 30 minutes.
This next step is a little fiddly but it helps get the sugar quantity just right so the pectin sets properly. Tip the cooked fruit into a colander set over a bowl to catch the juices. Weight the fruit alone and then weigh 3/4 of that weight in sugar. Add sugar, fruit and juices back to the saucepan. If you can’t be bothered with all that measuring, just add 4 cups of sugar and hope for the best.
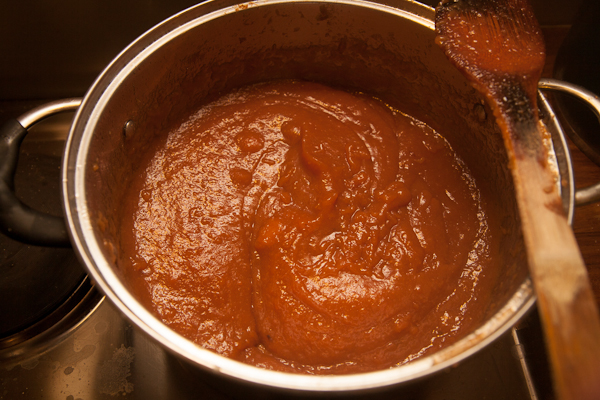
Here’s where you need to get comfy – the mixture needs to be simmered over low-medium heat for 2-3 hours, stirred every few minutes. I settle in with a book in one hand and a spatula in the other. Scrape the bottom as you stir, and consider wearing a glove or mitt as the mixture can spit globs of molten fruit and sugar.
The lumps of fruit need to be pureed till they are smooth at some point but if you leave it as long as possible, the mixture doesn’t spit and stick quite so much. I remove any obvious cores and then puree after about an hour of simmering, with a stick blender, food processor or food mill.
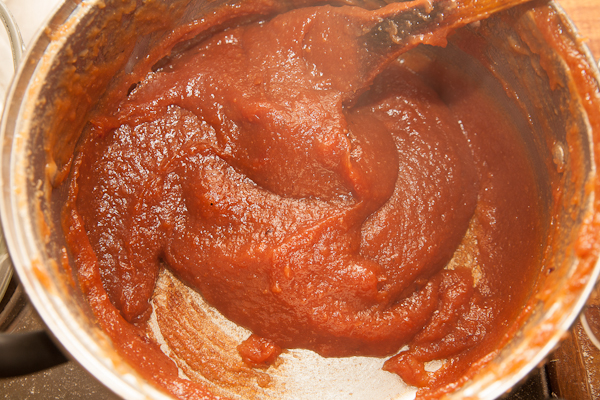
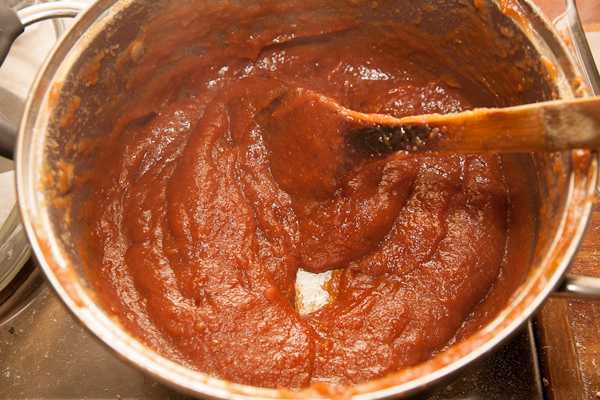
The goal here is to reduce the mixture to a thick paste and get that lovely deep red colour. The colour comes with time more than anything, so if the paste is looking very thick but not yet the colour you want, add half a cup of water at a time and keep cooking. When the paste is quite thick and starting to stick together when stirred, add the lemon juice and keep cooking.
It’s ready when the mixture can stand up in peaks when stirred, and it might be pulling away from the sides of the pan when stirred. You can flick a drop onto a plate and see if it solidifies a little as it sets.
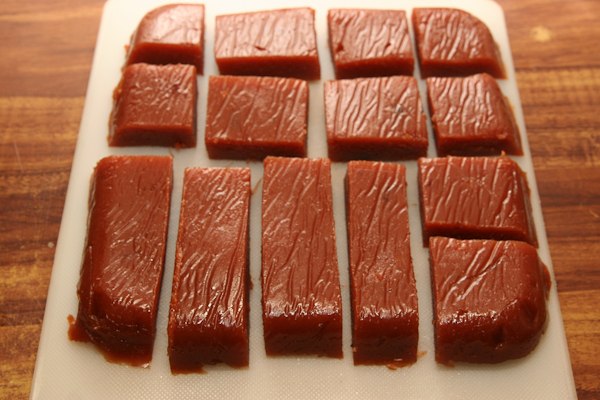
Line a baking tray with baking paper with a drop of oil rubbed over it and pour the mixture in. Use the back of a wet spoon to smooth down the top, cover and set aside to dry. A smaller pan will yield a thicker slab of paste obviously.
When completely cool, prod to see if it is solid enough to turn out. If not, dry as above. When solid enough, turn out onto a chopping board and cut into slabs. I cut different sizes for different occasions – little ones for a cheeky nibble and big ones for entertaining guests. The pieces keep best wrapped tightly in cling wrap, then bagged. They last for a long time – after 9-12 months you might find some of the sugar starting to go crunchy round the outside, but this doesn’t affect the flavour.
Heaven!
Variations
I sometimes add a star of star anise, or a stick of cinnamon for another layer of flavour. Recipes for Membrillo, the Spanish version, often add 1 scraped vanilla pod. Recipes for Cotagnata, THe Italian version, sometimes call for a few bay leaves.
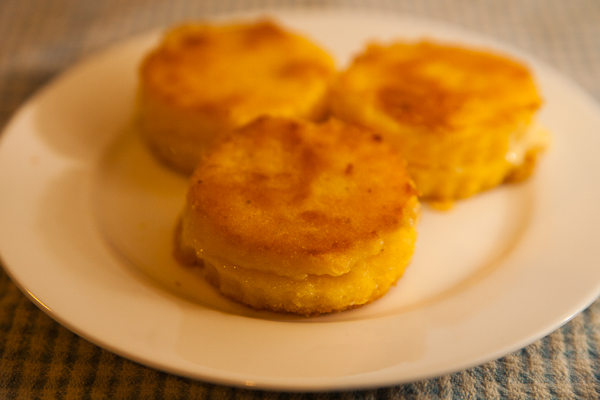
This recipe is another that I was eager to try from Artusi’s cookbook. I don’t know if I’ve got it exactly as described in the book yet but it’s a delicious late night munchie as much as a great idea for an appetiser. The recipe is as simple as a slice of cheese between 2 discs of polenta, dipped in crumbs and fried. This is a good appetiser to have up your sleeve as it is very easy to make gluten free – instead of using bread crumbs, either use dry polenta or a gluten free bread crumb, I use one called corn crispy crumbs that I actually prefer to regular bread crumbs. Or you can leave it un-crumbed and just fry the polenta directly which also works well.
1 1/2 cups water
1 cup milk
1/2 cup polenta
1 tbsp grated parmesan
about 100g gruyere or other tasty swiss cheese, sliced
1 egg
1/2 cup bread crumbs
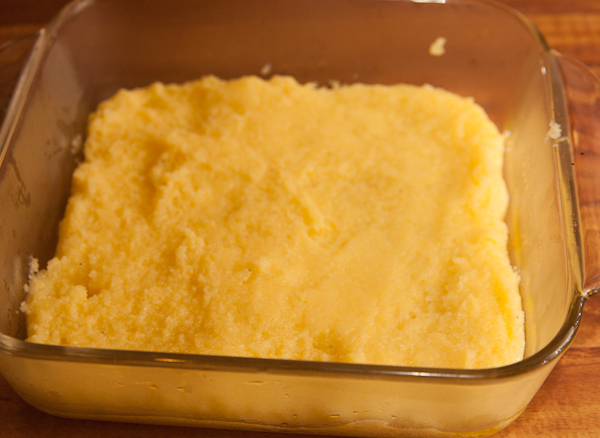
To make the polenta mix milk, water, polenta and parmesan in a large microwave save container – I use a ceramic casserole dish. The parmesan is optional but the polenta may be a littlebland without it. Stir well and set aside for a few minutes to start soaking up the water. Microwave the bowl of polenta for 4 minutes, remove and stir well. Wear oven mitts as the bowl and steam are very hot. Return to the microwave for another 2 minutes, remove and stir, then a final 2 minutes. Spoon out a little bit, blow on it and taste to make sure it is creamy. If still at all gritty it can be microwaved a little longer.
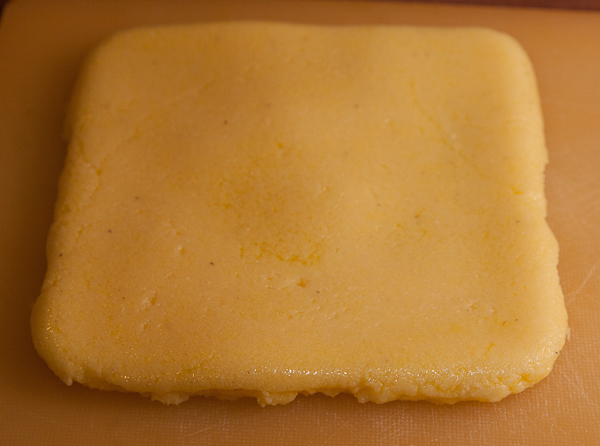
Pour out the polenta onto a large oiled chopping board or baking tray. Use a wet knife or the back of a spoon to flatten the surface as much as possible – Artusi says to “spread it out to the thickness of barely half a finger”. Mines a little too thick here. Allow to cool and set – it’s a little faster in the fridge.
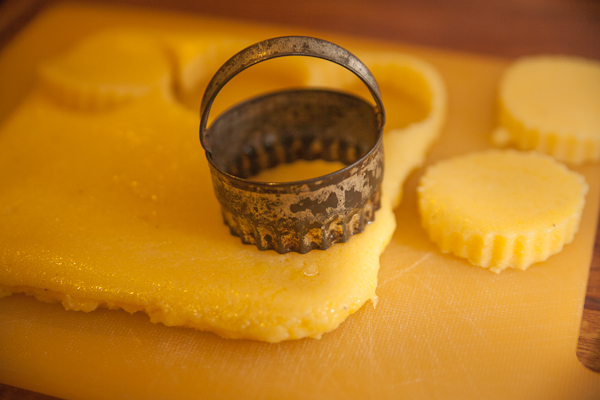
When set, use a cookie cutter to cut out circles of polenta.
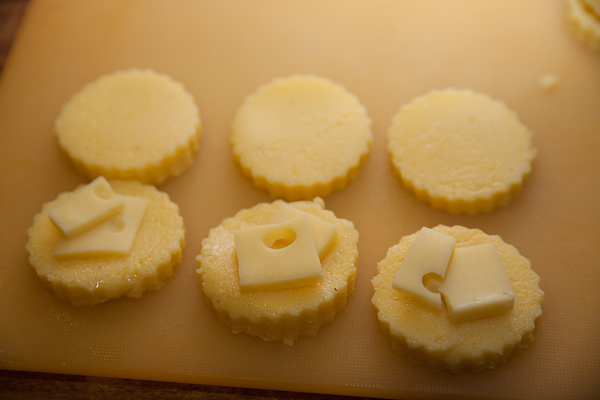
Lay a slice of gruyere or other cheese between 2 discs to make little sandwiches.
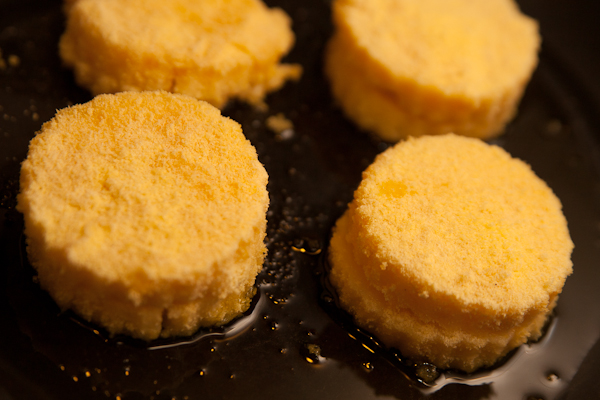
Crack an egg into a bowl, beat lightly and pour crumbs into another bowl. Dip each sandwich into egg, then crumbs. Fry in a good glug of olive oil. I find anything crumbed is always best fried over fairly moderate heat so that it can cook through without the crumbs burning.
So far we’ve just wolfed these down out of the pan but I think they’d be good with a sauce too – maybe some kind of chutney?