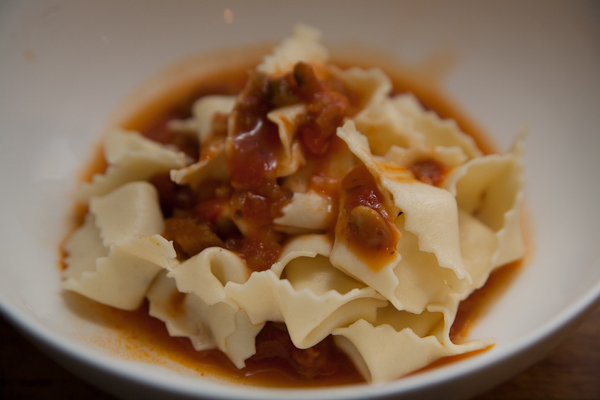
This pasta is taken from the recipe described in Pellegrino Artusi’s Science in the kitchen… and is the first of many recipes I want to try from this book. The shapes are very easy to make, and although a little time consuming the end result is worth the effort. The double loop shape is excellent for holding sauce and it feels good in the mouth, almost like a little dumpling. Interestingly all of the examples I could find described as Strichetti are in the bow tie shape rather than this double fold – although the principle is similar, these hold sauce much better. Artusi serves these in broth but I suggest a rich tomato based sauce to serve. I put the sauce in the bottom of the bowl first, then ladled the pasta straight from the pot onto each bowl of sauce, then spooned over a touch more sauce and added parmesan and pepper. Treating the pasta gently like this let it keep its shape very well.
This recipe makes an entree for 4 or a meal for 3.
Ingredients
2 eggs
200g plain white flour. If a firmer texture is liked, substitute 50g plain flour for fine semolina.
Method
Tip most of the flour into a large mixing bowl, keeping a little aside.
Crack eggs into the bowl and stir with a wooden spoon or fork until there are no more lumps. If the dough feels too sticky to handle easily, add a bit more flour at a time until no longer sticky. It’s much easier to add more flour to a sticky pasta dough than it is to have to knead in more liquid to a very stiff dough! When the dough is workable without being sticky, knead for a few minutes until smooth.
Cover the pasta in a bowl or wrap in glad wrap and set aside for 15-20 minutes.
Flatten dough as much as possible by pressing or rolling on a benchtop before feeding through a pasta machine. Pass through the widest setting a few times, folding the strip in half each time.
Divide the strip in 3, then start feeding a strip through progressively narrower settings on the machine until the right thickness – #2 on my machine. Of course, you can just roll it with a pin instead of using a machine.
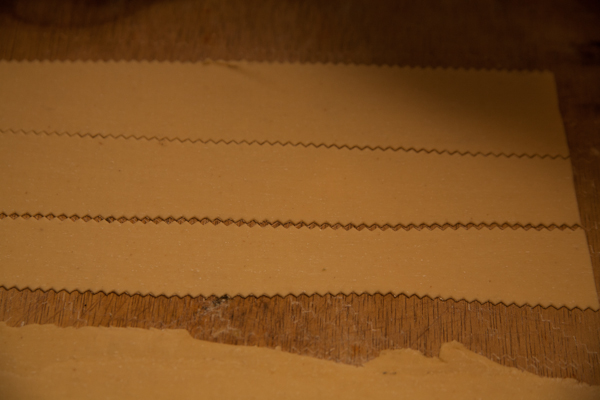
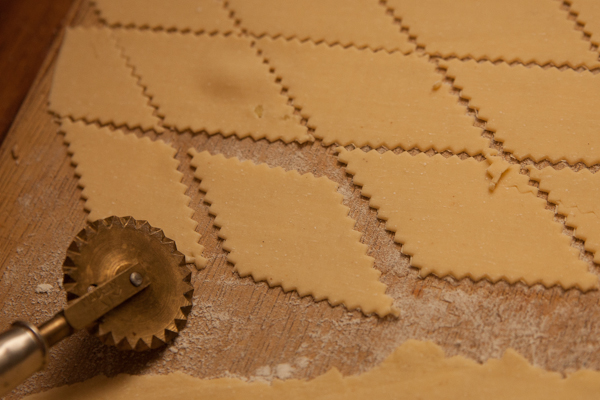
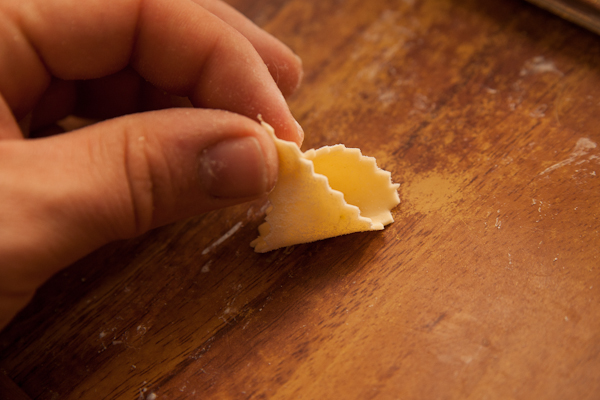
Lay the strip on a lightly floured board. Use a fluted pastry cutter to cut strips “a finger and a half wide”.
Then cut on an angle to get diamond shaped pieces.
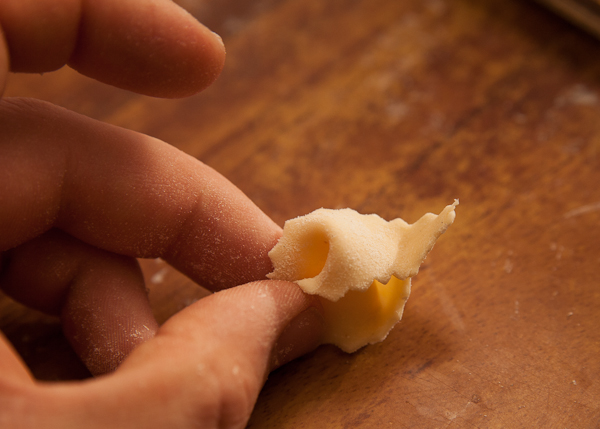
To shape the pasta, pinch 2 opposite corners together firmly.
Then turn around and pinch the other 2 corners together on the other side. Repeat for each diamond before rolling out the next piece. Work fast so the pieces don’t dry too much – I roped in the family to help.
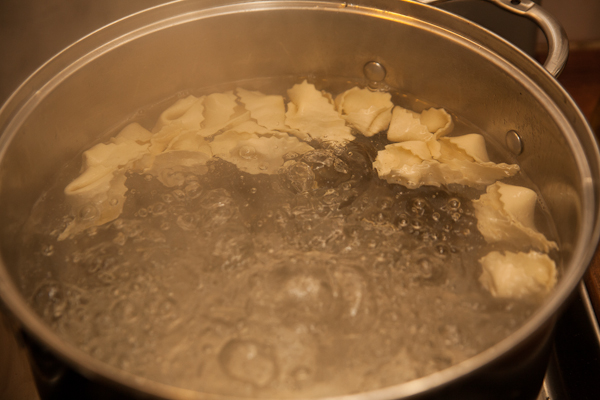
To cook, bring a large pot of water to a rolling boil with a few tsp salt. Add the pasta, and be ready to start tasting them for done-ness soon after they float to the top. Mine took about 60 seconds after floating up to be cooked to my taste.
You can do without a pasta machine if you don’t mind a bit of work with a rolling pin, but a fluted cutter like this one is worth having for this and lots of other pasta shapes! I found my lovely brass one on ebay second hand.
I recently heard about, and immediately had to get a copy of Artusi Pellegrino’s Science in the kitchen and the art of eating well. This amazing book is a huge collection of recipes from all around Italy, as they were cooked in the late 1800s. More than just a recipe book though, it includes anecdotes about popular culture and people in society at that time as well as some context for some of the recipes – the region where it is prepared or even the family who supplied the recipe. I can’t recommend the book enough for anyone with an interest in traditional Italian food, it’s very interesting comparing recipes as we know them now with the versions made 140 years ago. While a lot of things are similar, and arguably modern recipes are more refined in some respects, there are some interesting things here that I am eager to try out.
A few examples that caught my attention – I noted that one of Artusi’s recipes for gnocchi includes chicken breast, mined fine as well as potato. His anolini use a heavily reduced meat broth with beef cooked in broth and simmered for 8-9 hours until a few tablespoons of stock are left – this is used in the filling. The ingredients for Maccheroni Alla Bolognese (Macaroni Bolognese Style) are very similar to how I make it even including bacon, but tomato is not used – although Artusi adds a little tomato paste at a whim to many recipes, the cooking style he advocates is much more fluid than the ingredient lists given in modern cookbooks. The pasta used in this recipe is referred to as denti di cavallo – ‘horses teeth’ sized pasta which are in the form of short tubes, like rigatoni.
I’m a long time fan of Ribolita soup and have always seen recipes that include stale bread in the recipe. Reading the soup recipes in Science in the Kitchen I understand this much better as nearly every soup and many other dishes use cubed bread for thickening or to give body or extra substance. Generally the bread is sliced thin, toasted, then cubed and the soup poured over, although some soups boil the bread along with other ingredients.
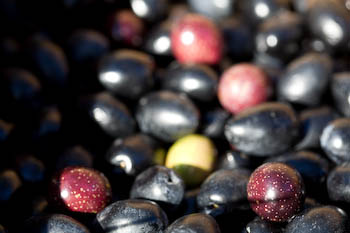
There are far too many recipes to detail here but I plan to cook, or at least adapt many of them in the near future. One new pasta shape that I have tried already based on the description in the book is the ‘strichetti’ pictured below, where diagonally opposite corners of a square of pasta are folded together above and below, creating a robust shape that holds sauce very well. This seems to be a variation of the modern, bow-tie shaped version also called farfalle. I’ll write up the recipe soon.
Strichetti, following Artusi’s recipe as well as I can
Science in the kitchen and the art of eating well is available here on Amazon in both hard copy and Kindle versions, including an interesting, quite long introduction with a lot of the back story and history of the book. Although I think the text would be well out of copyright, I haven’t been able to find it on Project Gutenberg etc – please leave a comment if you know where to find a free version. As a footnote – if you’re an offal lover you’ll have a field day here, with recipes and instructions for preparing parts of the animal I didn’t even know people ate. Veal udder anyone? Or maybe you’d prefer some frog risotto?
A staple in my families diet is some variation on bolognaise sauce – a rich, tomato and meat based sauce (although we do a vegetarian version with red lentils too) plus whatever vegetables are around, served with pasta. Zuchini, eggplant, capsicum and mushrooms all make an appearance at times but this is the classic version that we make for pure comfort food. My recipe probably isn’t far from many others – it isn’t a complex dish but so rewarding to make well with good fresh ingredients. I don’t use a lot of meat because I think the sauce should accompany the pasta but not dominate it. Traditional bolognaise recipes sometimes add a little milk or cream when nearly finished – I haven’t tried that yet because I like the rich version so much! Traditional recipes also use chicken liver, but at risk of excluding myself from the rest of the foodies I’m not a huge fan of eating offal.
Note – Katie Caldesi writes in The Italian Cookery Course that smoky bacon is overpowering in bolognaise sauce but I don’t agree (although the book is excellent). However if smoky bacon isn’t liked it can be replaced with a good non smoked bacon or similar cured pork, like pancetta, guanciale, or even diced salami.
Ingredients
1/2 kg (1lb) ground beef – as often as not I use packaged mince from the supermarket but when I have time to grind my own the difference is very obvious.
1 rasher good smoky bacon
1 stick celery
1 carrot
1 onion
2 tins plum tomatoes or tomato passata
1 glass red wine
1 small sprig rosemary – about 1 tsp when diced fine
1 generous pinch dried oregano – the stuff to look for comes from the flowering heads and is a tan/green colour, crumbly with a pungent smell. Plain dried oregano leaves don’t have so much flavour.
1 pinch chilli flakes
1 bay leaf
3 cloves garlic
olive oil
salt and pepper
Method
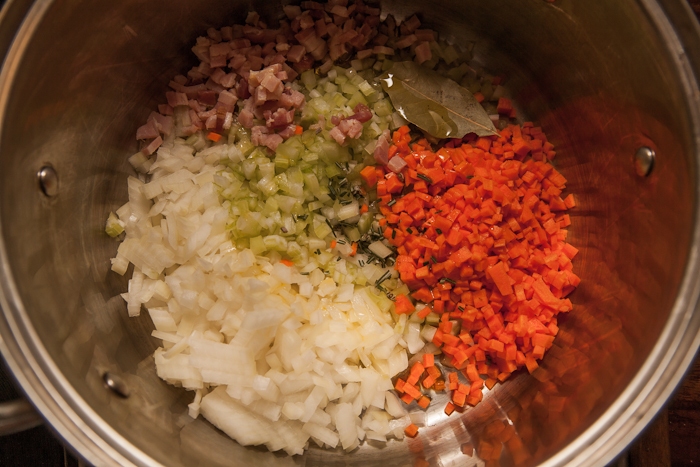
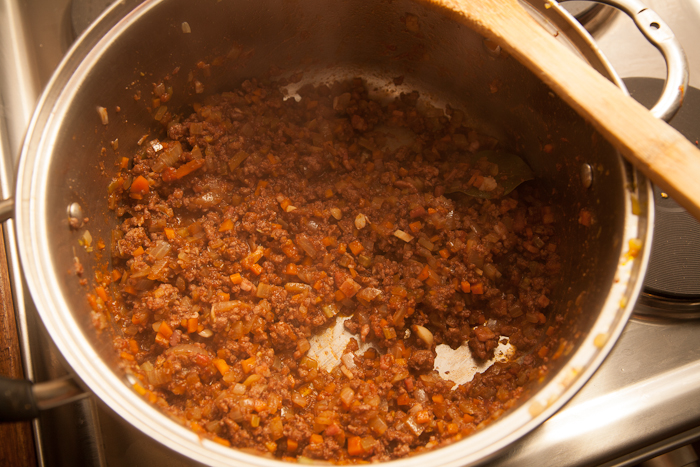
Dice carrot, onion, celery and bacon as fine as practical. Add to a large saucepan or frying pan over medium heat with 2 tbsp olive oil, bay leaf and finely chopped rosemary.
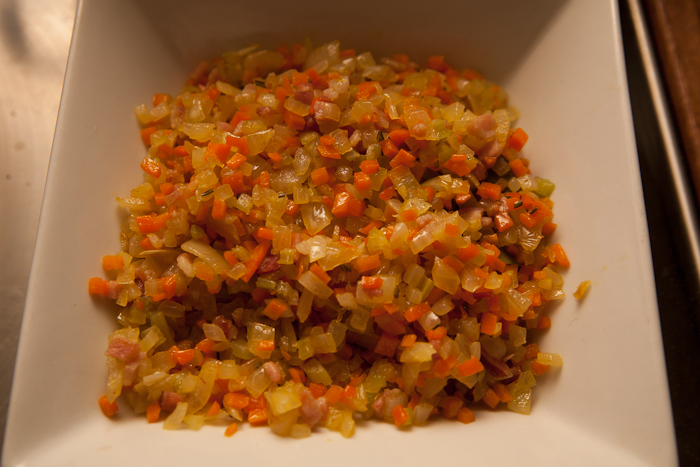
Stir regularly until well cooked, about 10 minutes. The onion should look translucent and starting to brown and the other vegetables should look soft. Remove the vegetables and set aside.
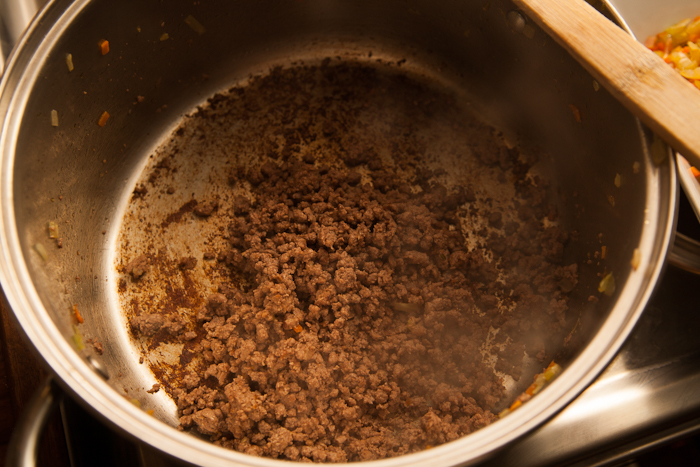
Add 1 tbsp olive oil to the pan and tip in the ground beef. Stir now and then until the beef is well browned.
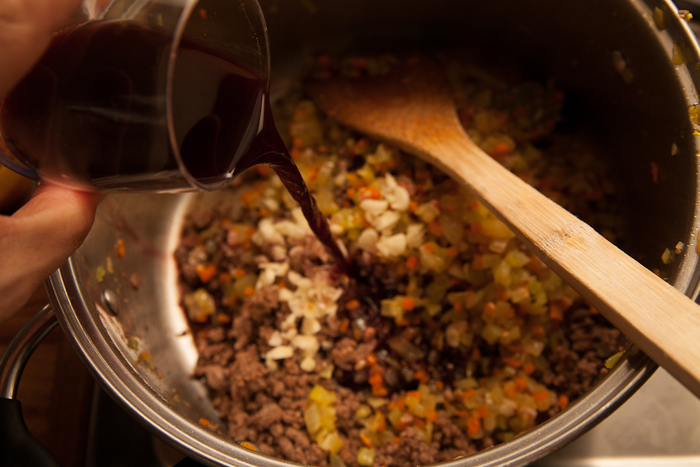
Crush and dice garlic and add to the pan together with the vegetables and 1/2 glass of wine. Scrape the bottom of the pan to loosen all the tasty browned bits. Stir the mixture over medium-high heat until the wine is bubbling. The rest of the wine is for the cook to drink while they are hard at work!
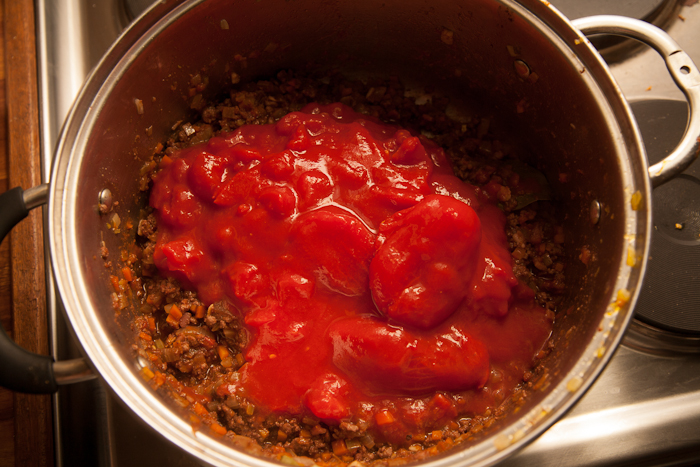
I picked up the next step from FX Cuisine . Tip about 1/2 cup of tomato mixture in to the pan and stir until most of the liquid has boiled off. Continue to stir for a minute over high heat. Concentrating and browning some of the tomato like this adds another layer of flavour.
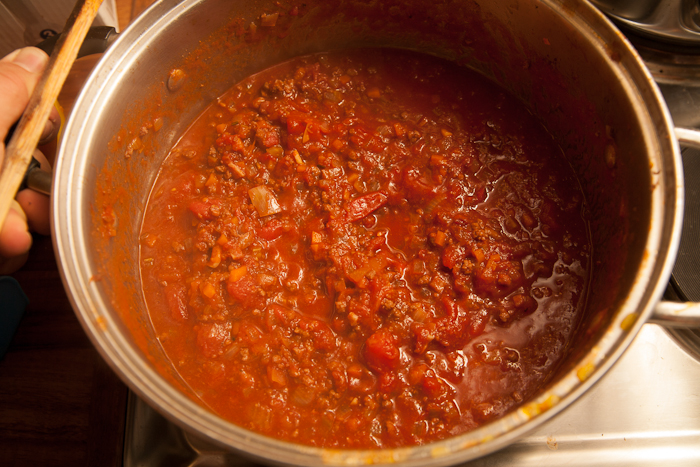
Add the rest of the tomatoes, chilli flakes and oregano. Use a spatula to smash the tomatoes until large chunks are broken up. Half fill the cans with water, swish around, and add the water to the pan too. Reduce to medium heat and simmer for 45 minutes or more, until fairly thick. If the sauce boils down and becomes too dry before 45 minutes is up, add just a little more water. When done, taste and add as much salt as is needed.
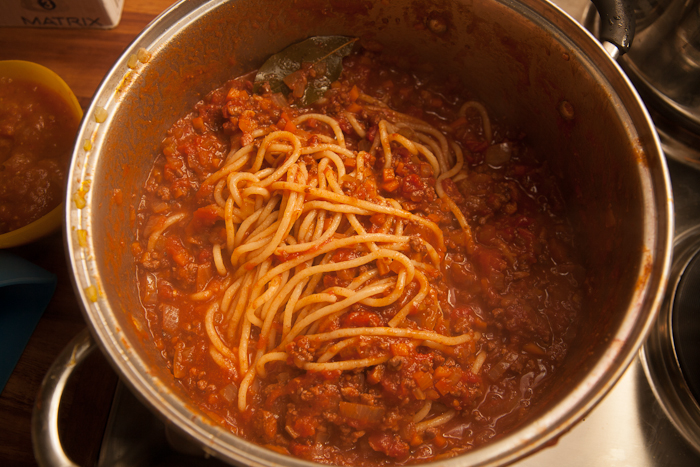
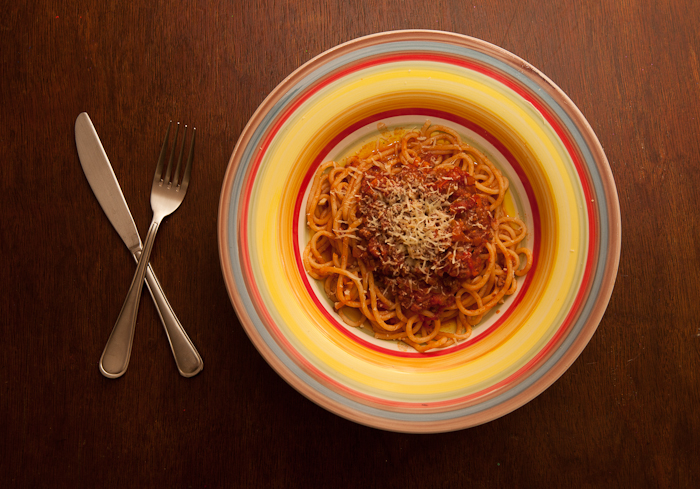
Bring your largest pot of water to a rolling boil and add a few tsp salt. Cook pasta until done. This sauce is great with a pasta with some body like fettucine or tagliatelle. Normal spaghetti doesn’t really do it justice despite the name of this recipe – I served it here with fresh bigoli made with semolina, a very fat type of spaghetti with rough edges. I’ve seen the wisdom of tossing cooked pasta through the sauce to coat it well – the extra flavour in each mouthful is hard to argue with. Use tongs or a pasta server to lift a serve of pasta into each bowl, then spoon more sauce over the top.
Serve with grated parmesan and cracked black pepper.
If you liked this…
Spaghetti Bolognese? No Thanks! – A great little Kindle ebook for $3.50 from an Italian about which recipes are and aren’t authentic – I enjoyed it. You can read Kindle books on PC, even in a browser directly now so you don’t need an actual Kindle.
Tomato season is over, just a few stragglers on the vines plus a few that will never ripen now. Yesterday I helped pull down the plants and trellis from my mums tomato patch to make room for something else. I came home with a big box of green/orange/red tomatoes for making delicious green tomato relish. Its great having a few jars of homemade chutney and relish around – they keep well in or out of the fridge because of the vinegar. A sandwich made with this relish on good bread with a nice sharp aged cheddar is heaven!
I based my recipe on Stephanie Alexander’s indispensable The Cooks Companion, but I added apples too since I have some nice ones to use. This is a spicy relish with lots of subtle flavours, but you can change the spices around as you like. Cumin is great in chutneys and relishes so often I use that too.
Ingredients
1kg (2lb) tomatoes – a mixture of green and ripe ones. All ripe tomatoes can be used too for a richer sauce. If you can’t find green tomatoes any supermarket ones will do. See what I did there?
1/2 kg (1lb) apples
1/3 cup white wine vinegar
1/2 cup sugar
2 tsp seeded mustard
2 tsp Garam Masala
1 tsp mustard seeds
1 tsp paprika
1 tsp salt
1 tsp cornflour
1 pinch powdered clove
1 pinch chilli flakes
1 pinch turmeric powder
Variations
Not everyone likes sultanas in relish but if you do, add half a cup. If you have vincotto, add 1-2 tsp for a hint of sultana and caramel sweetness.
Method
Slice tomatoes and onions. Peel, core and slice apples. It’s easy to nip out the stem bit of each tomato with the end of a knife but not essential.
Tip all ingredients except the cornflour into a large saucepan.
Bring to a boil, then reduce the heat to a simmer. Cook for around an hour, stirring every 10 minutes to check it isn’t sticking. Most of the free liquid should be reduced.
Mix the cornflour with about 1 tbsp water and stir well. Spoon out a little liquid from the sauce and mix with the cornflour paste. Tip the mixture back into the sauce pot and stir well. Simmer for a few more minutes.
Remove from the heat. Use a stick blender to break up any larger lumps, but don’t puree it too much – leave some texture.
Taste for sweet/sour balance and if necessary add a little more vinegar or sugar to taste.
Pour into sterile jars – an easy way to sterilise jars is to run them through the dishwasher. The vinegar in a relish makes it unlikely to spoil, so you don’t need to boil the full jars like you would if canning vegetables. If you want to be extra cautious put the jars in a large saucepan, tip in hot water nearly to the top of the jars and simmer for 30 minutes. I always put a tea towel under the jars when doing this so the jars don’t jump around and crack.
It is satisfying to make fresh homemade sausages and I have resolved to make them more often. The whole thing takes less than an hour, and it would be easy to make double the amount and freeze some for later. The best thing is coming up with your own fillings – they can be as crazy or as normal as you like. I have plans for a mega chilli sausage but tonight I did a chicken + fresh herb version. Most recipes call for extra fat for a juicier sausage but if you want a few less calories you can go without – the sausage will be less juicy but still nice.
A few quick tips – Michael Ruhlman in Charcuterie and Paul Bertolli in Cooking By Hand both say a sausage stuffer should be used to fill sausage casings instead of a funnel on a grinder. The problem with the grinder is that chunks of fat can break down too much and then leak out when cooked instead of hanging around to add juicy flavour. This version is the cheapest sausage stuffer on Amazon that gets OK reviews while these ones cost nearly 3 times as much but get much better reviews all round. I’m sold, not that it takes much to make me want a new kitchen gadget, but until I can track one down the old funnel on the mincer is all I have. If using a grinder with funnel, Ruhlman suggests chilling the mince mixture before sending it through the grinder the second time to fill the sausages.
I used to find that fat and sinew got caught on the grinding plate of my grinder, eventually blocking it up and spoiling the texture. It seems like this happens to even the experts sometimes but making sure the die and cutting blade in my grinder were sharp made a big difference. I just rub the flat side of each on a fine diamond stone now and then. Storing the dies and cutter in a zip lock bag with a drop of oil rubbed over stops them from rusting. The other thing that helps is to dice the meat and then pop it in the freezer 30 minutes before starting.
Sausage casings – natural casings need to be soaked in water before use, then flushed through with more water. Synthetic casings can be used dry.
If you notice the mine isn’t coming out cleanly, stop and take out the cutting die – it’s probably clogged with sinew
Making The Sausages
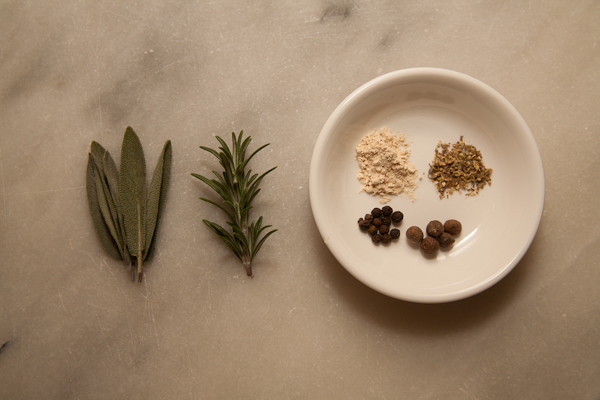
1. Chop fresh spices finely. Grind any dry spices that need it.
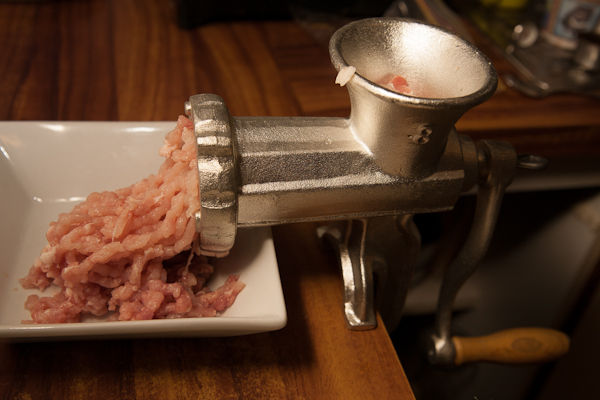
2. Cut chicken into rough chunks and spread out on a tray. Put it in the freezer about 30 minutes before grinding.
3. Pass chicken through the grinder – I used the finest die. When no more is coming out take half a slice of bread and send it through the grinder to push out the last bits. Stop when the bread starts to come through. It’s surprising how muc more this gets you, at least another sausage worth.
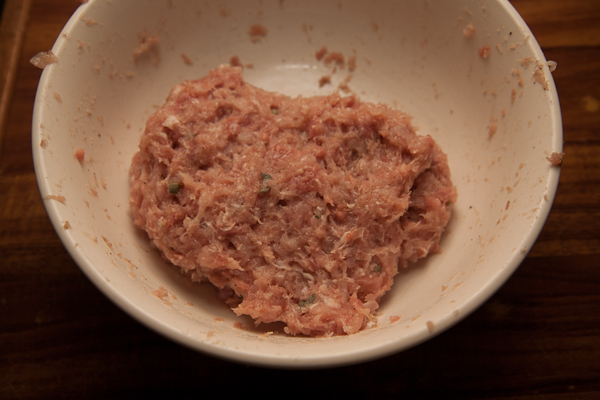
4. Time to get messy: Put the mince in a mixing bowl with all other ingredients and knead until well mixed and the meat feels sticky – a minute or two.
5. When filling I have been using the largest cutting die on my grinder so it doesn’t clog as much. I fit a length of casing over the funnel, working it right down until no more fits and tie a knot in the end.
6. I can just manage this next bit on my own but it’s more fun with an extra person helping – the meat mixture is fed into the grinder or stuffer and cranked or pressed through the funnel. The person on the casing end lets the casing slip off fast enough for the sausage to be plump but not stuffed tight so that it has room to cook.
7. I fill the whole length of the casing before twisting into sausages. When twisting , adjust the pressure in each link so that it isn’t too tight – keep in mind that twisting will make each sausage a bit tighter too. Alternate which way each link is twisted or else they’ll come undone – eg twist clockwise, then anti clockwise in order.
These were just a bit too tight – a couple split when cooking
I think sausages are best cooked over a moderate heat so they cook through and get nice and brown without burning. I tried par-cooking before I cut the links so the mix didn’t spill out the ends. Seemed to work.
Bangers and mash are a classic so we ate our sausages with buttery, garlicky pumpkin+sweet potato mash and gravy.
Almost all bread, pizza or other baked goods that are meant to be light and fluffy use yeast to raise or ‘leaven’ the bread. The easiest way to do this is to use a commercially packaged yeast but if you have the time there’s another method that offers even more complexity in flavour and texture – sourdough. Sourdough is dough that has been leavened using a portion of a sourdough ‘starter’ instead of a commercial yeast. The starter is just a dough of flour and water that has been allowed to start fermenting so that natural yeasts and other organisms multiply. The starter is ‘fed’ regularly with more flour and water.
Sourdough is very different to normal yeasted doughs in flavour and texture. Lactic acid bacteria produce a sharp tangy flavour, lending sourdough its name (although you can have more or less sourness depending on the balance of bacteria and yeasts in the starter). The consistency of sourdough may also be different, with some sourdough loaves having large irregular bubbles and a chewier consistency – although again this may vary based on the makeup of each starter. Sourdough also has health benefits – more claimed than I’m able to find hard evidence for but some very real. For example sourdough bread has a much lower glycaemic index (GI) value than regular yeasted white bread or even yeasted wholemeal bread! There is some research that shows sourdough breads have reduced levels of the gluten proteins that can’t be tolerated by celiacs. Sourdough also has less yeast than normal bread, important for people who are yeast-intolerant (although it does still have some yeast in the same family as the commercial varieties). Sourdough increases the bodies ability to absorb minerals in the grain by reducing phytate. So there are lots of good reasons to try making your own sourdough before you even consider that it is delicious.
How to make a sourdough starter
There’s lots of different ways of making a starter but the most basic method uses just flour and water. Organic flour is good, but plain unbleached flour works too. The water should be spring, rain or filtered water – most tap water contains chlorine, which will inhibit the microorganisms that want to flourish in the starter. Here’s how to do it:
Clean a glass jar very well. Putting it through the dishwasher is a great way to kill any nasty bugs that are lurking.
Mix about 1/2 cup flour and 1/3 cup water water together in the jar. Cover with a piece of cloth or tin foil (not cling wrap, it needs to breathe) and leave in a warmish spot.
Each day for the next few days, mix in the same amount of flour and water again. If you have the chance, stir well a few times each day. After a few days, you should start to notice bubbles forming in the dough.
Once you have seen these bubbles form, it’s time to change the feeding schedule. Each day for the next few days, first remove half the starter – just tip it down the sink. Then replace with the same amount of flour and water. The goal is to feed the starter with fresh flour without increasing the volume so much that you run out of space in the jar. Eventually the mix will up to double in size in the jar after a feeding, so leave plenty of room.
After 7-10 days, the starter should be healthy and ready to use. It will have an interesting smell, and may have a sharp taste.
To make a dough, I just take a portion of the starter and mix it with the other ingredients. I replace the amount I took out of the starter with more flour and water. If making a lot of dough I will feed up the starter more than usual so there’s enough starter to go around. As a rule of thumb, 1/3 – 1/2 a cup of starter is about enough to make a loaf of bread. Any ‘normal’ recipe for bread, pizza dough, whatever, can be made by replacing yeast in the recipe with some sourdough starter, although it will generally be much slower to rise.
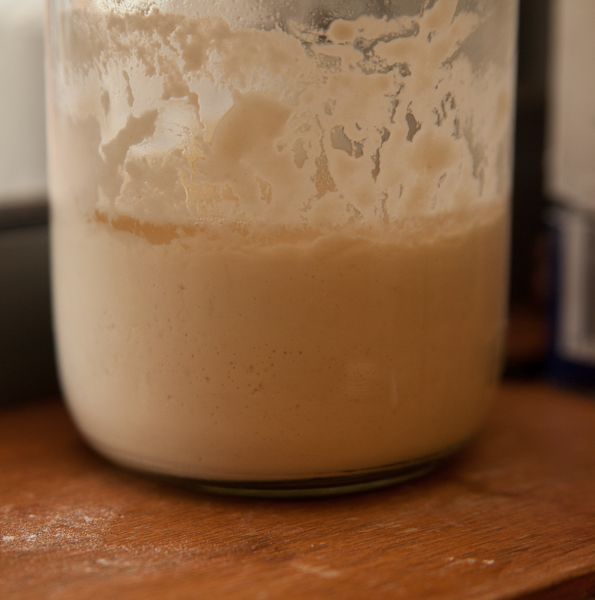
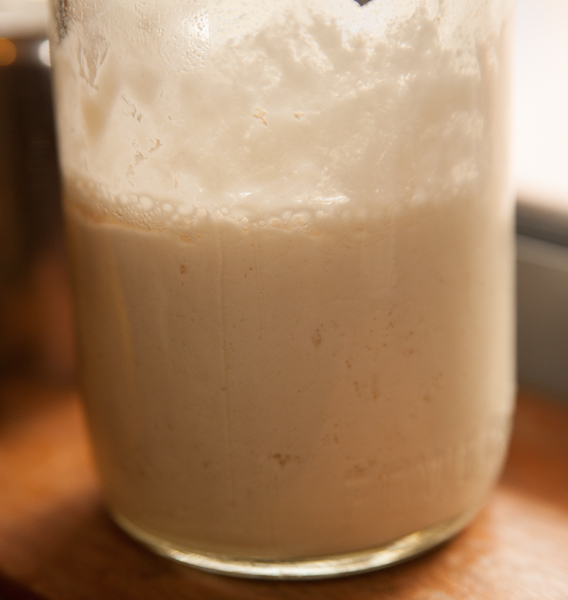
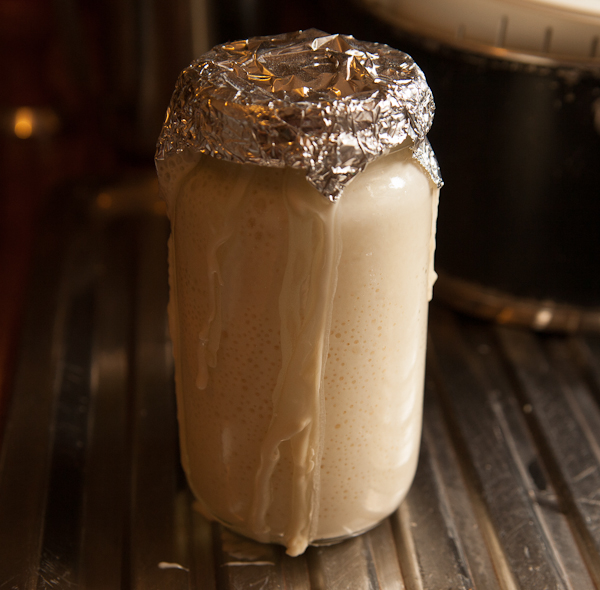
Day 0 – nuthin to see hereDay 2 – a little actionDay 3 – starting to see more bubbles. Yeasty smell.Day 5 – liftoff! That hasn’t happened before. Lots of bubbles, strong yeasty smell, tangy taste. You could start using it from here but the flavour will continue to develop over the weeks to come.
Storing the starter
If left at room temperature, a mature starter should be fed every 1-2 days. For bakers who don’t bake every day and don’t want to waste a lot of flour and water maintaining a starter it can be stored in the fridge for up to a week between feeds. If kept in the fridge it should be removed 24 hours before dough is to be made and given a feeding so that it is active.
What can go wrong
A sourdough starter is a living thing like any other pet. Some bakers have names or special pots or jars for their starter and even take it for walks! Like any living thing a starter can get sick. Here’s how to handle a few problems that might crop up without awkward phone calls to the vet.
Young starters
Depending on the type of yeast and bacteria in the kitchen, a starter might get an imbalance of the bad kind early on. If this happens you may observe the bubbles start, then slow down again. It will come good in time but Peter Rinehart suggests that you may have more luck starting again but using pineapple juice in place of water for the first 2-3 days – the extra acidity will create a less friendly environment for bad bacteria.
Old starters
If forgotten and left too long without food (how could you?), a starter can develop nasty off flavours like a strong funky cheese or even get a ring of mold in its jar. If this happens take a teaspoon of the starter, avoiding any moldy bits. Put it in a clean jar and restart the feeding process from the beginning, adding flour and water until bubbles appear. There should still be enough good yeast and bacteria from the old starter to get things moving quickly again.
Slow starters
If a starter seems very slow to work in a dough, it might be too acidic. Try feeding with more flour and water than usual or discarding more of the starter than usual before feeding. Feed twice in this way before using again. Make sure the water used is free of chlorine. Keeping the dough in a warm place to rise will also help.
Brown liquid on top
Just pour it off.
Cheating
Sometimes my sourdough loaves just don’t rise right. This is part of the fun and with experience you can work around the quirks of your own starter. But if I really want to bake that day I sometimes give in and add some instant dry yeast to the dough to give it an extra kick. It should be dissolved in 1 tbsp water, then kneaded well into the sourdough which should now raise more quickly.
Buying a sourdough starter
If making a starter from scratch isn’t for you, or you just can’t get it to work, plenty of stores sell a packaged version of the same yeasts and bacteria which you can use to reliably get a starter going. This one is 6 bucks on Amazon.
I couldn’t wait to try my new starter any longer so I whipped up a loaf. One of my next posts will be about my basic process to make sourdough bread and pizza crusts.
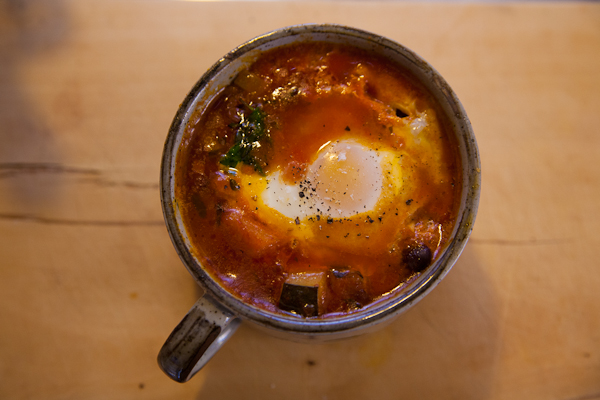
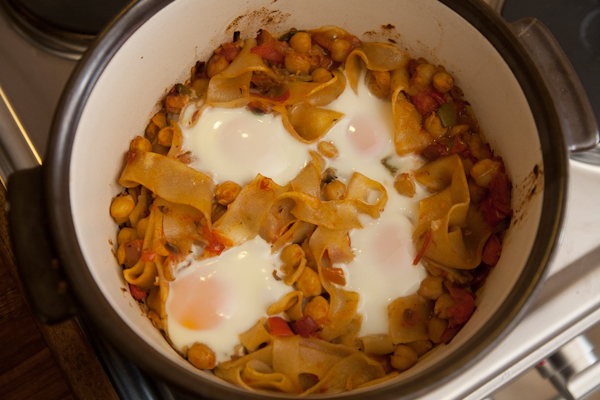
I was in Melbourne last month for work and my brother in law said I had to go to Hardware Societe. Unfortunately when I got there, I couldn’t get a table or even the attention of a waiter to start the process of getting a table. I gave up on breakfast that morning but I never gave up on the idea of baked eggs and this weekend I did two variations, both with pulses in a tomato based sauce finished with eggs baked on top. This is a seriously hearty breakfast that I plan on eating much more often, although it would make sense to make up the sauce the night before to save time. I’m treating this as more of an amazing new concept than a specific recipe and I will use whatever is in season – I chucked some zucchini and pumpkin into one of my versions too and will be trying one with beans soon.
Baked eggs with lentils
1 cup cooked lentils (or canned)
1 1/2 cups tomato passata or blended tinned tomatoes or plain pasta sauce
1/2 brown onion
1 carrot, peeled
1 stick celery
1 red or yellow capsicum (pepper)
2 cloves garlic
1/2 tsp cinnamon – I love a hint of cinnamon with lentils!
1 tsp paprika
1 tbsp chopped fresh herbs – any of thyme, basil, oregano, marjoram
olive oil
salt and pepper
1 egg per person
Finely dice onion, carrot, celery, capsicum, garlic. Sautee over medium heat in a dash of olive oil till soft, around 5 minutes.
Add cinnamon, paprika, fresh herbs, tomato passata and lentils. Simmer for about 15 minutes, stirring occasionally. If the mixture gets so dry it sticks, add a dash of water.
Taste the sauce and season with salt and pepper to taste.
Spoon sauce into a casserole dish or individual servings. I’ve been eying off a set of individual casseroles like these for a while but don’t have any yet, so I used large soup mugs. Use a spoon to make an egg sized depression in the sauce for each serve and crack in an egg. Cover the dish (foil works) and bake until the egg is cooked right. Mine took about 15 minutes in a hot oven. I served with a little flat leaf parsley and grated parmesan and of course toast fingers are an obvious match for creamy egg yolk…
My second version replaced the lentils with chickpeas, and I used up a little leftover pasta dough to make a few noodles for the sauce. I did this one in a single casserole. Soooo good!
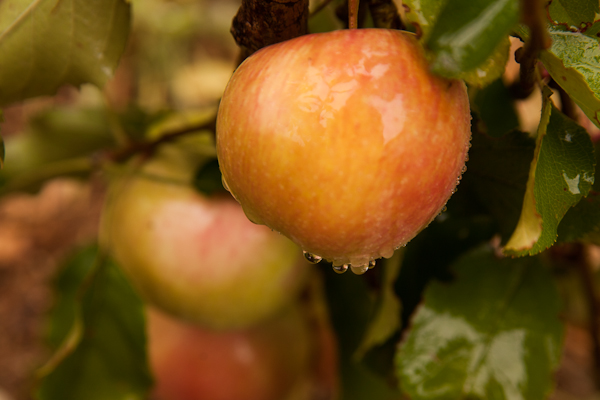
There’s apple orchards all around my home town and they’ve been busy harvesting this week. My little tree has usable fruit for the first time too!
So I have some nice fresh apples, and today I had a spare dough ball after making lunch. Apple pizza? Why not? Here’s what I used:
2 large apples
1 dough ball
2 tbsp raw sugar
1/2 tsp cinnamon
2 tbsp butter
1/2 cup flour
I didn’t have them handy but the pizza would have been even better with
walnuts
sultanas
cream to serve
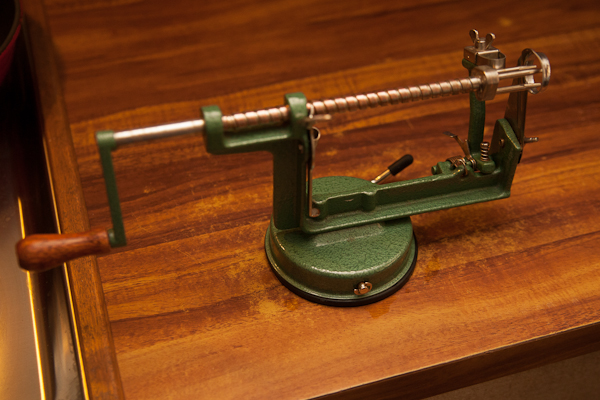
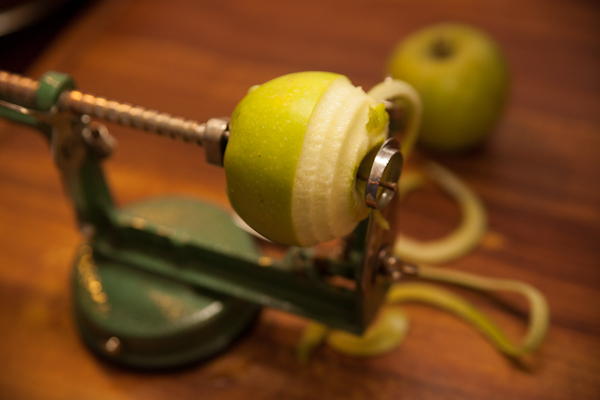
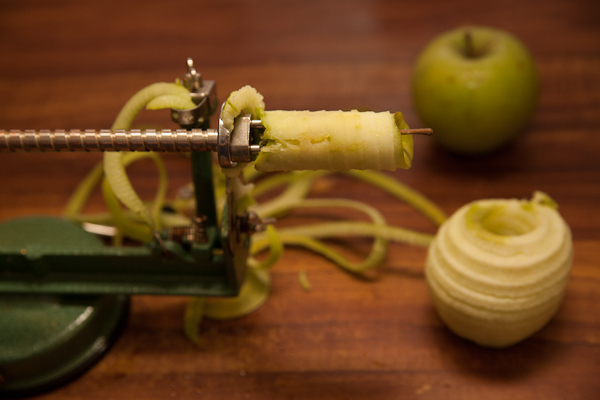
Not that I need an excuse to use any kitchen gadget but I was glad to get a chance to use my apple peeling machine. When I first saw these I thought they were ridiculous. I was wrong. With this little baby I can peel, core and slice a kilo of apples in a few minutes.
The apple peeling machine. You pull back the shaft and spear an apple…turn the handle, and a blade peels the skin and the apple is sliced and pushed through a corer…voila! Cored, peeled, sliced apple in seconds.
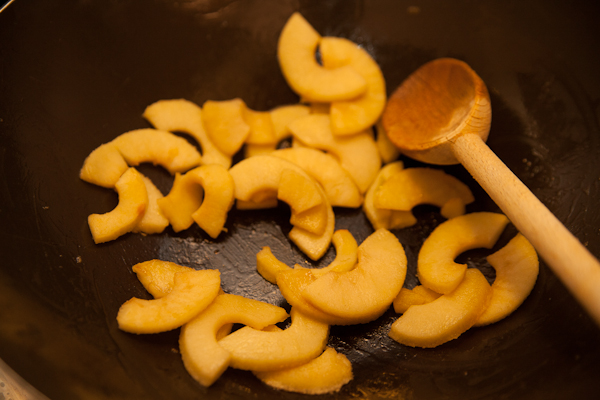
I put 1 tbsp butter in a non stick pan over medium heat and sautéed the sliced apple.
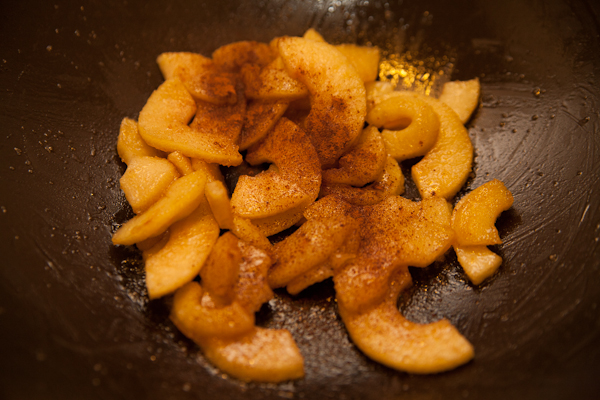
After around 5 minutes it started to look a bit soft so I added 1 tbsp raw sugar and stirred until the sugar was all melted and caramelised. Then I added 1/2 tsp cinnamon powder, stirred and removed from the heat.
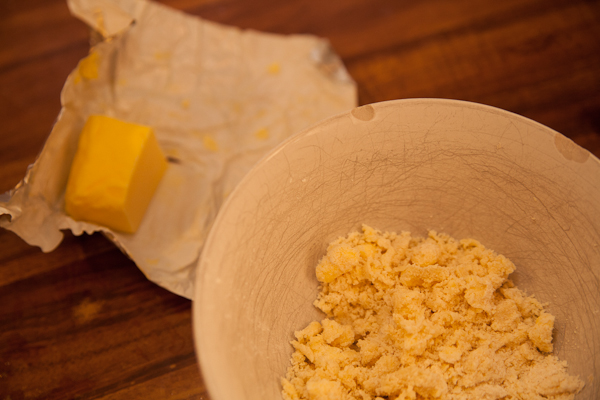
Next I made a little crumble topping by mixing 1/2 cup flour with 2 tbsp sugar and 1 heaped tbsp butter. The trick is to cut the butter into little pieces and just rub it into the flour with your fingertips. It should form crumbly clumps.
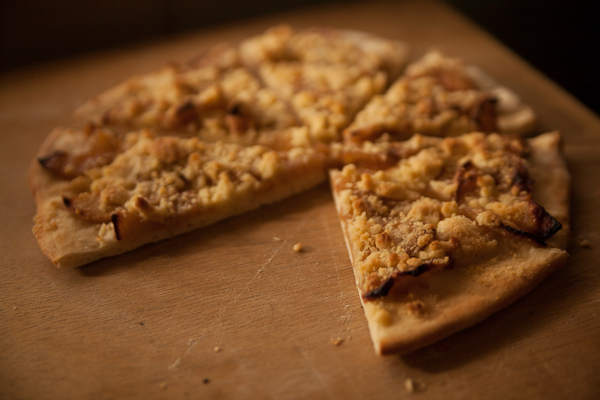
I shaped the dough ball into a base, scattered over the apple pieces and crumbled the crumble on top. If I had them I would have added a few sultanas and walnuts too.
The whole lot went onto a pizza stone, preheated for 30 minutes in a fan forced oven at 250C / 480F.
I took it out after 6-7 minutes, when the crumble was brown and the edges of the apple nice and crispy. This was one of my best dessert pizzas – just wish I had some cream left to serve it with too!
I served this as a birthday cake last week. The recipe is another that I have stolen from FXCuisine. I hope he doesn’t mind but it’s such a delicious gluten free dessert that I think everyone should know about it! I don’t normally love buckwheat but in this dish it adds a very interesting counterpoint to the almond flavour. One of the guests described it as like eating a giant friand, and I agree. I took the liberty of replacing some of the butter in this recipe with olive oil but you can replace the olive oil in my recipe with 50g more butter if you aren’t so paranoid about your waistline.
Ingredients
250g Almond meal
200g Buckwheat flour
1/2 tsp baking powder
6 eggs
200g butter
2 tbsp extra virgin olive oil
250g caster sugar
Icing sugar
1 jar of good jam – your choice but I liked strawberry
Method
Separate the egg yolks and whites
Use a fork to mash together the butter and sugar. Mix in the flours and baking powder. Add the egg yolks and mix very well – a hand mixer helps get the batter smooth.
Clean up the hand mixer and use it (or a whisk if you’re a glutton for whisking) to whip the egg whites until they make stiff peaks when you lift the mixer out. If using an electric mixer, don’t lift it out unless it is turned off or the egg whites will make stiff peaks all over your wall.
Add 1/3 of the egg whites to the batter and stir until they are mixed in. Now add the rest of the egg whites and fold them in more gently until evenly mixed. Adding a little of the egg white first makes it easier to fold in the rest more gently.
Pour the batter into a greased springform pan, or a round cake pan with greased baking paper cut to fit in the bottom. Bake at 180C/350F for about 40 minutes or until the top is golden. You can poke a skewer in to see if it is cooked, but be careful where the hole is, this cake doesn’t spring back as much as usual so the hole will be visible afterwards.
When cooked, let it sit in the pan to pull itself together for 5-10 minutes before you carefully remove it to a cake rack to finish cooling.
When cool, very carefully cut horizontally down the middle and use an egg flip to lift the top off. Spread jam liberally over the cake and put the top back on. Put some icing sugar in a sieve or flour sifter and dust over the top.
I served slices with whipped cream and vincotto… yum!
More
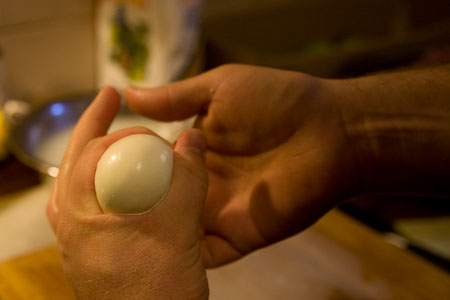
You can separate eggs quite well by just cracking eggs into your hands and letting the whites fall through your fingers. If you don’t like getting your hands dirty you can get some cool egg separators – I have one along these lines but you have to see this one too. Words can’t describe the awesome.
There’s no doubt Autumn is here – it’s been raining and leaves are turning yellow and orange. Today as I listened to the wind chimes jangling I started to think of comfort food, and since I have one of the seasons first home grown pumpkins waiting to be used this recipe was a natural choice. I don’t like to brag but my pumpkin soup recipe, refined through the years, is getting pretty good. It helped win my fiancées heart when I cooked it on our first date and if you choose to use it as a love potion too I can nearly guarantee your success.
Use the ripest pumpkin you can find – the flesh should be a deep yellow to orange when cut, depending on variety and the stem should appear dry. I used a butternut (also called a squash in some parts). Some recipes call for the pumpkin to be roasted to deepen the flavour before it is boiled but if you start with a ripe pumpkin, I don’t think it is necessary – although by all means give it a go if the pumpkin isn’t as ripe as you’d like. I suggest about 1kg of pumpkin but more or less is fine, depending on how much pumpkin you have. I used about 2/3 of the monster below.
Ingredients
1 large carrot
1 large potato
1 brown onion
1 ripe pumpkin (about 1kg / 2lb)
1 liter of stock – chicken or vegetable. Or water if you don’t have stock.
1 rasher of good smoky bacon or pancetta
2 cloves garlic
1/2 tsp nutmeg, freshly grated if possible
1/2 tsp turmeric
1 tsp paprika
1 tbsp olive oil
1 tbsp butter
salt and pepper
To Serve
1 small bunch of coriander (cilantro)
sour cream
1. Remove the bacon rind. Finely dice the bacon, onion, carrot and garlic. Add to a large saucepan over medium heat with the butter and olive oil.
2. While you’re stirring the onion etc, roughly dice the potato and peel and dice the pumpkin. It’s easy to peel the pumpkin by cutting thick slices first, then cutting the skin off each slice.
3. Once the onions are starting to look transparent, add the potato and pumpkin and stock. If there isn’t enough stock to cover the pumpkin top up the pan with water. Bring to a boil, then reduce the heat and simmer until the pumpkin is soft and falling apart – about 1 hour.
4. Stir in the paprika, nutmeg and turmeric and simmer for another few minutes.
5. Remove from the heat and allow to cool slightly. Use a hand blender to puree the soup in the pan until it’s smooth and creamy.
6. Taste and season with salt and freshly cracked black pepper to your taste.
7. Ladle into bowls and add a spoonful of sour cream to the middle of each one. Use a fork to twirl the sour cream in a little whirlpool pattern, but not so much that it is mixed in – just leave a few trails. Scatter each bowl with a little chopped coriander. Serve with a nice crusty white bread and butter.
Mmmmmmm
More:
A good hand blender is the easiest way to get the soup nice and creamy – this Cuisinart one comes in every colour you could want.
Pumpkins are easy to grow if you have a little space, and very rewarding. Here is a pretty good guide.
My recipe is ‘straight’ pumpkin but I love a curried pumpkin soup too – here’s a take on that (and they make it look so good…)
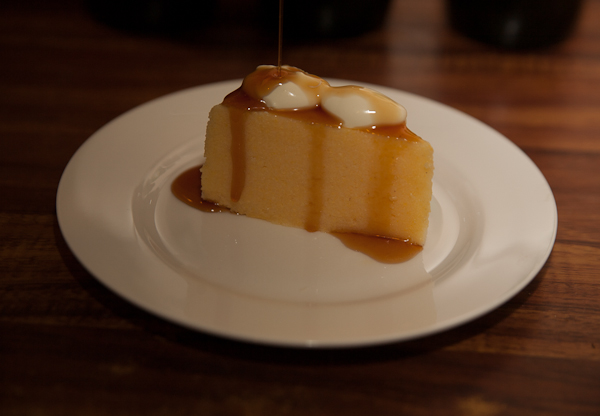
This is one of my all time greatest desserts. Creamy, buttery wedges of polenta are topped with freshly whipped cream and vincotto. After you mix it around on your plate and get a bit of everything in a mouthful, it is heaven.
Polenta With Vincotto Recipe
1 Cup polenta
1 Tbsp butter
2 Cups milk
2 Cups water
1/2 Tsp of fresh grated nutmeg
1 Tbsp sugar (optional)
Vincotto & whipped cream to serve
*When I’m feeling lazy I microwave my polenta – it isn’t traditional but it beats stirring for ages when you just want to eat! The traditional way is to simmer the polenta, nutmeg, milk, water, butter and sugar over a low heat while stirring regularly for about 20 minuts, until thick and smooth. Otherwise:
In a large microwave safe bowl with a lid or covering, stir together the water, sugar, milk, butter, nutmeg and polenta. Microwave on high for 4 minutes. Remove carefully (wear oven mitts!), open the lid (carefully, the steam is very hot) and stir well to break up lumps. Return and microwave for another 3 minutes, remove and check for done-ness. There shouldn’t be any obvious hard grains – you want it smooth and creamy. Give it another minute at a time if it needs it.
Pour the polenta mixture into a small cake or loaf pan that has a piece of baking paper cut to fit on its bottom. Use a spoon to smooth the top and press it down evenly. Let the polenta set – this might take an hour, a bit less in the fridge.
To serve, turn out the set polenta and cut into wedges or slices. Put a wedge on each plate and spoon or pipe over whipped cream. Just before serving give it a healthy drizzle of vincotto.
Every winemaking season we put aside a few buckets of grapes to make delicous syrupy vincotto – also called vinicotto or vino cotto. Although vincotto translates as “cooked wine” the version I’m familiar with isn’t alcoholic – just a sweet reduction of fruit juice. We make a big batch using freshly pressed grapes but we have also experimented with bought, bottled grape juice and found that it works well. I recommend that if you use bought juice, you look for a preservative free one or else you will be concentrating the preservative too. Just 100% dark grape juice. Organic juices seem to give cleaner flavours than the cheaper stuff in plastic bottles but experiment with different brands to see what works best.
To make vincotto all you do is simmer grape juice over a low heat for several hours, until it is reduced to a syrupy liquid. Then bottle in clean bottles and store – it keeps well and improves with age. We found a seller at a farmers market with vincotto that had been aged on oak and tried this ourselves. The oak adds another layer of flavour that is pretty interesting, so I recommend trying it out. You don’t need a barrel, just get some oak chips used for winemaking from any homebrew store or from Amazon here. Tie the oak chips in the end of a stocking or a scrap of muslin. Put this in a big jar, and fill it with vincotto. I’d use about 1tbsp of oak chips per 1 liter/2 pints, and give it a stir every week or so to distribute the flavour. Taste it often and take out the oak when it tastes right.
This batch was made of Pinot Noir grapes so my mum called it Pinot Cotto. Ha ha.
How To Use Vincotto
Use vincotto anywhere you’d use maple syrup or similar sweet dressings. We eat it drizzled over pancakes or buttered crumpets, or with icecream and stewed fruit. You can use a dash of it in any savoury dish that needs a little sweetening for balance too – sometimes I’ll add 1/2 tsp to a rich pasta sauce or meat stew. My personal favourite though is polenta wedges with cream and vincotto. This would be part of my last meal – the intense sweet/tart/caramel flavour of vincotto powers through soft buttery polenta with cool whipped cream to contrast – I’ll write up the recipe tomorrow!
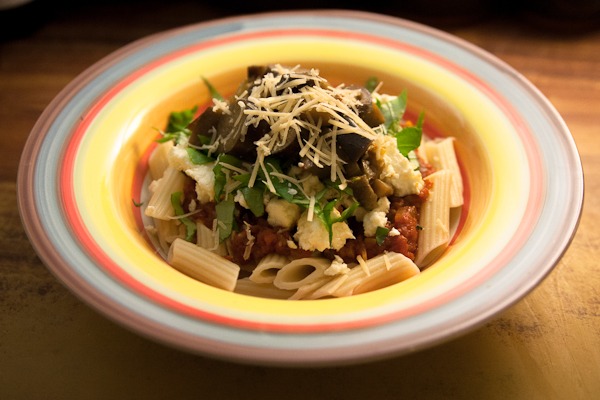
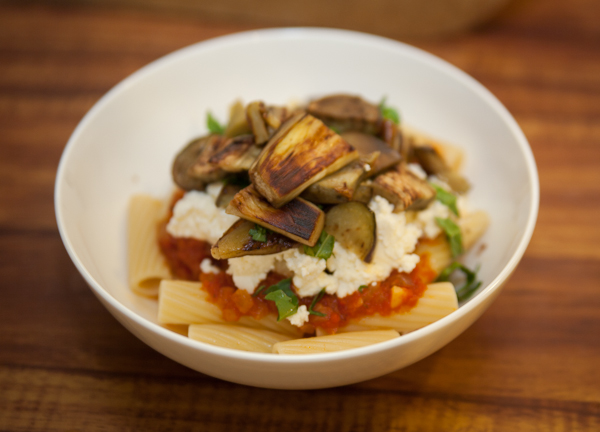
First off I have to give credit to the incomparable FXCuisine, where I got this recipe for Pasta Alla Norma. If you haven’t seen his site, check it out.
Pasta Alla Norma is a Sicilian dish, simple to make but deliciously rewarding. It is made up of good pasta – usually larger shapes like penne -topped with a simple tomato sauce, ricotta salata, basil and fried eggplant (aubergine). I made this when I wanted to offer a good dinner to guests but I was in a hurry that day as this is so simple to make – I made the sauce the day before to save time.If you can find a bronze die pasta it will have a better texture for the sauce to stick to, but don’t sweat it too much!
Ricotta salata is a salted and aged version of ricotta. I couldn’t find any at short notice so I used normal ricotta and while the dish was good, I thought it needed an extra kick that the ricottta salata would have provided. I added some fresh grated parmesan and I recommend using that or pecorino with your ricotta if you can’t find ricotta salata either. I’ve also seen versions of this recipe calling for capers which would have the same effect – you want a punchy, salty ingredient to go with the smooth flavours of eggplant. Serious Eats suggest trying a saltier cheese like sheeps milk fetta as another option. I took this advice for my second attempt at the dish and it was excellent – I mixed equal parts creamy fetta and ricotta, then used that in place of ricotta salata.
The dish is best with a simple but tasty tomato sauce, something like a good can or 2 of tomatoes blended up (I use my own preserved tomato sauce) and simmered with some tomato concentrate, garlic, salt and pepper and herbs. I think at a pinch you could use a good jar of simple tomato passata from a store, with a bit of salt and pepper.
Ingredients
2 Eggplants (aubergines), firm/young ones if possible, diced/sliced
500g / 1lb good quality pasta – penne, macaroni or other larger shapes
4-5 Cloves of garlic
3 Tbsp olive oil
About 2 cups of pasta sauce of your choice (see above)
250g / 1/2lb Fresh ricotta or ricotta salata or ricotta mixed with fetta (see above)
Fresh grated parmesan or pecorino to serve
1 Small bunch of basil
Method
Prepare or heat up the pasta sauce.
Fill a large saucepan nearly to the top with hot water and put it on the stove, high heat. Stir in 1/2 tbsp salt. Put the lid on while it comes to a boil.
Crush and dice the garlic. Add to a large frying pan with the olive oil over medium-low heat, and cook stirring occasionally until the garlic is just golden brown. Remove and discard the garlic (the flavour is now in the oil).
Add the eggplant to the frying pan and cook, stirring and turning until it is all nicely browned. Keep the heat fairly low, you want it to cook through and get golden brown on the outside without burning. This step might take 10-15 minutes.
While the eggplant cooks and as soon as the pot of water is boiling vigorously tip in the dried pasta and stir well. After 8 mins or so start tasting a piece now and then for done-ness. Cook until done how you like it – not so long that it starts to get very soft and lose its shape. When cooked, ladle the pasta out into a strainer using a slotted spoon and set aside.
To assemble the dish, ladle some pasta into each bowl, then top with a good splash of pasta sauce. Crumble over the ricotta and parmesan/pecorino. Use kitchen scissors to snip little bits off the bunch of basil, adding around 1 tbsp to each bowl. Finally, top with the cooked eggplant.
When eating, you stir the ingredients through so you get a bit of everything in each mouthful – the different flavour combinations are mouth watering.
Here’s an update – my second attempt at the dish, using a mixture of fetta and ricotta for the cheese.
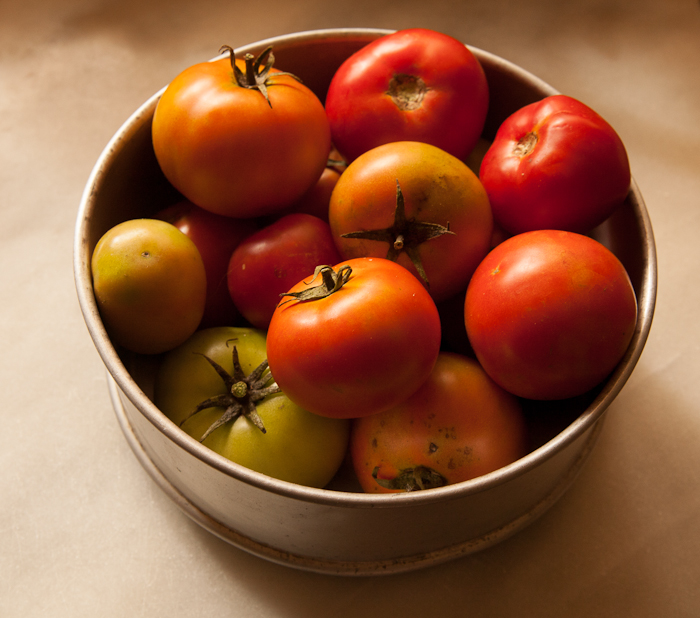
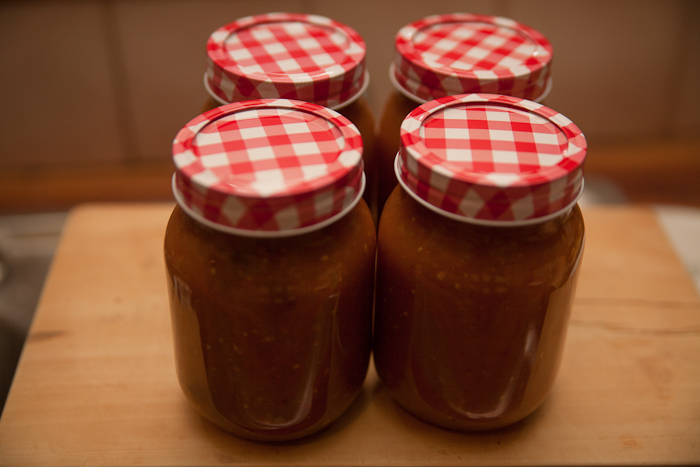
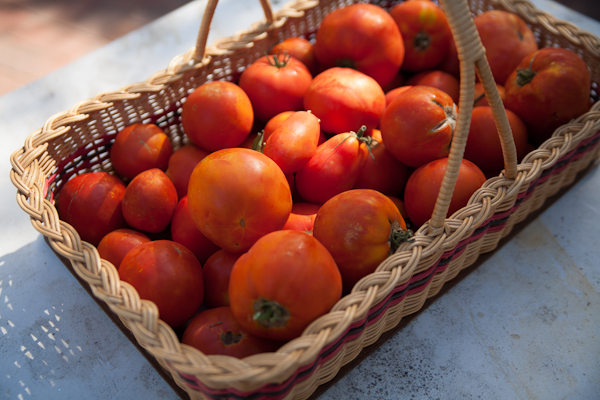
The end of summer is a delicious time. The last month or two we have had tons of zucchinis, eggplant, onions, apples, peaches and more but just maybe the most delicious – beautiful tomatoes. We eat as many as we can and bottle the rest as sauce. I can’t recommend this enough – if you can start with good, ripe tomatoes and make a simple sauce the difference between home made and bought sauces is mind blowing.
If you’re growing your own tomatoes it makes sense to save up as many as possible and do one big sauce making session. This usually means picking as they ripen and storing in the fridge for a few days while stocks slowly build up. When we haven’t grown our own some years we have bought a few boxes from farmers markets or grocers.
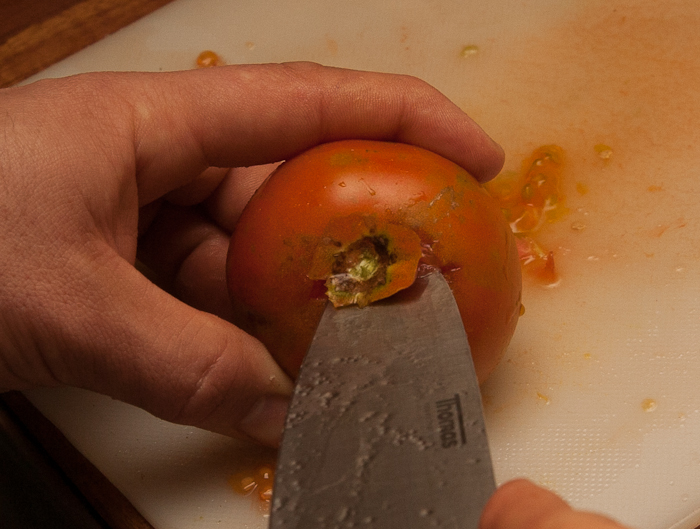
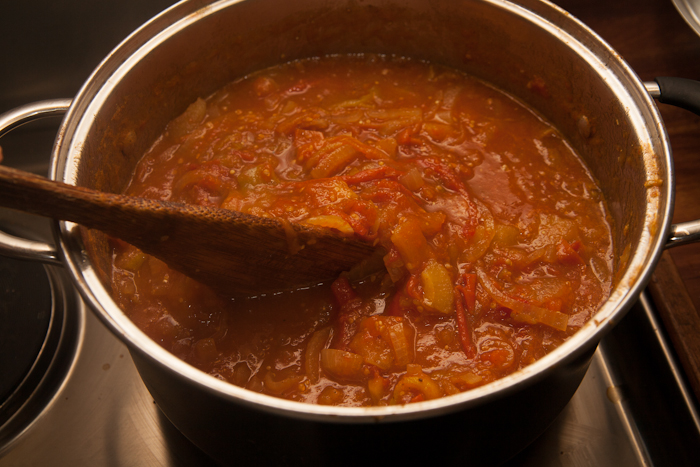
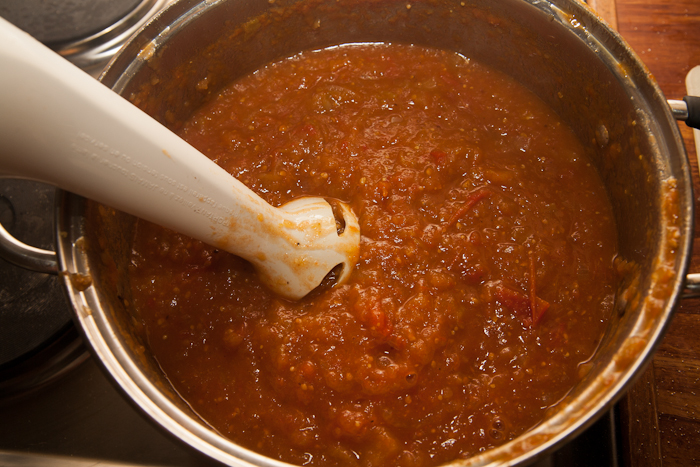
The best way we’ve found to make a simple sauce is to simmer the tomatoes in big pots until just soft, then let them sit in a colander for a minute to drain. Or you could try the approach of roasting your tomatoes first – this does look pretty tasty I admit! After cooking, use a tomato mill like the one I reviewed here last year or a mouli (vegetable mill) to get the skin and seeds out. You can jar them at this point but you’ll probably end up with quite a runny sauce, which will separate in the jars. This isn’t such a bad thing but this year we took our sauce and simmered it over low heat for a few hours, until reduced in volume by about a quarter. The taste of this reduced sauce… I’m drooling again thinking about it.
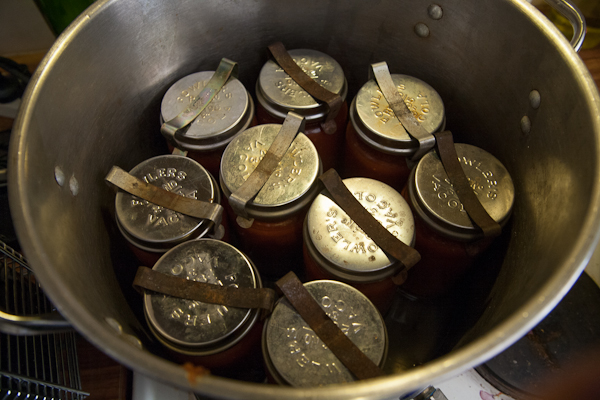
There are lots of different styles of jars for preserving or ‘canning’ vegetables. Although expensive new, we have found many crates of them at garage sales and op shops for a fraction of the price – just make sure you can still get the rings and lids for whichever ones you get. We use Fowlers brand jars as the parts are available new if you need them. To use these jars you fill to about an inch from the top, and slip over a rubber seal, the lid and a clip to hold it down. Before we got jars we used long neck beer bottles with crown caps from a homebrew store, and you can save and reuse any jars or bottles as long as they have good metal lids.
When full put all of your jars in a big stock pot and add water to just below the lids and slowly bring to a low boil. I boil the jars for an hour, then let them cool slowly in the hot water to be on the safe side.
Here’s how the seal should sit on the jar – these are a bit fiddly to get on but you soon get the hang of flicking the twists with your thumb to straighten them up.
If you have a dedicated ‘Vacola’ pot for boiling the jars, it has a raised platform in the bottom so that the jars aren’t right on the hot bottom of the pot. If you’re using a stock pot, bring to the heat slowly or the jars can crack – either from the heat or bubbles jittering them around. I’ve seen people put rags or tea towels on the bottom to stop this happening.
Another batch of sauce ready to boil.
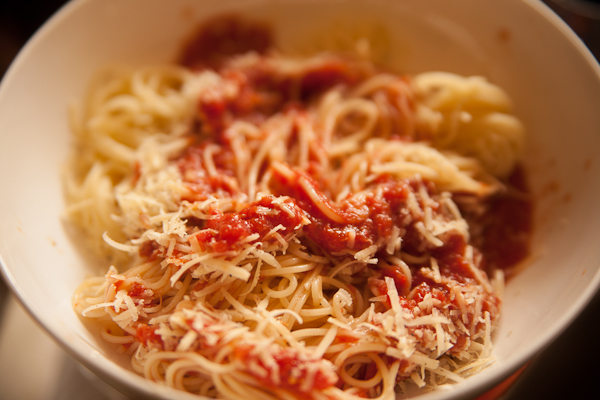
If you’ve been making sauce all day and need a quick meal, take a ladle full of your fresh sauce, grind in a little salt and pepper, cook up whatever pasta you have lying around – thick shapes like spirals work well but anything goes and hit it with the sauce. Grate a little parmesan on top if you have it. Might not look like much but the clean flavours and textures are so good.
More:
Mouli on Amazon (or try second hand shops) – this is a good, cheap option for making smaller batches of sauce.
Leading up to this years wine season, I’ve been reading a lot about ‘natural wines’ – eg wines produced with as little intervention as possible. This usually means no yeast added, no acid added and no or minimal sulfur used. By extension techniques like micro-oxygenation, use of tannin extracts, reverse osmosis and many other things done in modern commercial winemaking would be ruled out. I think an advocate would say that taking this approach is the way to get the clearest expression of the character of the grape. This is a romantic idea, and one I agree with to some extent. It is nice to think that you could pick grapes, let them sit for a while, and end up with wine produced so naturally that it’s almost as if it just dropped from the vine into the bottle, with a character that expresses something about where and when and how it was grown.
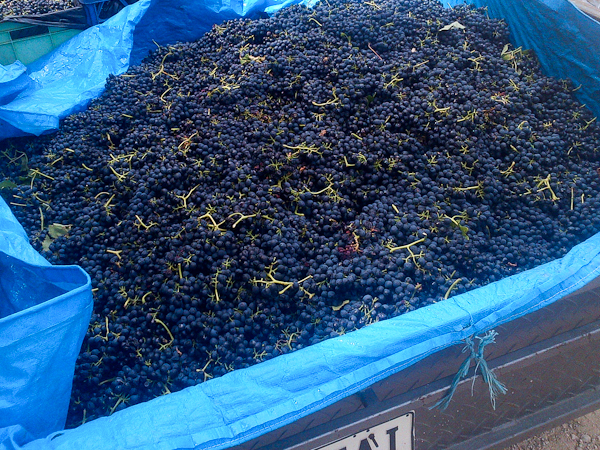
400kg makes enough wine for the extended family for another year
On the other hand there are many good reasons that commercial wineries do the things they do. Adding a little acid to lower the wine pH stops bacteria from producing various foul tastes. Sulfur, in the form of metabisulphate, is used to stop the wine oxidising and also to reduce bacterial growth. Selected strains of wine yeast are added so that the fermentation completes and the wine doesn’t end up tasting too sweet. As much as it may be possible to create amazing wines with nothing more than grapes, I have tasted, made and heard of foul tasting bottles of syrupy vinegary horse blanket juice.
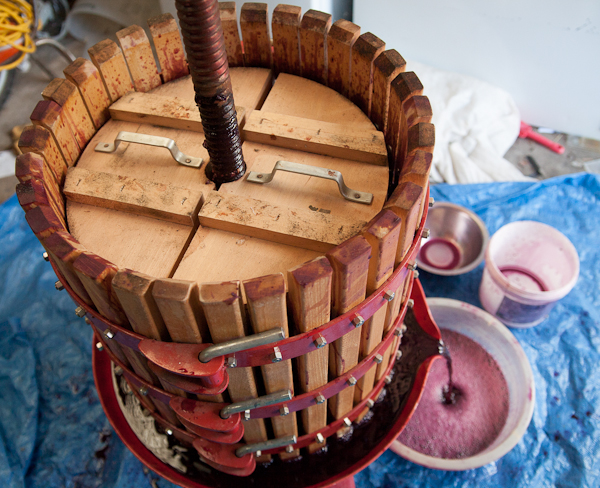
After fermentation, pressing with my little press
I picked up a Kindle copy of Naked Wine – Letting Grapes Do What Comes Naturally by Alice Feiring, which is a good read no matter which side of the fence you’re on regarding natural winemaking. Although she is very pro-nature, one message I took from that book was that anything you do should be justified, required vs done out of habit. Scientific methods shouldn’t be ruled out any more than natural methods – whatever will let you achieve your goal for your wine is what you should do.
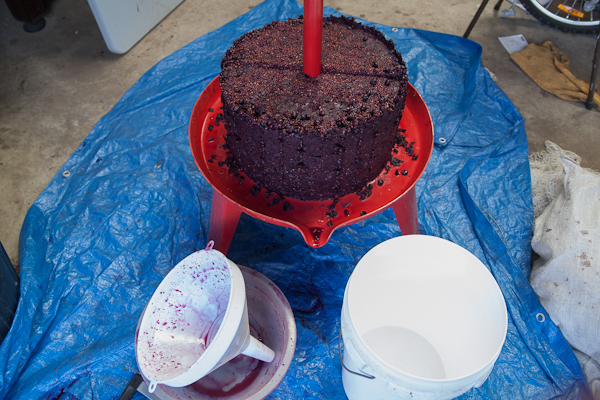
Grapes, squished dry
This year I decided to take this approach, with intervention only where I really thought it was needed. For me this meant:
No sulfur at crush – a nerve wracking change but one I hoped would yet wild yeasts add to the flavour profile of the wine.
Only a tiny amount of commercial yeast – a pinch – was added to make sure there was some yeast capable of finishing the fermentation.
A small amount of acid added to reduce the pH to a safe range without adding so much it was obvious in the flavour
Minimal amount of sulfur added when the primary fermentation was added, to prevent bacteria turning the wine to vinegar as it ages.
Minimal amount of sulfur will be added at bottling.
No filtering or fining.
I should add that if you are taking this approach I think you should be tasting and smelling your wine at least once a day so you can spot any problems early on and do something about them. I’m happy to say my wine is going well so far – I just pressed it today after 2 weeks on the skins and it tastes, fruity, complex and delicious with a hint of butter in the mouth feel.
2 seemingly unrelated facts led me to try out a new recipe today.
1: I think beans can be among the most delicious of all foods – rich, creamy, satisfying and healthy.
2: I need work lunches!
Since I often fall back on tinned baked beans I decided to try making my own. In an old family cookbook I have a recipe for ‘Mrs Abbenantes Baked Beans’ that I loosely based this on.
Ingredients
2 cups dried Haricot beans (you could substitute other white dried beans or a few tins of already cooked beans if in a hurry).
2 rashers smoky bacon
2 carrots
1 onion
3 cloves garlic
1 capsicum (pepper)
1 tsp paprika
1 tsp dried oregano
1 bay leaf
1 tsp honey
1 tsp salt
2 tins diced tomatoes
2 fresh ripe tomatoes (optional – but it adds a little zing)
1/2 cup red wine
olive oil
Method
Unless using tinned beans, soak the beans overnight in plenty of water. Then drain the water, and put the soaked beans in another pan with enough fresh water to cover them well (water as deep above the beans as the width of your hand or so). Bring to a boil, then simmer for 1-2 hours. After an hour, start tasting the beans now and then to see if they are done – they should be soft, but not falling apart. Try not to stir too much while they cook to avoid breaking them up. When done, drain and set aside.
Dice the capsicum (pepper), bacon, onion and carrot medium fine. Mash and dice the garlic. Over medium heat, saute in a saucepan with a glug of olive oil until starting to soften and brown – 5-10 minutes.
Add the wine, bay leaf and other spices (and diced fresh tomato if using). Stir for another minute or so.
Add the tinned tomatoes, cooked beans and honey along with 4 cups of water. Put the lid on the pan and simmer on fairly low heat for about an hour, stirring now and then. If the mixture dries out too fast add a little more water.
After an hour remove the lid and continue to simmer until the mixture is as thick as you like, stirring often. Remove the bay leaf and season to taste with more salt if needed.
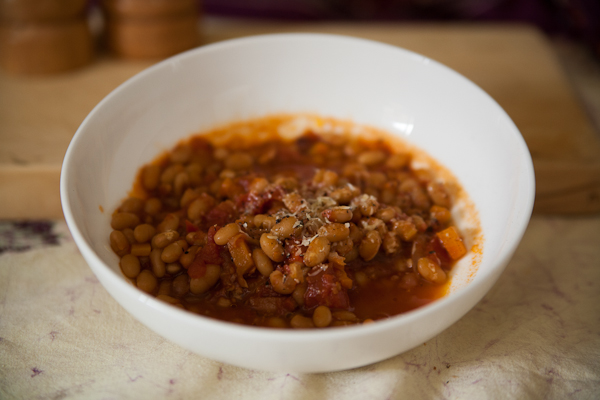
I ate mine with a drizzle of good olive oil, grated parmesan and black pepper – delicious. The plan is to freeze portions for work lunches – but we will see how much is left over as I just went back for seconds…
We had a great lamb pizza recently and I was inspired to try making a version at home. It came out pretty well – definitely one I’ll make again! There’s a lot of scope to use different ingredients on this pizza, I think spinach or avocado would both work well. Lamb has quite a strong flavour, so it works well with other assertive ingredients. Yoghurt is a classic pairing adding some contrast to the roast capsicum too, but it is optional if you aren’t such a fan.
Ingredients were sourced from a local farmers market, with the lamb produced by Wattle Wood Springs.
*These quantities are enough to top 2 x 12″/30cm pizzas
Prepare the dough in advance according to your chosen recipe. Preheat a pizza stone if using.
Mix half the garlic with the yoghurt. Mix well and set aside until needed.
Lightly toast the cumin seeds in a small pan. This is easy to overdo, so remove from the heat as soon as they start to smell toasty. When toasted, whiz in a spice blender. As an alternative, just use cumin powder.
Make a marinade for the lamb using 1/2 the garlic, a pinch of salt, the cumin and the lemon juice. Marinate the lamb for at least an hour.
To roast a pepper/capsicum, place under the grill/broiler until the skin blackens, turning until cooked all around. Allow to cool and peel off the skin. As an alternative, you can purchase pre-roasted. Cut into strips.
Remove the lamb from its marinade and cut into strips, as thin as possible.
Shape the pizza dough. Hit it with a splash of sauce, then scatter over a little paprika. Sprinkle over 1/4 of the Mozzarella.
Arrange the onion and red pepper, then the lamb and finish with another 1/4 of the Mozz.
Cook on a preheated pizza stone or tray, in as hot as oven as possible for around 5-6 minutes or until browned and delish!
Before serving, drizzle with the garlic yoghurt to taste.
In December, my family was invited to an Italian wedding anniversary party – a great night, with course after course of wonderful food and a round of coffee to finish the night off. But this coffee wasn’t like anything I had tried before – it was served as shots in double walled glasses, black and syrupy with a brown foam on top, and tasted just like drinking a liquid coffee bean. I knew then I had to learn to make the same thing at home. I knew I needed an espresso machine, so I gave the wife fair warning to expect new gadgets, and started shopping.
After a bit of research, I discovered the Mypressi Twist. This is a handheld device for making true espresso coffee. It uses small gas cartridges (used for soda water and whipped cream and available anywhere) to force hot water through ground coffee at high pressure. The resulting ‘shots’ of espreso can be drunk as-is, or added to hot water and/or milk to produce any kind of coffee.
The Mypressi Twist
It is straight forward to use. You twist the water chamber off the handle, and pour in some boiling water to preheat the device (this is important as the temperature of the water used makes a big change to the flavour of the coffee). You take some ground coffee and tamp it down in the basket. Then empty the water chamber, drop the basket into the handle, screw the chamber on top and pour in some more boiling water. Fasten the lid, hold down the trigger, and in 20-30 seconds you have your coffee!
So how does it perform? I’d have to say it is pretty good. Milk based drinks are always delicious, and my wife can’t go without her morning (and afternoon) cappucino now or else I’ll hear about it. I have been drinking a couple of espressos per day and they are mostly very good. A slight drawback is that it is a little harder to get temperature consistency between shots unless you very carefully time how long you preheat etc. Some of my shots are certainly better than others and I think temperature plays a part. It seems like the hotter the better for espresso, and sometimes I will do the preheat-with-boiling-water step twice, boiling the kettle fresh each time I refill it.
You’ll need some way of frothing milk if you want cappucino style drinks, but there’s a couple of good ways of doing it. A lot of people use a small coffee plunger/french press, plunging the plunger up and down until the milk froths up. I usually use one of the small battery powered frothing wands, which works well too. Neithermethod is as good as steamed milk from a bigger machine with a boiler though.
The Mypressi - coffee basket, water reservoir and handle
Included in the box are standard, pod and pressurised baskets and an attachment with 2 spouts. The water reservoir holds enough to make 2 single shots, and the double spouts pour quite evenly into 2 cups at once. The pressurised basket is for preground coffee or coffee that isn’t ground properly fine enough for espresso – if this is the case, water flows through the standard basket too fast no matter how hard you tamp. Real coffee snobs seem to frown on the pressurised basket but it works well enough for me – my grinder doesn’t quite grind fine enough to use the standard basket. Note that you will need a decent burr grinder to get the best out of this or any espresso machine, and a decent powered model starts around the $300 mark. A cheaper alternative that seems to get good reviews is the Kyocera hand grinder – I’m thinking about getting one of these myself.
Conclusion
After using the MyPressi 3-4 times a day for a month now I strongly recommend it as a budget alternative to an espresso machine. It makes a great cup of coffee and the unit itself is well made and stylish, and very portable. I think I will still get a bigger machine one day so I can steam my milk, make espresso at a consistent temperature and make coffees more quickly for entertaining. But when I do, the twist will become a nice upgrade for my office plunger. Paired up with the Kyocera grinder I think this would make an amazing tool for camping or travel too.
Sources:
I’m in Australia and had to go to a local specialty coffee store, Simply Coffee to find one of these for $200, which was $50 less than the best price I could find on ebay.
In the US, try ebay and Amazon. They seem to go for USD$150 plus shipping on ebay, or you can find them here on Amazon for the same price but with an offer of free shipping.
Olive oil is an important part of Italian cooking, at least for some regions – that spicy, peppery taste gives an extra dimension to anything it touches. I’ve always wanted to make my own oil but my olive tree is still too small and experiments with wild roadside olives have produced mixed results. This year I got lucky though – my uncle has an untended olive grove on his property and invited the family to come pick some before the emus got them!
Picking olives by hand takes a while, but there is a trick to doing it efficiently. We spread large pieces of shade cloth and tarpaulins on the ground, and then attacked the trees with olive rakes – small handheld plastic rakes that slip easily over leaves and branches but catch the fruit. When each tree was bare, we carefully gathered up the shade cloth and tipped olives into waiting buckets. The olives go to a local plant for pressing. Olives can yield around 10-15% of their weight in oil; I’d be very happy if my share is 20 litres.
Using an olive rakeCollecting the olives
My uncle also has a stand of plump Kalamata olives, so I picked some for curing. Preserving olives isn’t too hard but there a lot of variations – some recipes use lye, some dry salt, some brine and some fresh water. I don’t love the idea of using lye (sodium hydroxide) and in the past my fresh water cured olives have tended to go off more easily, so this year I tried wet and dry salt curing. If they taste as good as I hope these will end up on pizza in tapenade, salads and foccacia among many other uses!
Kalamata olives for curing
Brined olives
Rinse olives, discarding any soft or shrivelled ones. Fill a clean jar or crock pot with the olives.
Make up brine with 5% cooking salt by volume –half a cup of salt in 10 cups of water. Pour this brine over the olives until covered.
Olives need to stay completely submerged while curing so that mould doesn’t get a chance to grow above the level of brine. A helpful trick I picked up a while ago is to place a loose piece of cling wrap over the vessel, press it down to the surface, then pour a little more brine on top.
Change this brine every day or two, until the olives are no longer bitter – this might take a few weeks. Taste regularly after the first week so you know when they are done.
Finishing brine
Once the initial curing is complete, the olives are marinated in a finishing brine mixture. This mixture helps preserve the olives and can also add other ingredients for flavour. I use one third of a cup of salt to 5 cups of water and 2 cups of red wine vinegar. Other common ingredients are bay leaves, rosemary, garlic, oregano, chilli or basil – add any of these to your own taste. Fill clean jards with the olives, top up with finishing brine and then add a layer of olive oil which will float on top of the jar and prevent air contact. Olives preserved in this way should last for up to a year in the fridge, but will likely be eaten long before that!
Dry cured olives
Half fill a large jar or crock pot with olives. Pour over coarse sea salt until the olives are covered.
Every day, carefully tip out any liquid that has collected in the bottom of the vessel. Taste the olives every week or so until they no longer taste bitter, then preserve with finishing brine as above.
Making your own Mozzarella might seem like overkill, but it is surprisingly easy to do with great results! You will need a few tools and ingredients but nothing too complicated, and the smooth, creamy taste and texture of fresh homemade Mozzarella on your pizzas will have you hooked – I recommend making a double or triple batch and freezing some for later.
Note: The first step of making mozzarella is to acidify the milk. This method uses food acid to speed up the process, but if you prefer you can use a little yoghurt instead of the food acid. If using yoghurt, you would add it to the milk and allow it to sit overnight until fermented.
Tools and Ingredients
pH tester
I’m using a digital pH meter but if you don’t want to spring for a meter, pH strips will do the job just fine, but get some like these – they are more accurate than the type with just one or two colour squares. To be honest, you can probably skip the pH testing completely if you aren’t scientifically minded or don’t mind taking a chance. I don’t like my cheese to be more acidic than necessary as I feel that it affects the taste, so I do check the pH of the milk while adding acid and stop as soon as I’ve reached my target.
Tartaric Acid
In the past, I have followed recipes that called for citric acid. I have decided to use tartaric acid as I found that the citric acid left a slightly more pronounced bitterness in the finished cheese. You can substitute the tartaric for citric acid if necessary or preferred though.
Rennet
Being a little squeamish, I use this non-animal rennet and have not had any problems with it. If you prefer, traditional rennet is just fine too.
Milk
It’s important to use non homogenised milk to make mozzarella – homogenised milk does not work well if at all. Interestingly though, it is possible to use milk powder. I’ve done it, and while the cheese wasn’t as good as with fresh milk, it was better than not having any Mozzarella at all. Source your milk from a local dairy if possible, the taste of the finished cheese will reflect the quality of the milk you use.
Thermometer
You will need an accurate probe thermometer. I use an analogue one out of habit but I also have a digital version that is more accurate.
Mozzarella Recipe
Makes around 400g/1lb
Milk
4 litres
4 pints
Tartaric Acid
7g
1 level tsp
Rennet
Per instructions
Salt
6g
1 tsp
Pour the milk into a large saucepan or stock pot. Dissolve the tartaric acid in half a cup of water, then add to the milk. If using a pH tester, make up more acid solution than needed and add a tablespoon at a time while stirring well, until the milk reaches pH 5.6.
Checking pH with a meter
Heat the milk to 32C/90F. I find the best way to do this is to put it over the lowest heat possible while stirring, and monitor the temperature. If it isn’t warm enough after 10 minutes or so, increase the heat slightly and continue to monitor. Once at 32C/90F, turn off the heat.
Check the instructions for your chosen rennet and add the appropriate amount. With the one I used, I added 5 drops per litre of milk to a tablespoon of water, which was then stirred into the milk.
Cover the pan and leave to sit for several hours. You are looking for the milk to set to the point that the curd breaks cleanly when pressed or cut.
Clean break, the curd is ready to cut
Cut the curd into cubes about 1cm (½ inch) apart.
Cutting the curd
Return the pan to the heat, and slowly increase the heat to 105C. Leave at this temperature for half an hour, stirring occasionally.
Line a colander or large sieve with cheesecloth. My guilty secret is that I never have cheesecloth handy in my kitchen – I use a clean tea towel. Don’t tell my missus! Pour the curds and whey into your lined sieve, and allow the whey to drain out for 10 minutes. Turning over the curds halfway through lets a little more whey drain out, but there’s no need to squeeze or press them. TIP: save the whey and you can make ricotta later!
Straining the curd
Tip your strained curds into a mixing bowl, and add the salt. Work it through, breaking up the curd as you mix.
At this point you will have salted curd, ready to be stretched!
Stretching Mozzarella
Before it can be stretched, the curd needs to be melted. I have seen two different methods of doing this. One is to take one cup of curd at a time and microwave it for 45 seconds. The other is to tip the curd into a large bowl of hot water. Both have the potential to cause owies, but I think the hot water method is safer as the microwave can sometimes heat things more quickly and hotter than you might realise, which makes the curd dangerous to handle.
For the hot water method, boil a pan full of water, remove from the heat, and let it cool slightly. 70C/160F is enough to melt curd for stretching, but if it is a little hotter you won’t have to work so fast before it cools too much. Tip the curd into the hot water. Use tongs or a slotted spoon to pull out some curd ready to shape. It will be hot, so keep a bowl or sink full of cool water handy to dip your fingers into. If it’s too hot to handle, wear rubber gloves.
Stretch the curd out and fold it over itself a few times. You will see it start to look shiny as you work it.
Stretching the curd
Shape it into a ball by making a ring with your thumb and forefinger and holding the piece in between. Continuously tuck the curd up inside itself until you have a neat ball, Squeeze your thumb and forefinger together to seal the end. You can shape either big or small balls as desired. When shaped, drop each ball into a bowl of cold salt water – I use 1 tbsp per litre of water.
Shaping the balls
Finished! You can store your mozzarella balls in the salt water, or remove them when cool and store in a bowl or bag. For pizza use it’s probably more sensible to store dry, to avoid soggy bases. Fresh mozzarella should keep for a few days in the fridge, or longer frozen.
To Make Ricotta
Boil the strained whey vigorously for a few minutes. Pour into a cheesecloth lined sieve. Tie the ends of the cloth with string and hang from something overnight.


")

")
")
")
")
-4")
-3")
-2")
-5")