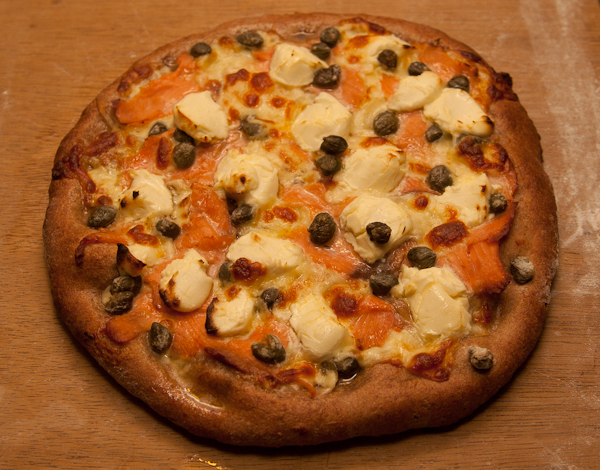
Rye bread is one of my favourite things to eat so recently I have been learning more about making my own. Rye is a bit tricky to handle compared to wheat flour because of its natural stickiness and lack of gluten but once you get the hang of it the reward is a spicy more-ish flavour with a moist dense crumb. Of course I can’t experiment with an ingredient without seeing if it can make a pizza and rye pizza dough seemed like something I had to try. Here it is, ready to eat! This was a good pizza, my favourite of the night.
Rye pizza dough ingredients – makes two small-medium pizza bases
300g Rye flour (around 2 cups but weigh it if possible). I used whole rye flour which is also called dark rye flour. Light rye is the equivalent of ‘white’ flour made from rye, with bran sifted out. Either should work but the amount of water needed might be different for light rye.
6g salt (1 teaspoon)
3g Instant dry yeast (1 teaspoon)
220ml water ( a bit more than 4/5 cup)
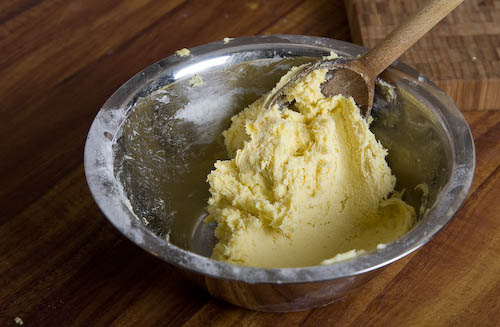
Stir the dry ingredients together in a mixing bowl, then add most of the water and stir well. Continue to add water until a workable dough is formed – it will be more like a putty than wheat based doughs. I use around 70% hydration for whole rye doughs, it would be interesting to try a wetter dough but frankly this dough is already hard to handle!
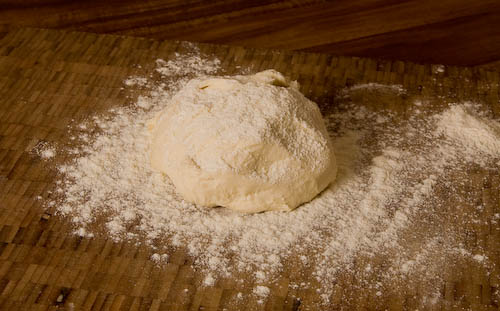
Cover the bowl and set aside for 10 minutes before kneading. Rye is challenging to work with and will stick like glue to your hands. There’s not that much you can do about it (wear gloves? Use an electric mixer?). Knead for a few minutes, then divide into 2 balls and set aside, covered, to rise for at least 2 hours. As always the dough will be better if it is left in the fridge overnight and removed a few hours before use.
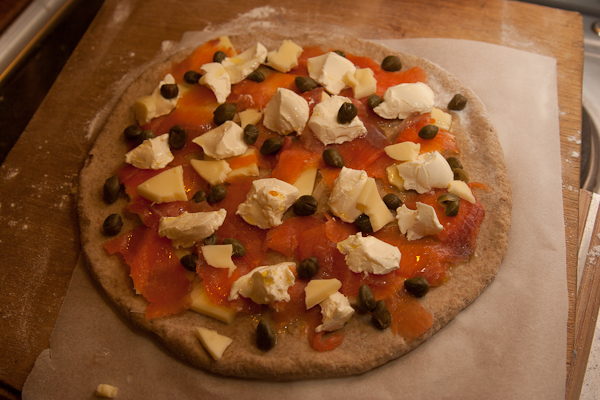
Because this dough is so sticky, I recommend assembling the pizza on a sheet of baking paper. You can shape the base, top it, and slide it paper and all onto a preheated pizza stone. Remove the paper after a few minutes of cooking. When shaping the base I aimed for a thickness of about 3mm (3/32 in). It is a bit harder to pick up and stretch a rye dough because it doesn’t have as much gluten as wheat so handle it gently.
Smoked Salmon & Caper topping
Rye can handle bold flavour matchups. I was thinking of a smoky bacon/mettwurst/tomato combo but settled on smoked salmon, capers and cream cheese which is a pretty classic combo with rye bread. I didn’t think it would need any tomato sauce. Cream cheese is great on pizza, just use teaspoon sized blobs and they’ll crisp up on the outside and be light but gooey inside. I laid a few slices of mozzarella underneath to help it all stick and finished with a drizzle of olive oil.
Assembled on baking paper, ready to bake
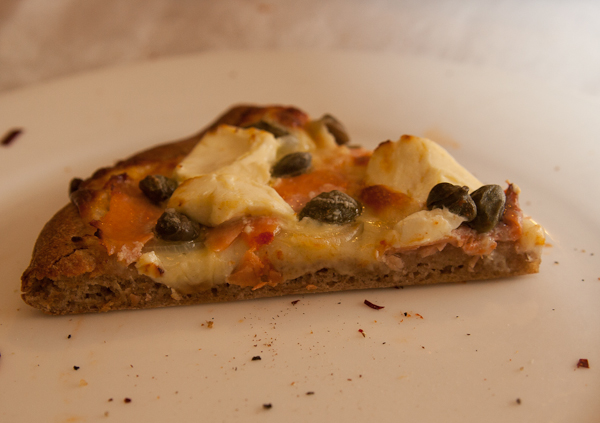
As can be seen from this last sorry slice the base is not as dense as might be expected.
Conclusions – I’ll be making this again but be warned that it’s a very different thing than wheat based pizza. The rye is fairly dense and not as chewy – I think of it as more of a topped flatbread than a pizza although of course those things are pretty similar. If you give it a go, let me know what you think!
Almost all bread, pizza or other baked goods that are meant to be light and fluffy use yeast to raise or ‘leaven’ the bread. The easiest way to do this is to use a commercially packaged yeast but if you have the time there’s another method that offers even more complexity in flavour and texture – sourdough. Sourdough is dough that has been leavened using a portion of a sourdough ‘starter’ instead of a commercial yeast. The starter is just a dough of flour and water that has been allowed to start fermenting so that natural yeasts and other organisms multiply. The starter is ‘fed’ regularly with more flour and water.
Sourdough is very different to normal yeasted doughs in flavour and texture. Lactic acid bacteria produce a sharp tangy flavour, lending sourdough its name (although you can have more or less sourness depending on the balance of bacteria and yeasts in the starter). The consistency of sourdough may also be different, with some sourdough loaves having large irregular bubbles and a chewier consistency – although again this may vary based on the makeup of each starter. Sourdough also has health benefits – more claimed than I’m able to find hard evidence for but some very real. For example sourdough bread has a much lower glycaemic index (GI) value than regular yeasted white bread or even yeasted wholemeal bread! There is some research that shows sourdough breads have reduced levels of the gluten proteins that can’t be tolerated by celiacs. Sourdough also has less yeast than normal bread, important for people who are yeast-intolerant (although it does still have some yeast in the same family as the commercial varieties). Sourdough increases the bodies ability to absorb minerals in the grain by reducing phytate. So there are lots of good reasons to try making your own sourdough before you even consider that it is delicious.
How to make a sourdough starter
There’s lots of different ways of making a starter but the most basic method uses just flour and water. Organic flour is good, but plain unbleached flour works too. The water should be spring, rain or filtered water – most tap water contains chlorine, which will inhibit the microorganisms that want to flourish in the starter. Here’s how to do it:
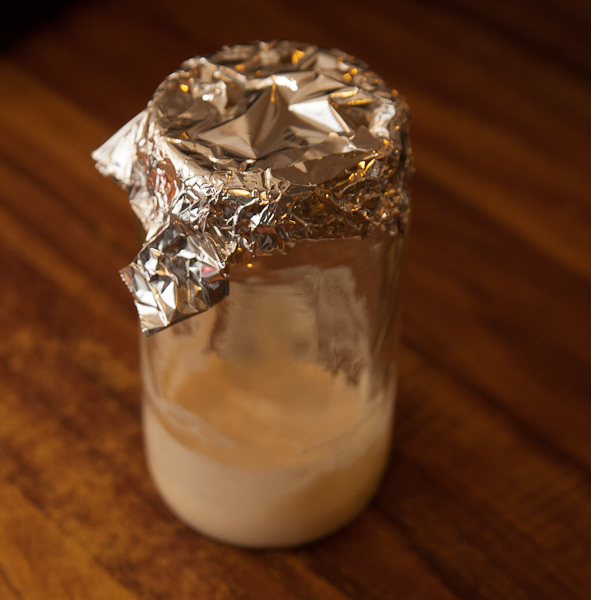
Clean a glass jar very well. Putting it through the dishwasher is a great way to kill any nasty bugs that are lurking.
Mix about 1/2 cup flour and 1/3 cup water water together in the jar. Cover with a piece of cloth or tin foil (not cling wrap, it needs to breathe) and leave in a warmish spot.
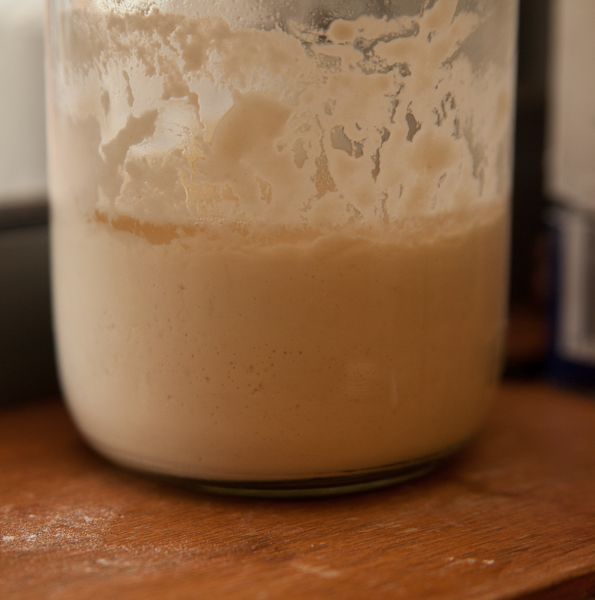
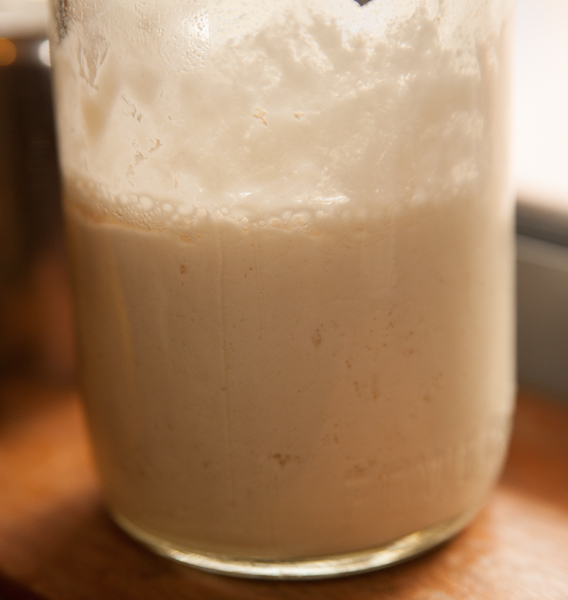
Each day for the next few days, mix in the same amount of flour and water again. If you have the chance, stir well a few times each day. After a few days, you should start to notice bubbles forming in the dough.
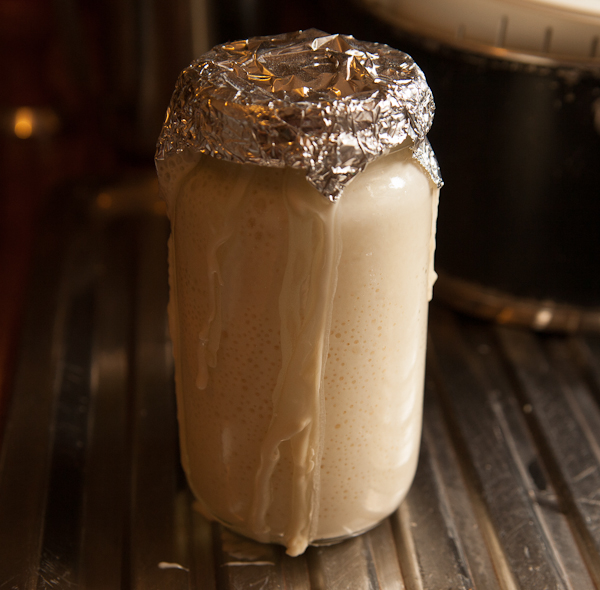
Once you have seen these bubbles form, it’s time to change the feeding schedule. Each day for the next few days, first remove half the starter – just tip it down the sink. Then replace with the same amount of flour and water. The goal is to feed the starter with fresh flour without increasing the volume so much that you run out of space in the jar. Eventually the mix will up to double in size in the jar after a feeding, so leave plenty of room.
After 7-10 days, the starter should be healthy and ready to use. It will have an interesting smell, and may have a sharp taste.
To make a dough, I just take a portion of the starter and mix it with the other ingredients. I replace the amount I took out of the starter with more flour and water. If making a lot of dough I will feed up the starter more than usual so there’s enough starter to go around. As a rule of thumb, 1/3 – 1/2 a cup of starter is about enough to make a loaf of bread. Any ‘normal’ recipe for bread, pizza dough, whatever, can be made by replacing yeast in the recipe with some sourdough starter, although it will generally be much slower to rise.
Day 0 – nuthin to see hereDay 2 – a little actionDay 3 – starting to see more bubbles. Yeasty smell.Day 5 – liftoff! That hasn’t happened before. Lots of bubbles, strong yeasty smell, tangy taste. You could start using it from here but the flavour will continue to develop over the weeks to come.
Storing the starter
If left at room temperature, a mature starter should be fed every 1-2 days. For bakers who don’t bake every day and don’t want to waste a lot of flour and water maintaining a starter it can be stored in the fridge for up to a week between feeds. If kept in the fridge it should be removed 24 hours before dough is to be made and given a feeding so that it is active.
What can go wrong
A sourdough starter is a living thing like any other pet. Some bakers have names or special pots or jars for their starter and even take it for walks! Like any living thing a starter can get sick. Here’s how to handle a few problems that might crop up without awkward phone calls to the vet.
Young starters
Depending on the type of yeast and bacteria in the kitchen, a starter might get an imbalance of the bad kind early on. If this happens you may observe the bubbles start, then slow down again. It will come good in time but Peter Rinehart suggests that you may have more luck starting again but using pineapple juice in place of water for the first 2-3 days – the extra acidity will create a less friendly environment for bad bacteria.
Old starters
If forgotten and left too long without food (how could you?), a starter can develop nasty off flavours like a strong funky cheese or even get a ring of mold in its jar. If this happens take a teaspoon of the starter, avoiding any moldy bits. Put it in a clean jar and restart the feeding process from the beginning, adding flour and water until bubbles appear. There should still be enough good yeast and bacteria from the old starter to get things moving quickly again.
Slow starters
If a starter seems very slow to work in a dough, it might be too acidic. Try feeding with more flour and water than usual or discarding more of the starter than usual before feeding. Feed twice in this way before using again. Make sure the water used is free of chlorine. Keeping the dough in a warm place to rise will also help.
Brown liquid on top
Just pour it off.
Cheating
Sometimes my sourdough loaves just don’t rise right. This is part of the fun and with experience you can work around the quirks of your own starter. But if I really want to bake that day I sometimes give in and add some instant dry yeast to the dough to give it an extra kick. It should be dissolved in 1 tbsp water, then kneaded well into the sourdough which should now raise more quickly.
Buying a sourdough starter
If making a starter from scratch isn’t for you, or you just can’t get it to work, plenty of stores sell a packaged version of the same yeasts and bacteria which you can use to reliably get a starter going. This one is 6 bucks on Amazon.
I couldn’t wait to try my new starter any longer so I whipped up a loaf. One of my next posts will be about my basic process to make sourdough bread and pizza crusts.
This is a new version of a gluten free pizza base that I have been working on and I think it’s finally ready to share! I’m quite excited about this base – you would be hard pressed to pick it as gluten free and it tastes delicious. The key is to give the shaped base time to rise before topping and baking.
Full credit to the talented Dan Lepard who wrote a recipe for gluten free bread using psyllium husks. I had never used these before and they work amazingly well in gluten free doughs, helping the dough to rise naturally and giving a nice chew to the cooked base. I use both yeast and baking powder in this recipe to get as much lightness in the dough as possible without overloading on the taste of either ingredient. Another interesting addition can be to add some herbs and spices to the dough as in this gluten free pizza recipe. Maybe not for the purists but worth considering.
I have included links to some of the more unusual ingredients on Amazon, but you should be able to find them in your local health food store.
Add the oil, vinegar and water and stir well for about 30 seconds. The dough should be a stiff, sticky paste.
Lay out 2 squares of oiled baking paper. Oil your hands to prevent sticking, and separate the dough into equal sized lumps.
Following the shaping technique from my previous gluten free dough recipe, press the dough into a disc shape. Drizzle with as much olive oil as needed to make the dough workable. Aim for a base about 4mm thick with a slightly raised edge.
Lay a piece of plastic wrap or baking paper over each base to stop it drying out and leave to rise for about 1 hour. You should also start preheating your pizza stone at this point.
Once the bases have risen for an hour and the oven is properly hot, add cheese, sauce and ingredients according to your recipe and slide the pizza along with its sheet of baking paper into the oven. Cook until the crust is starting to brown, rotating in the oven halfway through cooking if necessary. You can also finish it off under the grill for a minute to really get the top browned well.
NOTES: If you don’t have all of these ingredients, you could substitute the rice flour, corn flour & tapioca for a commercial gluten free flour mix. The soy flour could be replaced by millet flour, fine polenta or maize flour as it is used to add flavour and colour. If reducing the sugar at all, add a pinch more baking powder as the sugar helps the yeast leaven the bread. Salt can be reduced or eliminated completely; it is mostly for flavour.
Having a few friends and family members on gluten free diets, a good gluten free pizza recipe has been a bit of a holy grail for me over the last few years. This recipe is the closest that I have come – and it is quite delicious!
Recipe
150g White rice flour
80g Tapioca starch
30g Fine polenta
6g Guar or xanthan gum
6g Sea salt
10g Sugar
10g Baking powder
25ml Olive oil
1 Egg (this can be omitted to make a vegan base, add a little more water instead)
Method
In a large mixing bowl, stir all of the dry ingredients together.
Add the oil, egg and water and stir until the mixture is smooth. The consistency should be a thick, sticky paste.
Gluten free pizza dough
Shaping the bases
Place 2 squares of baking paper on a bench or peel and give them a light coat of oil.
Before handling the mixture drizzle some olive oil into the bowl, and rub a little into your hands. This makes the bases much easier to shape and handle.
Separate the mixture into 2 equal size lumps and place one on each square of paper. Drizzle a little more oil over the lump of dough.
Using the palms of your hands, start to press the dough into a pizza shape. Try to get an even thickness of about 4 millimeters.
Smooth any cracks around the edge and create a slightly raised rim.
The base is now ready for your toppings! Once topped, use a peel to lift the pizza and greaseproof paper and slide onto a preheated pizza stone to bake.
See the article on toppings to see how this pizza looked fresh out of the oven!
Sometimes the need for a pizza just comes out of nowhere and you need to whip up a dough at short notice. All is not lost, the dough will not have such a complex flavour as one that has rested overnight, but you can still make a perfectly serviceable dough and go from mixing it to baking it in an hour.
Ingredients (makes 2 pizzas)
300gm White flour (1.5 cups)
200ml Water (4/5 of a cup)
6g Sea salt (1 heaped tsp)
8g Instant dried yeast (2 heaped tsp)
8g Sugar (2 tsp)
15ml Olive oil (1 tbsp)
Method
In a large mixing bowl, stir all of the dry ingredients together.
Add the water and stir briefly.
Add the oil and continue to stir until the ingredients are well mixed.
Cover the bowl and allow to rest for 10 minutes
Turn out the dough onto a floured work surface. Knead the dough for around 5 minutes. As you knead, you will notice the dough losing its stickiness and becoming smooth and supple.
Separate the dough into two equal parts and shape into dough balls. Sprinkle with flour and cover with plastic wrap. Leave in a warm place to rise for one hour.
NOTE: Because the dough has not had much time to relax since being kneaded, these bases might spring back a bit when being shaped. If this happens, shape the base half way, then let it rest for 5 minutes before finishing.
It’s always a good idea to use the best ingredients you can get your hands on, but for pizza dough, the most important ingredient is free – time! When dough is left to rest or ‘age’ for long enough the difference in flavour compared to a standard dough is incredible. The cooked base has a sweet, nutty/buttery flavour, so good that you’d be happy to eat it with no toppings at all. In this recipe, we start by making a simple dough and then leaving it to rest in the fridge overnight or up to a few days. It sounds a little complicated but the besides the great taste, the benefit is having dough ready to go at a moments notice – you can just pull your premade dough out of the fridge and start making pizza!
For those interested in the science, the flavour develops in this way because enzymes in the flour start to break down the starch molecules, converting them to complex sugars. These sugars give the dough a natural sweetness and help the crust caramelise to a golden brown when cooked. Incidentally, this is why there is no sugar in this dough – when other recipes call for added sugar they are looking for the effect that we get by just leaving the dough be. The dough is kept in the fridge because the low temperatures slow down the activity of the yeast, preventing the dough from raising so much that it collapses. The low temperatures also keep the yeast from consuming all of the sugars in the dough! It is a complex topic – if you would like to read more about this, author and baker Peter Reinhart has a lot of excellent, detailed information in his book The Bread Baker’s Apprentice. Peter also has a great blog about his books for those interested in bread and other baking.
There is one other benefit from the overnight rest, which is less need to knead. In a standard recipe the dough must be kneaded for up to 10 minutes to develop the gluten, which gives the dough strength and allows it to be shaped without tearing. But when dough is left to rest for longer, the gluten starts to develop on its own and just a short period of kneading is enough to shape a useable dough. The reduced handling improves flavour and colour by reducing oxidation (caused by increased exposure to air ).
HOWEVER – you don’t have to know any of this to make the dough, so let’s jump in and get started!
This recipe makes enough dough for 2 medium-thin crust pizzas. You can scale up the quantities to make as many or few as you like. It’s important to use good quality flour, but you can experiment with different brands to find one that works for you. Look for an unbleached flour with around 11% protein and you can’t go wrong, although you may have to use a tiny bit more or less water as every flour absorbs water a little differently. If you can find a good one, the traditional flour used in Italian pizza is ’00’ grade flour. 00 flour is a little finer than normal flour, and the texture and flavour is wonderful.
It’s important to weigh the ingredients when making dough, and weights are given here in grams. Kitchen scales that measure grams are ok for the yeast and salt if you don’t mind guesstimating a bit, but scales that measure fractions of a gram are a nice luxury as well. However, I have given approximate measurements in volume for those who don’t have scales.
Ingredients
300gm White flour (2 1/4 cups)
200ml Water (4/5 of a cup)
6g Sea salt (1 heaped tsp)
3 g Instant dried yeast (1 slightly heaped tsp)
15ml Olive oil (1 tbsp)*
*The olive oil is not truly traditional but it is added here to make the base more tender. If making this dough for a wood fired oven, you can omit the oil as the faster cooking time in a WFO gives a tender base without it.
Method
Mix the flour, yeast and salt together in a large mixing bowl.
Add 3/4 of the water and stir with a spoon. Slowly add as much of the rest of the water is needed for the mixture to form a rough lump. If there are stray crumbs of flour left in the bottom of the bowl, add a little more water half a tablespoon at a time and continue mixing.
Pour the olive oil over the dough.
Cover the bowl with a clean tea towel and leave to stand for 10 minutes.
Sprinkle some flour on a large board or clean bench top, and turn out the dough. Sprinkle a little flour over the top, just enough to make it easy to handle without sticking to your hands.
Knead the dough for 8-10 strokes, just until the olive oil is mixed in and the dough feels silky and smooth.
Put the dough back in your mixing bowl, cover, and leave to rest for another 10 minutes.
The dough is now ready to divide into pieces. This recipe makes 2 x 250g pizza bases, so use your scales to make 2 even lumps.
Shape each piece into a dough ball, roll each ball in flour to coat well, and put them in the fridge overnight or for at least 6-8 hours. You can put them in a baking tray or plate covered loosely with glad wrap, or a large sealable plastic container. Make sure you leave room for the balls to expand – they may grow up to double in size while in the fridge.
Remove the dough balls from the fridge about 1 hour before you want to start cooking, around the same time you start preheating your pizza stone in the oven. Once the oven is ready, shape your base, add toppings of your choice, and use your peel to slide the pizza into the oven! A thin crust pizza cooked in a properly preheated oven should be browned and bubbling in 5-7 minutes.