Kneading is the process of working dough to help proteins join together and form gluten, which gives dough its strength and elasticity. The most common method of kneading is to press the dough flat, fold it over itself, squash flat again, and repeat.
Method
Prepare your pizza dough according to the recipe you are using.
When the recipe calls for kneading, proceed as follows steps. If the dough becomes too sticky to handle at any point, sprinkle a little flour as needed.
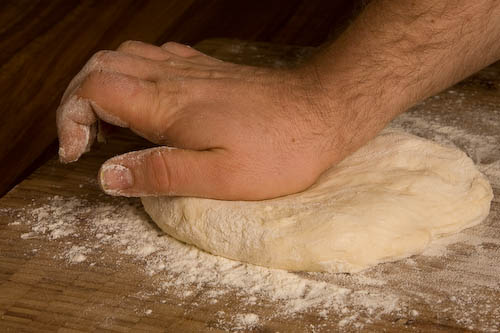
Press the dough into a flattish lump, pushing forwards with the heel of your hand so that the dough is longer than it is wide.
Pick up one of the long ends, and fold the dough back over itself.
Rotate the folded dough a quarter turn.
The dough is now ready to press flat with the heel of your palm again. Repeat these steps as many times as called for in the recipe.
Shaping your pizza dough into balls before use is an important step. If shaped correctly the balls will tend to expand evenly as they rise, rather than slumping into puddles and sticking together in your tray. They will also be easier to stretch into a nice round pizza base. There are several good methods of making a dough ball but the key principle is to stretch the ‘skin’ of the dough around the ball to create surface tension. This surface tension is what helps the dough ball to hold its shape. This method works well but you can use any method which creates a tight ball.
Method
Once you have finished preparing your dough according to your pizza dough recipe of choice, take a lump of dough weighed out to make one base.
Sprinkle a little flour on the dough and your working surface to prevent sticking if necessary. Don’t overdo the flour at this point though, as you want the dough to stick to itself as you form the ball.
Flatten the dough with the palm of your hand.
Fold the dough in half.
Fold the dough again, so that it is now folded into quarters.
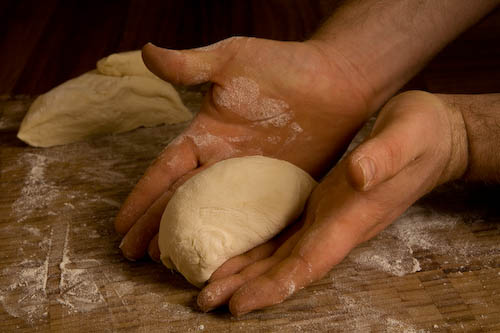
Turn the dough so that the folds are underneath, and you have a flat surface on top. Make a ‘karate chop’ shape with each hand, and press the bottom of each hand against the top of the dough, on the left and right sides.
Applying pressure, squeeze the top of the dough over itself with the sides and bottoms of your hands and pinch together underneath.
Keeping the bottom of the dough ball squeezed together, move one hand forwards and the other backwards. The dough ball should rotate in your hands while it squeezes together underneath.
If necessary, you can pinch together the bottom a little to neaten up, or repeat the previous step. You should end up with a nice round dough ball! Dust the dough ball well with flour and set aside while you roll up the rest of your batch of dough.
It’s sometimes easy to get carried away and cover your pizza with every topping you like. And fair enough, everyone has a good memory of the supreme from their favourite takeaway.
The problem with using a lot of toppings on a thin style base is that the base doesn’t support a lot of weight. It can also get soggy if overloaded. Using just a few toppings lets you play off different flavours against each other – you can really come up with some unique combos of just a few good ingredients.
A good rule of thumb is to use no more than 3 separate toppings, as well as cheese and/or sauce. Try to think of interesting flavours that will work well together. A good way to come up with a new idea for a pizza is to use some of the key ingredients in a favourite non pizza dish!
Whatever toppings you decide on, make sure not to lay them on too thickly. Aim for a single layer of all of the ingredients combined, on top of your cheese/sauce layer – this means that you might have to leave space between each ingredient.
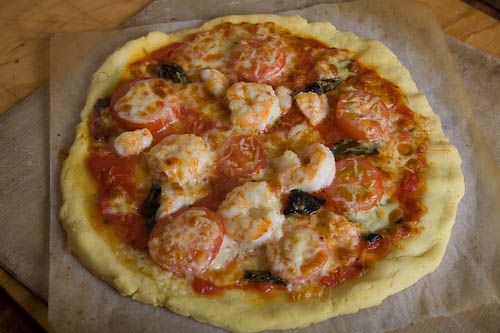
This is a quick series showing a the process of putting together a simple prawn, tomato and basil pizza made on a gluten free base. The prawns were marinated in olive oil with a clove of mashed garlic whisked in. Delicious vine ripened cherry tomatoes were used – good quality tomatoes make a big difference and are worth the extra cost.
A layer of sauce is spread over the base. Leave a rim around the edge for visual appeal and so you have a good place to hold the slices. When applying sauce, try to leave a few spaces with less or no sauce, so that the base doesn’t get too soggy when it cooks.
Scatter a sparse layer of mozzarella over the sauce. The purpose of this layer is really just to help hold the toppings to the base. Using grated cheese is also perfectly fine but I like using slices torn into pieces to vary the appearance and texture a little.
If you are using fresh herbs, it is best to put them underneath the other ingredients to stop them overcooking and drying out. Here, a handful of torn basil leaves are pressed into the dough.
Finally, an even layer of the prawns and sliced tomato are added, and a garnish of some extra whole prawns followed by another sprinkle of chunks of mozzarella and a little fresh grated parmesan.
And here’s how it looked straight out of the oven. The tangy garlic and prawns were wonderful together with the acidic sweetness of the tomatoes. A winning combo!
Wood fired ovens have some characteristics that really influence the pizzas that they produce. Most importantly they are extremely hot – often 400 degrees Celsius / 750F or more. This very hot environment cooks the pizza extremely quickly. The quick cooking time means that a lot of moisture remains in the dough after it is cooked which produces a lovely moist, chewy crust with a crisp outside. In contrast a thinnish crust pizza cooked on a tray in a home oven with a standard method might take 20 minutes or more to cook through, by which time the crust will be as dry as a cracker.
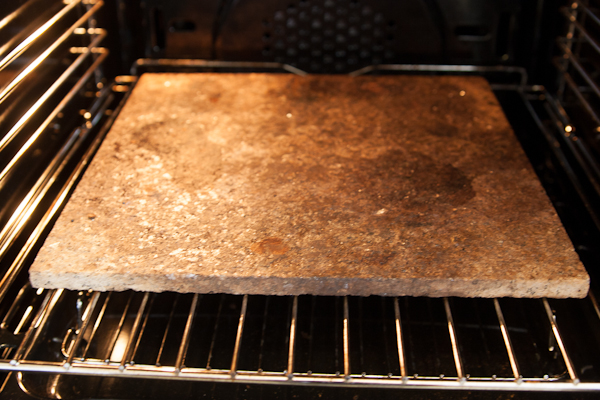
A genuine wood fired brick oven is not something everyone has room for, but a home oven can be greatly improved for pizza cooking by using a a ceramic or terracotta pizza stone. Pizza stones can be found at most good kitchenware or department stores fairly cheaply, and they are probably the most essential tool for making great pizza at home. If you don’t have a pizza stone and can’t get one easily, a common alternative is to use unglazed quarry tiles. I’ve had success using sandstone and granite tiles too, any untreated stone tile should work. Failing this you can preheat a heavy baking dish in the oven and slide your pizza onto this instead.
This stone tile cost me a dollar from a local hardware store. It is much stronger than a ceramic pizza stone and works just as well.
To use a pizza stone, put the stone on a shelf in your oven, and then turn the oven to its highest setting for up to an hour before cooking pizza. It’s important to preheat the stone for a fair while, as it absorbs heat slowly. Experiment with different positions in your oven – I recently got a new oven but was disappointed with the results using a stone in the top shelf, which worked well in my last oven. Moving the stone down a shelf made a huge difference – every oven probably has a different hottest spot. If you are in a hurry and don’t have time to preheat a stone properly it is better not to use one at all, as pizza will take much longer to cook if the stone is absorbing all of the heat from the oven – try this method instead. Once the stone is really hot, slide your pizza directly onto the stone using a peel. The stone acts as a heat bank and radiates the heat that it has absorbed, cooking your pizza quickly.
Most thin crust pizzas cooked on a properly preheated stone should be ready in as little as 5-7 minutes.
TIP: In ovens that have a top element for grilling (broiling), switch over to the grill on medium heat after 5 or 6 minutes of cooking. This gives a beautiful burst of heat to the top of the pizza to crisp up your cheese. The bottom of the pizza will continue to cook from the heat of the stone. Just keep a close eye on it so the toppings don’t burn.
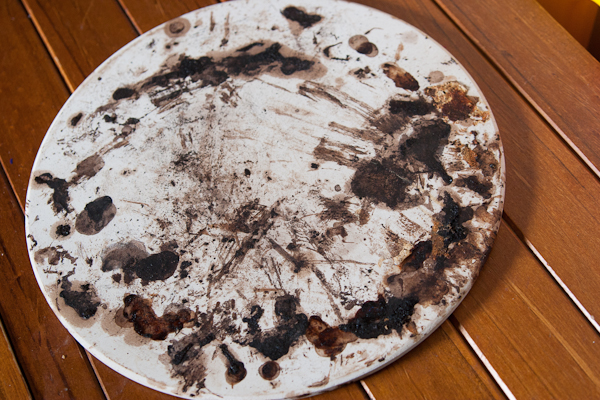
Your nice new pizza stone will end up looking like this very quickly.
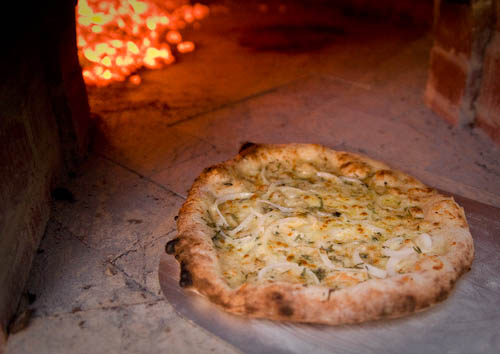
The strength of this pizza is it’s simplicity and the combination of a small amount of powerful ingredients. The subtle sweetness and texture of the onions is lovely against the bitey blue cheese and the rosemary.
Use your favourite blue cheese here but don’t be afraid to experiment. A nice gorgonzola would be wonderful.
This is a good introduction to the pizza bianca, or white pizza, for those who have always used tomato sauce before!
Ingredients
1 Small brown onion, sliced finely into rings
Mozzarella, finely sliced
Blue cheese
Pecorino (or Parmesan if preferred)
2-3 tsp of fresh Rosemary leaves, chopped but not too finely.
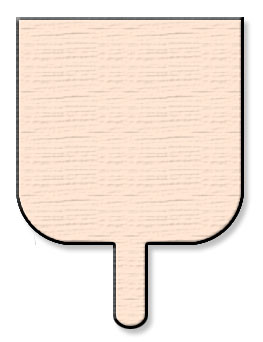
A peel is one of the most useful tools in the pizza-makers arsenal. Peels can be bought fairly cheaply online or at most good kitchenware suppliers.
You can also make your own peel easily using sheets of medium plywood. They might not look quite as nice, but they will work fine! I have a couple of homemade peels as well as a bought one, and the extras come in handy at pizza parties where lots of guests want to get their pizza ready at the same time.
You will need:
Medium thickness plywood – look for around 3-4mm thick (1/4″)
An electric jigsaw or hand coping saw.
Sandpaper
Method
1. Start by tracing out the design of the peel. The basic design is a square with a handle at the back. You can round the corners here and there for appearance. Here’s an example of the shape you are aiming for.
2. Make it a little wider than the size of the largest pizza you think you’ll make – eg a bit bigger than your pizza stone. Just make sure it will fit in your oven!
3. Once you have cut out the shape, use sandpaper to clean up any rough parts around the edges. You can also use sandpaper to create a slight slope on the front edge of the peel to help slip under your pizzas more easily.
4. Before using the peel, rub some cooking oil into the wood with a clean cloth and allow to stand to soak in.
A pizza peel is a kind of wood or metal paddle, used to slide a pizza into the oven, move and turn it while cooking, and take it out again when it’s done. Pizza peels allow you to make a pizza in advance, then slide it directly onto a pizza stone to cook, without damaging the base or disturbing the toppings. This is a critical skill to master for wood fired ovens, where pizzas are placed deep in a very hot oven. Peels are very useful for home pizza cooking as well, but a shorter handled peel like this one will do the job.
The best peel for home use is a wooden one. A wooden pizza peel will help slide you pizzas without sticking, as the wood absorbs some of the moisture from the base and stops it from sticking. The worst disaster is when your pizza sticks to the peel, changing its graceful slide into a messy cartwheel. This may well be how calzone was invented!
Before using a wood pizza peel, sprinkle some flour over it and then rub the flour into the wood. Over time, your peel becomes even more slippery as it builds up a coat of flour.
Once you have floured your peel, you simply place a prepared pizza base on it, add your toppings, and slide it into the oven!
TIPS:
It can be useful to keep several peels, so you can prepare a few pizzas at once and put each into the oven as soon as the last is cooked.
Instead of using wheat flour on your peel, try using white rice flour. This is less prone to absorb moisture and become sticky, and it is also less likely to burn on the pizza stone. I keep a small shaker of rice flour handy for this purpose.
If your pizza sticks to the peel, try quickly but carefully shaking the peel back and forth. If this doesn’t work, try lifting the spot where it is sticking and brushing some flour underneath.
If you don’t have a peel, you can use a flat cookie tray, turned upside down. If you do, don’t leave the pizza sitting on it for too long as it may stick! Or, try making your own.
Having a few friends and family members on gluten free diets, a good gluten free pizza recipe has been a bit of a holy grail for me over the last few years. This recipe is the closest that I have come – and it is quite delicious!
Recipe
150g White rice flour
80g Tapioca starch
30g Fine polenta
6g Guar or xanthan gum
6g Sea salt
10g Sugar
10g Baking powder
25ml Olive oil
1 Egg (this can be omitted to make a vegan base, add a little more water instead)
Method
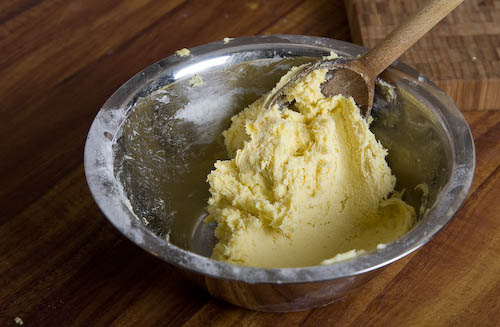
In a large mixing bowl, stir all of the dry ingredients together.
Add the oil, egg and water and stir until the mixture is smooth. The consistency should be a thick, sticky paste.
Gluten free pizza dough
Shaping the bases
Place 2 squares of baking paper on a bench or peel and give them a light coat of oil.
Before handling the mixture drizzle some olive oil into the bowl, and rub a little into your hands. This makes the bases much easier to shape and handle.
Separate the mixture into 2 equal size lumps and place one on each square of paper. Drizzle a little more oil over the lump of dough.
Using the palms of your hands, start to press the dough into a pizza shape. Try to get an even thickness of about 4 millimeters.
Smooth any cracks around the edge and create a slightly raised rim.
The base is now ready for your toppings! Once topped, use a peel to lift the pizza and greaseproof paper and slide onto a preheated pizza stone to bake.
See the article on toppings to see how this pizza looked fresh out of the oven!
Some people like a rich sauce with herbs and garlic, some like an ultra simple sauce with nothing but tomato – the DOC standard (which dictates how traditional Italian pizza is made) is to use nothing but crushed tinned San Marzano tomatoes. There’s a lot of opinions about what makes a good pizza sauce and of course no one recipe to rule them all – if it tastes good to you, then it’s ‘right’ (unless you simply must have a DOC pizza of course…). For me a fairly simple sauce with just a hint of extra herbs is best, a good burst of tomato acidity and sweetness that still lets the other ingredients shine through.
1 Tin of good tomatoes, preferably skinned whole tomatoes. San Marzano are traditional but there’s good and bad brands like everything else. A good tin of generic plum tomatoes is much nicer than a bad tin of San Marzanos. If you make pasta or pizza sauce regularly it is worth buying a few different brands that are easy to find in your area and comparing them to find the nicest.
1 generous pinch of dried oregano – the good stuff is sometimes sold as ‘Mediterranean oregano’, an olive/tan colour with a pungent aroma from the dried flowers.
1 generous pinch of salt
Tip all ingredients into a bowl and use a stick blender to briefly pulse and break up the whole tomatoes. Don’t overdo the blending – a little texture in the sauce is nice. If you don’t want to use a blender, use kitchen scissors to snip the whole tomatoes into pieces or just squish them with a spatula or even with bare hands. Good tinned tomatoes shouldn’t taste bitter but if yours do, add a little pinch of sugar to the sauce for balance. You might also find that the taste of some tinned tomatoes is a little dull or flat – in this case 1 tsp of lemon juice can give a lift.
This is a simple veggie pizza that packs a flavour punch. The earthy mushrooms work nicely with the sweet zucchini, and the smoky cheese is complemented by a little squeeze of fresh lemon.
Ingredients
Half a cup of your favourite mushrooms, roughly diced
Half a cup of zucchini (courgette), diced to the same size as the mushroom
1 Clove of finely chopped or mashed garlic
Olive oil
1 Good pinch fresh or dried Oregano
1 Tbsp Lemon juice
Smoked cheese
Mozzarella
Method
In a hot pan, add 1 Tbsp of olive oil and then the zucchini and oregano. Saute for 1-2 minutes until just starting to soften. Add the mushrooms and sautee for another minute.
Pour over the lemon juice, and stir well. Season with salt and a little freshly cracked black pepper and put the mixture aside until ready to use.
Top your prepared base with sauce and a thin layer of torn or grated mozzarella.
Scatter a layer of the zucchini and mushroom mixture over the pizza. If any juices have collected, avoid transferring them to the pizza with the rest of the mixture so the base doesn’t get too soggy.
Crumble or dice the smoked cheese and scatter the pieces over the pizza.
Finally, top with a little more mozzarella before baking.