Walnut Pesto

Pesto is a beautiful sauce combining fresh basil, garlic and parmesan with a base of nuts and oil. Tangy and flavourful, if you need an excuse to grow some basil plants this is it! Pesto goes well on pizza or pasta and makes a great dip to serve with cheese and crackers. I use walnuts here but any nut can be used really – pine nuts are used in a lot of traditional recipes. Lightly toast the nuts first by tossing them in a pan over low-medium heat until just starting to change colour. Pine nuts burn very easily and taste awful when burnt, so keep an eye on them. A food processor works well but I like using a mortar and pestle – after all the words pesto and pestle share a root word. If a food processor is used I suggest blending cheese and nuts first until the consistency of bread crumbs, then adding oil and lemon juice and finally the basil, pulsing until the basil is in small pieces – don’t take it so far that there’s no specks of basil left.

Depending on the ingredients on hand flat leaf parsley can also be added. Lemon is not completely traditional but I like the extra kick of flavour, and it makes up for not using as much raw garlic as some recipes.
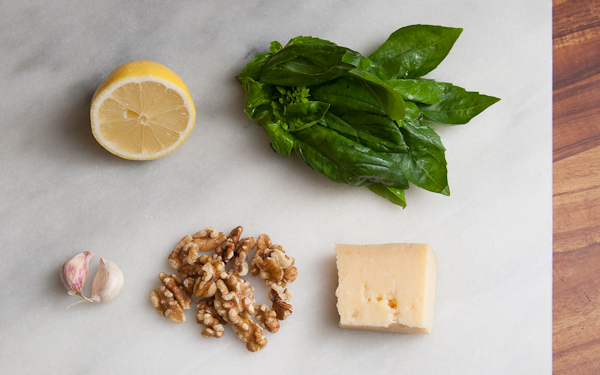
pesto (1 of 1)

Ingredients

  • 1-3 cloves of garlic, to taste
  • 1 chunk of parmesan or grana padano cheese, around 50g/2 oz
  • a handful of toasted walnuts, pine nuts or other neutral flavoured nuts.
  • 1/3 cup good olive oil
  • juice of half a lemon
  • 1 good bunch of fresh basil
  • salt

Method

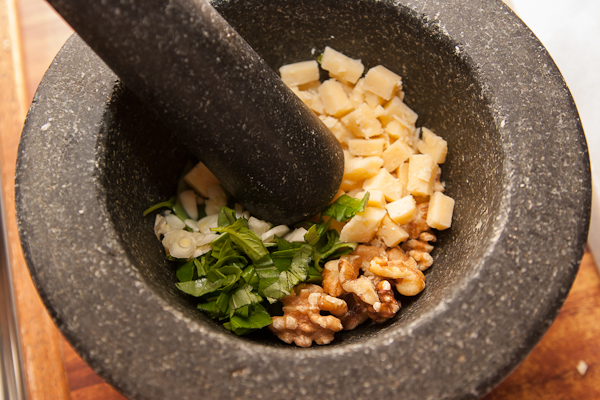
Pick basil leaves off any large stems. Dice or grate the cheese. Add a pinch of salt, nuts, garlic, cheese and basil to a large mortar.

pesto (1 of 1)-2

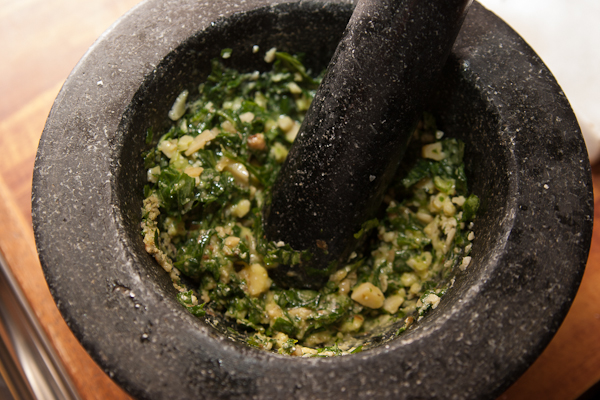
Start pounding and stirring until the ingredients are fairly well broken down and mixed together.

pesto (1 of 1)-3

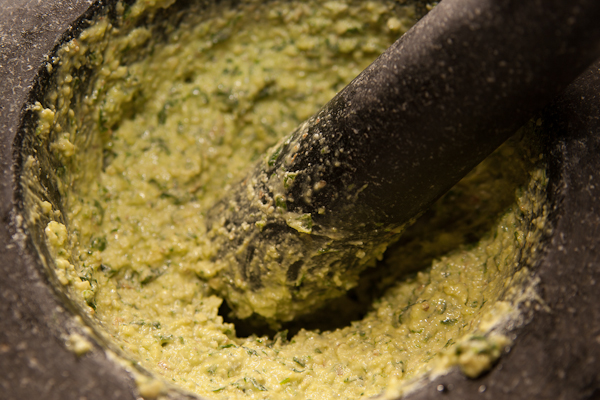
Add olive oil and lemon juice and continue to mix. until the mixture is fairly smooth.

pesto (1 of 1)-4

Picking And Curing Olives

Olive oil is an important part of Italian cooking, at least for some regions – that spicy, peppery taste gives an extra dimension to anything it touches. I’ve always wanted to make my own oil but my olive tree is still too small and experiments with wild roadside olives have produced mixed results. This year I got lucky though – my uncle has an untended olive grove on his property and invited the family to come pick some before the emus got them!

Picking olives by hand takes a while, but there is a trick to doing it efficiently. We spread large pieces of shade cloth and tarpaulins on the ground, and then attacked the trees with olive rakes – small handheld plastic rakes that slip easily over leaves and branches but catch the fruit. When each tree was bare, we carefully gathered up the shade cloth and tipped olives into waiting buckets. The olives go to a local plant for pressing. Olives can yield around 10-15% of their weight in oil; I’d be very happy if my share is 20 litres.

Using an olive rake
Collecting the olives

My uncle also has a stand of plump Kalamata olives, so I picked some for curing. Preserving olives isn’t too hard but there a lot of variations – some recipes use lye, some dry salt, some brine and some fresh water. I don’t love the idea of using lye (sodium hydroxide) and in the past my fresh water cured olives have tended to go off more easily, so this year I tried wet and dry salt curing. If they taste as good as I hope these will end up on pizza in tapenade, salads and foccacia among many other uses!

Kalamata olives for curing

Brined olives

Rinse olives, discarding any soft or shrivelled ones. Fill a clean jar or crock pot with the olives.
Make up brine with 5% cooking salt by volume –half a cup of salt in 10 cups of water. Pour this brine over the olives until covered.

Olives need to stay completely submerged while curing so that mould doesn’t get a chance to grow above the level of brine. A helpful trick I picked up a while ago is to place a loose piece of cling wrap over the vessel, press it down to the surface, then pour a little more brine on top.

Change this brine every day or two, until the olives are no longer bitter – this might take a few weeks. Taste regularly after the first week so you know when they are done.

Finishing brine

Once the initial curing is complete, the olives are marinated in a finishing brine mixture. This mixture helps preserve the olives and can also add other ingredients for flavour. I use one third of a cup of salt to 5 cups of water and 2 cups of red wine vinegar. Other common ingredients are bay leaves, rosemary, garlic, oregano, chilli or basil – add any of these to your own taste. Fill clean jards with the olives, top up with finishing brine and then add a layer of olive oil which will float on top of the jar and prevent air contact. Olives preserved in this way should last for up to a year in the fridge, but will likely be eaten long before that!

Dry cured olives

Half fill a large jar or crock pot with olives. Pour over coarse sea salt until the olives are covered.
Every day, carefully tip out any liquid that has collected in the bottom of the vessel. Taste the olives every week or so until they no longer taste bitter, then preserve with finishing brine as above.

Dry salt cured olives

Resources

Cooking with olives

Pickling olives – includes lye methods

Olive oil from tree to table

Salt cured olives recipe