New Gluten Free Pizza Dough Recipe

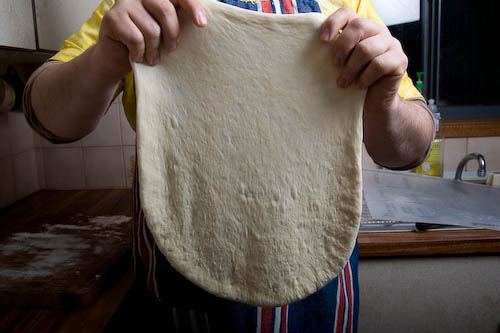
This is a new version of a gluten free pizza base that I have been working on and I think it’s finally ready to share! I’m quite excited about this base – you would be hard pressed to pick it as gluten free and it tastes delicious. The key is to give the shaped base time to rise before topping and baking.

Full credit to the talented Dan Lepard who wrote a recipe for gluten free bread using psyllium husks. I had never used these before and they work amazingly well in gluten free doughs, helping the dough to rise naturally and giving a nice chew to the cooked base. I use both yeast and baking powder in this recipe to get as much lightness in the dough as possible without overloading on the taste of either ingredient. Another interesting addition can be to add some herbs and spices to the dough as in this gluten free pizza recipe. Maybe not for the purists but worth considering.

I have included links to some of the more unusual ingredients on Amazon, but you should be able to find them in your local health food store.

Ingredients – makes 2 bases

Ingredient Weight Measure Bakers Percentage
Rice flour 140g 1 Cup 100%
Tapioca starch 70g ½ Cup 50%
Cornflour 70g ½ Cup 50%
Soy flour 20g 2 Tbsp 14.3%
Psyllium husks 12g 2 Tbsp 8.6%
Guar gum (you could use Xanthan gum if preferred) 6g 2 Small Tsp 4.3%
Instant Dried Yeast 12g 4 Level Tsp 8.6%
Baking Powder 8g 2 Level Tsp 5.7%
Salt 8g 2 Level Tsp 5.7%
Olive oil, plus more for shaping 20g 2 Tbsp 14.3%
Sugar 20g 14.29%
Gluten free Vinegar 3g 2.1%
Warm water 110g 1/2  of a cup 78%

Method

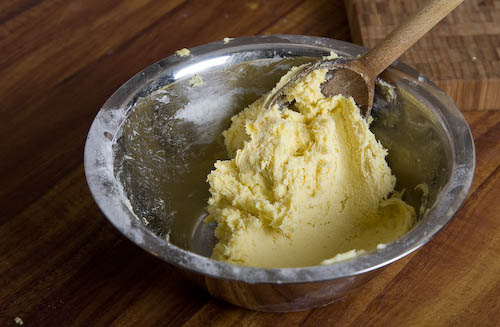
  1. Mix together all of the dry ingredients
  2. Add the oil, vinegar and water and stir well for about 30 seconds. The dough should be a stiff, sticky paste.
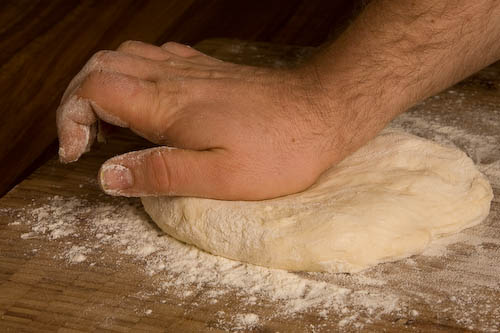
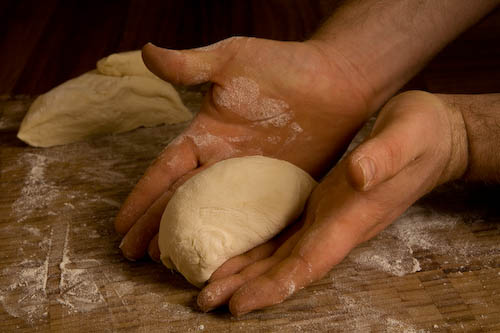
  3. Lay out 2 squares of oiled baking paper. Oil your hands to prevent sticking, and separate the dough into equal sized lumps.
  4. Following the shaping technique from my previous gluten free dough recipe, press the dough into a disc shape. Drizzle with as much olive oil as needed to make the dough workable. Aim for a base about 4mm thick with a slightly raised edge.
  5. Lay a piece of plastic wrap or baking paper over each base to stop it drying out and leave to rise for about 1 hour. You should also start preheating your pizza stone at this point.
  6. Once the bases have risen for an hour and the oven is properly hot, add cheese, sauce and ingredients according to your recipe and slide the pizza along with its sheet of baking paper into the oven. Cook until the crust is starting to brown, rotating in the oven halfway through cooking if necessary. You can also finish it off under the grill for a minute to really get the top browned well.

NOTES: If you don’t have all of these ingredients, you could substitute the rice flour, corn flour & tapioca for a commercial gluten free flour mix. The soy flour could be replaced by millet flour, fine polenta or maize flour as it is used to add flavour and colour. If reducing the sugar at all, add a pinch more baking powder as the sugar helps the yeast leaven the bread. Salt can be reduced or eliminated completely; it is mostly for flavour.

Shaping pizza bases

Pizzaiolo competitors in the Pizza Olympics lend a certain mystique to the art of shaping pizza bases, spinning them into shape between their legs or behind their backs blindfolded. But stretching out a nice pizza base is a straight forward process and you will get great results in your own kitchen. This method is for non gluten free doughs, as gluten free doughs may not have enough elasticity to handle in this way.

TIP: The key to stretching out a base is to use dough that has been resting for at least 1 hour, preferably more. This gives the gluten in the dough time to relax, so that it spreads more easily. If you find the dough is too elastic and keeps springing back while shaping, cover it with plastic wrap and leave to rest for 10 minutes. If all of your dough is quite springy, do the first step of pressing out your dough into 1cm thick discs, then leave them all to rest for 10 minutes before stretching.

Method

Place your dough ball onto a floured surface. If it becomes too sticky to handle at any point, dust with flour again.

Stretching-dough

Start by pressing the dough ball into a disc shape, first with your fingertips and then with the flat of your hands. Try to get the dough as flat as possible before you start the next step. Pressing out the dough first makes it much easier to maintain a nice round shape in the finished base. You may find that you need to flip the dough over and press on the other side.

Stretching-dough-4 Stretching-dough-10

At this point you should have an evenly round disc perhaps 1cm thick.

Stretching-dough-11

The next step is to stretch the dough. First, pick up the dough with your thumbs and forefingers near the outer rim. Stretch gently by moving your hands apart. Once you have stretched a section, rotate the dough and stretch again, working your way around the dough. Keep rotating and stretching until the base is a fairly even thickness.

Stretching-dough-18 Stretching-dough-19

You may be able to achieve an even thickness just by stretching and rotating the dough as above. If not, try draping the base over your knuckles, with both hands clenched into fists in front of you. Gently move your hands apart to stretch the base out. Concentrate on any thicker areas that you might have missed. The thickness of your base may vary with personal taste, but I aim for a base around 2mm thick in most places, with a slightly thicker rim.

Stretching-dough-53 Stretching-dough-54
Stretching-dough-55 Stretching-dough-56

The base should now be ready to flip onto a floured peel and start topping. If you have ended up with a few minor tears in the dough, just squeeze them together – they will not be noticed in the finished pizza.

Stretching-dough-52

And that’s it! Don’t worry if this seems tricky, give it a try and you will be stretching and spinning bases in no time. Just take it slow, and start off stretching gently until you get a feel for your dough.

NOTE: If you aren’t confident to try this method, you can use a rolling pin to roll out your base. However rolling pins tend to knock more air out of the base, so stretching is the preferred method.

Kneading dough

Kneading is the process of working dough to help proteins join together and form gluten, which gives dough its strength and elasticity. The most common method of kneading is to press the dough flat, fold it over itself, squash flat again, and repeat.

Method

    1. Prepare your pizza dough according to the recipe you are using.
    2. When the recipe calls for kneading, proceed as follows steps. If the dough becomes too sticky to handle at any point, sprinkle a little flour as needed.
    3. Press the dough into a flattish lump, pushing forwards with the heel of your hand so that the dough is longer than it is wide.

knead1

    1. Pick up one of the long ends, and fold the dough back over itself.

knead2

    1. Rotate the folded dough a quarter turn.

knead3

    1. The dough is now ready to press flat with the heel of your palm again. Repeat these steps as many times as called for in the recipe.

knead4

Making dough balls

Shaping your pizza dough into balls before use is an important step. If shaped correctly the balls will tend to expand evenly as they rise, rather than slumping into puddles and sticking together in your tray. They will also be easier to stretch into a nice round pizza base. There are several good methods of making a dough ball but the key principle is to stretch the ‘skin’ of the dough around the ball to create surface tension. This surface tension is what helps the dough ball to hold its shape. This method works well but you can use any method which creates a tight ball.

Method

    1. Once you have finished preparing your dough according to your pizza dough recipe of choice, take a lump of dough weighed out to make one base.
    2. Sprinkle a little flour on the dough and your working surface to prevent sticking if necessary. Don’t overdo the flour at this point though, as you want the dough to stick to itself as you form the ball.
    3. Flatten the dough with the palm of your hand.

ball1

    1. Fold the dough in half.

ball2

    1. Fold the dough again, so that it is now folded into quarters.

ball3

    1. Turn the dough so that the folds are underneath, and you have a flat surface on top. Make a ‘karate chop’ shape with each hand, and press the bottom of each hand against the top of the dough, on the left and right sides.

ball4

    1. Applying pressure, squeeze the top of the dough over itself with the sides and bottoms of your hands and pinch together underneath.

ball5

    1. Keeping the bottom of the dough ball squeezed together, move one hand forwards and the other backwards. The dough ball should rotate in your hands while it squeezes together underneath.

ball6

    1. If necessary, you can pinch together the bottom a little to neaten up, or repeat the previous step. You should end up with a nice round dough ball! Dust the dough ball well with flour and set aside while you roll up the rest of your batch of dough.

ball7

Gluten free pizza dough

Having a few friends and family members on gluten free diets, a good gluten free pizza recipe has been a bit of a holy grail for me over the last few years. This recipe is the closest that I have come – and it is quite delicious!

Recipe

  • 150g White rice flour
  • 80g Tapioca starch
  • 30g Fine polenta
  • 6g Guar or xanthan gum
  • 6g Sea salt
  • 10g Sugar
  • 10g Baking powder
  • 25ml Olive oil
  • 1 Egg (this can be omitted to make a vegan base, add a little more water instead)

Method

  1. In a large mixing bowl, stir all of the dry ingredients together.
  2. Add the oil, egg and water and stir until the mixture is smooth. The consistency should be a thick, sticky paste.
Gluten free pizza dough

Shaping the bases

    1. Place 2 squares of baking paper on a bench or peel and give them a light coat of oil.
    2. Before handling the mixture drizzle some olive oil into the bowl, and rub a little into your hands. This makes the bases much easier to shape and handle.
    3. Separate the mixture into 2 equal size lumps and place one on each square of paper. Drizzle a little more oil over the lump of dough.
      Gluten-free4
    4. Using the palms of your hands, start to press the dough into a pizza shape. Try to get an even thickness of about 4 millimeters.
      Gluten-free5
    5. Smooth any cracks around the edge and create a slightly raised rim.
      Gluten-free6
    6. The base is now ready for your toppings! Once topped, use a peel to lift the pizza and greaseproof paper and slide onto a preheated pizza stone to bake.

Gluten-free7

See the article on toppings to see how this pizza looked fresh out of the oven!

Quick pizza dough recipe

Sometimes the need for a pizza just comes out of nowhere and you need to whip up a dough at short notice. All is not lost, the dough will not have such a complex flavour as one that has rested overnight, but you can still make a perfectly serviceable dough and go from mixing it to baking it in an hour.

Ingredients (makes 2 pizzas)

  • 300gm White flour (1.5 cups)
  • 200ml Water (4/5 of a cup)
  • 6g Sea salt (1 heaped tsp)
  • 8g Instant dried yeast (2 heaped tsp)
  • 8g Sugar (2 tsp)
  • 15ml Olive oil (1 tbsp)

Method

  1. In a large mixing bowl, stir all of the dry ingredients together.
  2. Add the water and stir briefly.
  3. Add the oil and continue to stir until the ingredients are well mixed.
  4. Cover the bowl and allow to rest for 10 minutes
  5. Turn out the dough onto a floured work surface. Knead the dough for around 5 minutes. As you knead, you will notice the dough losing its stickiness and becoming smooth and supple.
  6. Separate the dough into two equal parts and shape into dough balls. Sprinkle with flour and cover with plastic wrap. Leave in a warm place to rise for one hour.
  7. The dough is now ready to be used. Shape each ball into a pizza base, place on a floured peel, add toppings according to your favourite recipe and cook your pizza on a preheated pizza stone!

NOTE: Because the dough has not had much time to relax since being kneaded, these bases might spring back a bit when being shaped. If this happens, shape the base half way, then let it rest for 5 minutes before finishing.