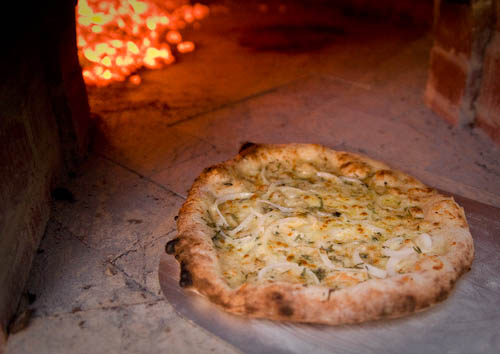
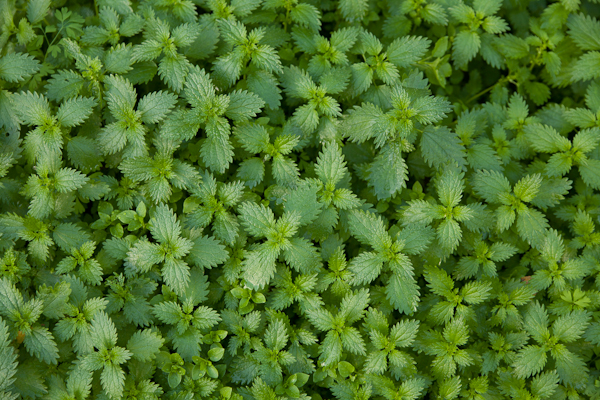
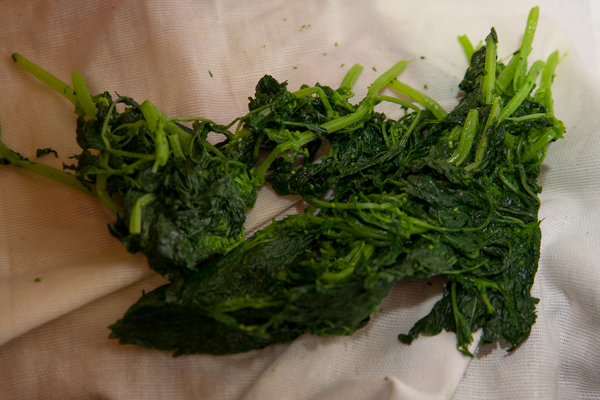
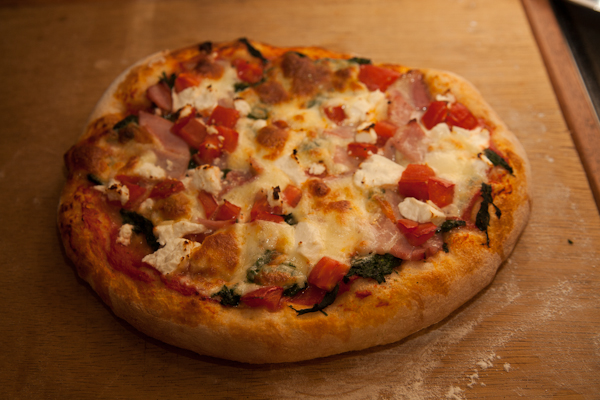
Every year I look at the nettles growing in the weedier bits of my back yard and vaguely think about eating them. I’ve seen them used in different dishes in some of my cookbooks, usually in the same kind of place you might use spinach. I know it sounds weird but apparently cooking removes the sting completely and this year we have had a bumper crop so I bit the bullet, gloved up and brought in a bagful. The first dish I cooked was (of course) a nettle pizza. I usually match spinach with salty/sharp flavours, so I decided to combine nettle, bacon and fetta with a little fresh tomato. For a more subtle flavour you could use ricotta instead of fetta and in hindsight you could skip the tomato and let the nettles shine through a little more but the whole family enjoyed how the pizza came out. Verdict: Would eat again.
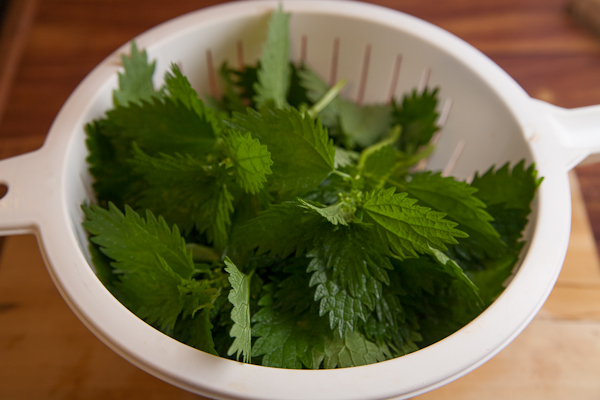
First, blanch the nettles. Bring a pot of water to a boil and drop them in. You might find it easier to remove any thicker stems first. Allow to boil briefly, then remove with a sieve or slotted spoon and dunk in cold water to stop them cooking. The nettles need to be squeezed dry before use so they don’t make the pizza soggy – wrap in a clean tea towel or kitchen cloth and press down on a board or bench.
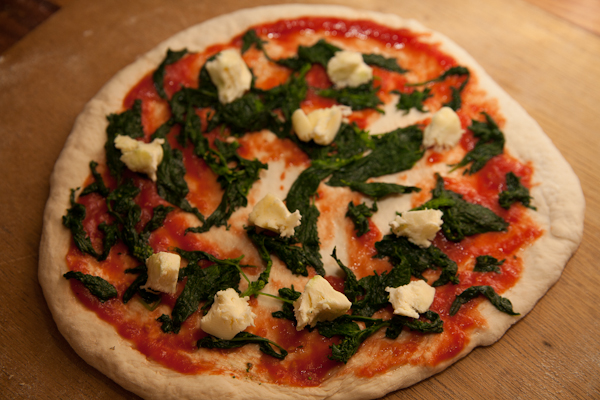
Stretch out the base and flop it onto a floured peel. Smear over a little tomato sauce, then blanched nettles and a few pieces of torn mozzarella. Save some mozz for the top. This is far from my best base ever by the way!
Scatter with bacon, tomato and pieces of fetta, then a few more chunks of mozzarella. Slide onto a preheated pizza stone with the oven as hot as it gets. Cook until browned on top – 7-8 minutes if the oven is nice and hot.
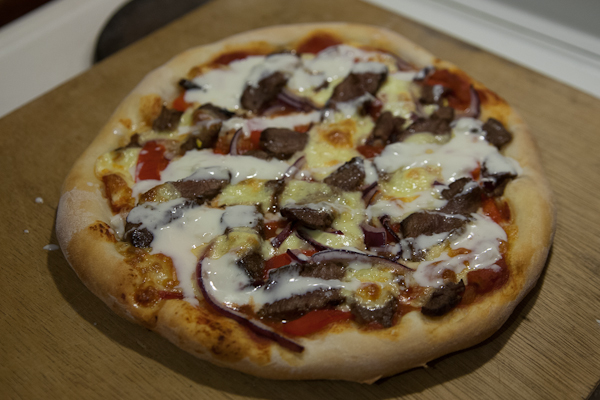
We had a great lamb pizza recently and I was inspired to try making a version at home. It came out pretty well – definitely one I’ll make again! There’s a lot of scope to use different ingredients on this pizza, I think spinach or avocado would both work well. Lamb has quite a strong flavour, so it works well with other assertive ingredients. Yoghurt is a classic pairing adding some contrast to the roast capsicum too, but it is optional if you aren’t such a fan.
Ingredients were sourced from a local farmers market, with the lamb produced by Wattle Wood Springs.
*These quantities are enough to top 2 x 12″/30cm pizzas
Prepare the dough in advance according to your chosen recipe. Preheat a pizza stone if using.
Mix half the garlic with the yoghurt. Mix well and set aside until needed.
Lightly toast the cumin seeds in a small pan. This is easy to overdo, so remove from the heat as soon as they start to smell toasty. When toasted, whiz in a spice blender. As an alternative, just use cumin powder.
Make a marinade for the lamb using 1/2 the garlic, a pinch of salt, the cumin and the lemon juice. Marinate the lamb for at least an hour.
To roast a pepper/capsicum, place under the grill/broiler until the skin blackens, turning until cooked all around. Allow to cool and peel off the skin. As an alternative, you can purchase pre-roasted. Cut into strips.
Remove the lamb from its marinade and cut into strips, as thin as possible.
Shape the pizza dough. Hit it with a splash of sauce, then scatter over a little paprika. Sprinkle over 1/4 of the Mozzarella.
Arrange the onion and red pepper, then the lamb and finish with another 1/4 of the Mozz.
Cook on a preheated pizza stone or tray, in as hot as oven as possible for around 5-6 minutes or until browned and delish!
Before serving, drizzle with the garlic yoghurt to taste.
Making your own Mozzarella might seem like overkill, but it is surprisingly easy to do with great results! You will need a few tools and ingredients but nothing too complicated, and the smooth, creamy taste and texture of fresh homemade Mozzarella on your pizzas will have you hooked – I recommend making a double or triple batch and freezing some for later.
Note: The first step of making mozzarella is to acidify the milk. This method uses food acid to speed up the process, but if you prefer you can use a little yoghurt instead of the food acid. If using yoghurt, you would add it to the milk and allow it to sit overnight until fermented.
Tools and Ingredients
pH tester
I’m using a digital pH meter but if you don’t want to spring for a meter, pH strips will do the job just fine, but get some like these – they are more accurate than the type with just one or two colour squares. To be honest, you can probably skip the pH testing completely if you aren’t scientifically minded or don’t mind taking a chance. I don’t like my cheese to be more acidic than necessary as I feel that it affects the taste, so I do check the pH of the milk while adding acid and stop as soon as I’ve reached my target.
Tartaric Acid
In the past, I have followed recipes that called for citric acid. I have decided to use tartaric acid as I found that the citric acid left a slightly more pronounced bitterness in the finished cheese. You can substitute the tartaric for citric acid if necessary or preferred though.
Rennet
Being a little squeamish, I use this non-animal rennet and have not had any problems with it. If you prefer, traditional rennet is just fine too.
Milk
It’s important to use non homogenised milk to make mozzarella – homogenised milk does not work well if at all. Interestingly though, it is possible to use milk powder. I’ve done it, and while the cheese wasn’t as good as with fresh milk, it was better than not having any Mozzarella at all. Source your milk from a local dairy if possible, the taste of the finished cheese will reflect the quality of the milk you use.
Thermometer
You will need an accurate probe thermometer. I use an analogue one out of habit but I also have a digital version that is more accurate.
Mozzarella Recipe
Makes around 400g/1lb
Milk
4 litres
4 pints
Tartaric Acid
7g
1 level tsp
Rennet
Per instructions
Salt
6g
1 tsp
Pour the milk into a large saucepan or stock pot. Dissolve the tartaric acid in half a cup of water, then add to the milk. If using a pH tester, make up more acid solution than needed and add a tablespoon at a time while stirring well, until the milk reaches pH 5.6.
Checking pH with a meter
Heat the milk to 32C/90F. I find the best way to do this is to put it over the lowest heat possible while stirring, and monitor the temperature. If it isn’t warm enough after 10 minutes or so, increase the heat slightly and continue to monitor. Once at 32C/90F, turn off the heat.
Check the instructions for your chosen rennet and add the appropriate amount. With the one I used, I added 5 drops per litre of milk to a tablespoon of water, which was then stirred into the milk.
Cover the pan and leave to sit for several hours. You are looking for the milk to set to the point that the curd breaks cleanly when pressed or cut.
Clean break, the curd is ready to cut
Cut the curd into cubes about 1cm (½ inch) apart.
Cutting the curd
Return the pan to the heat, and slowly increase the heat to 105C. Leave at this temperature for half an hour, stirring occasionally.
Line a colander or large sieve with cheesecloth. My guilty secret is that I never have cheesecloth handy in my kitchen – I use a clean tea towel. Don’t tell my missus! Pour the curds and whey into your lined sieve, and allow the whey to drain out for 10 minutes. Turning over the curds halfway through lets a little more whey drain out, but there’s no need to squeeze or press them. TIP: save the whey and you can make ricotta later!
Straining the curd
Tip your strained curds into a mixing bowl, and add the salt. Work it through, breaking up the curd as you mix.
At this point you will have salted curd, ready to be stretched!
Stretching Mozzarella
Before it can be stretched, the curd needs to be melted. I have seen two different methods of doing this. One is to take one cup of curd at a time and microwave it for 45 seconds. The other is to tip the curd into a large bowl of hot water. Both have the potential to cause owies, but I think the hot water method is safer as the microwave can sometimes heat things more quickly and hotter than you might realise, which makes the curd dangerous to handle.
For the hot water method, boil a pan full of water, remove from the heat, and let it cool slightly. 70C/160F is enough to melt curd for stretching, but if it is a little hotter you won’t have to work so fast before it cools too much. Tip the curd into the hot water. Use tongs or a slotted spoon to pull out some curd ready to shape. It will be hot, so keep a bowl or sink full of cool water handy to dip your fingers into. If it’s too hot to handle, wear rubber gloves.
Stretch the curd out and fold it over itself a few times. You will see it start to look shiny as you work it.
Stretching the curd
Shape it into a ball by making a ring with your thumb and forefinger and holding the piece in between. Continuously tuck the curd up inside itself until you have a neat ball, Squeeze your thumb and forefinger together to seal the end. You can shape either big or small balls as desired. When shaped, drop each ball into a bowl of cold salt water – I use 1 tbsp per litre of water.
Shaping the balls
Finished! You can store your mozzarella balls in the salt water, or remove them when cool and store in a bowl or bag. For pizza use it’s probably more sensible to store dry, to avoid soggy bases. Fresh mozzarella should keep for a few days in the fridge, or longer frozen.
To Make Ricotta
Boil the strained whey vigorously for a few minutes. Pour into a cheesecloth lined sieve. Tie the ends of the cloth with string and hang from something overnight.
There’s a few different methods of cutting pizza, with the pizza wheel being the most traditional. Wheel cutters are suitable for most pizzas, with the exception perhaps of pizzas with toppings that can easily be disturbed – things like whole prawns and so on. For those pizzas I use scissors or a single rocker blade style cutter, but for everything else I use a Zyliss cutter, one of the best pizza cutters I have used!
You can see the difference between this and a more traditional wheel cutter – the large handle lets you get a really good grip, and because the blade is supported on both sides it feels more sturdy that the old fashioned cutters.
To clean, the plastic part is hinged on one corner, so the blade can be removed. It seems to be dishwasher safe after many cycles, which is a bonus if you eat pizza often (I do).
Ready For Cleaning
I use a diamond stone to sharpen the wheel, but I have to say it’s trickier than sharpening a knife (as are all pizza wheel cutters). More to come on that as I figure out the best technique. To be honest, it might be easier to just buy a new wheel every year or two!
A bacon and egg pizza has been on my mind for a while now, so with a cool sunny morning on the weekend it seemed like the perfect time to do some morning baking in the wood oven! This is the first breakfast pizza recipe I’ve put together and while it wasn’t an unqualified success it was quite delicious, and I’m going to enjoy tweaking the recipe.
A note on ingredients – most commercial bacon is made by injecting pork with a solution of brine and phosphates so that it retains water and weighs more when it’s sold. They use liquid smoke and other additives for flavouring. While any bacon can taste good, I prefer to buy bacon from smaller producers who care about the quality of their products and minimise the chemicals they use. If you can find such a producer at a farmers market or specialty store, or even direct from the farm, stock up – the taste of traditionally cured and smoked bacon is worth the hunt!
You could vary the ingredients to include other breakfast favourites but I chose to keep it simple with onion adding some crunch and tomatoes contributing acidity and richness that goes well with smoky bacon. I chose to dice rather than slice the onions, to give a layer of texture underneath the bacon. Tearing the bacon adds to the presentation a little and makes for more interesting, varied mouthfuls.
This recipe allows for topping 2 small or one very large pizza.
Tearing off crust to dip in the egg yolk was delicious!
Shape the base, and place on a floured peel. In a bowl, sprinkle the tomato with a little salt. Place the pieces in a sieve and allow to drain. This will remove some moisture from the tomatoes and give them a little flavour kick as well. Drizzle olive oil over the base, then add tomato sauce followed by a thin scattering of mozarella.
Scatter the onion and tomato over the base. Add a little more cheese, then the bacon pieces.
At this point you need to make a decision about when to add the eggs, based on how well you want them done. I cooke my pizza in a wood fired oven for a minute before I poured on the eggs. This resulted in quite a runny yolk which was great to dip pieces of the crust into. If you are cooking in an indoors oven with a pizza stone, allow a few minutes for the eggs to cook to runny or put them on at the start if you like well done.
When adding eggs, you can choose to beat them in advance or pour them on whole. Whichever approach you take, have all of your eggs cracked and ready so you can get them on quickly and the pizza back in the oven. If using whole eggs, think about the position so that you can give guests an egg on every slice. The next improvement I will be making to this recipe will be to use large egg rings on the pizza – it is quite hard to get them to land where you want! I think egg rings will allow a little white to leak out around the edges and look nice, but hold the eggs roughly where I want them.
Once cooked, scatter with some fresh herbs. It’s hard to go past parsley for a classic egg pairing; I used basil from my garden as well. A final note – you could easily make mini pizzas following this approach, and I bet kids would love having their own breakfast pizza with an egg in the middle!
As always, don't overdo the toppings - leave room for the crust to breathe. This is before adding the bacon.Enjoy! Yes, I burnt the crust... just a little.
I’m an avid cookbook collector, but I always gravitate towards books that are more than just collections of recipes, preferring to learn more about the background and general techniques involved in the topic than just cook blindly from a list. For these reasons, I grabbed Peter Reinharts pizza recipe cookbook American Pie as soon as I heard about it!
This book has been out for a few years now, but is well worth tracking down.
American Pie is subtitled “my search for the perfect pizza”, and true to the name the first part of the book tracks Peter’s travels around the world, hunting down great pizza at some well known international destinations. I enjoyed reading about the different pizza styles and toppings in different cities and continents, but if I have one criticism of the book it is that as travel writing, it is a little ‘tame’. Not many great adventures, but I guess that’s not really the point. Many American locations are also featured, with some great descriptions of well known pizza joints like Pizzeria Bianco and their techniques.
The second section of the book is where it gets good though. Peter dedicates nearly 40 pages to different dough styles alone, including many of the recipes described in the first section of the book. This focus on dough is in line with Peter’s statement that for him, a good crust is 80% of the enjoyment of a pizza. For me, it might be a little less than 80% but it’s certainly the most important factor! Delayed fermentation doughs are introduced together with standard enriched doughs, thick and thin crust, and so on. A good recipe for sourdough pizza dough is included, with instructions on raising and maintaining a sourdough starter from scratch.
Following the dough recipes, there is a good range of sauces and other toppings like pesto, flavored oils, purees and so on. The sweet and sour onion marmalade sounded good to me but my first attempt was a mess!
Rounding out the latter section of the book is a large collection of pizza recipes, with most of the recipes from the earlier travel section of the book recreated.
American Pie is available on Amazon for under $20.
I cooked a bit of an unusual pizza recently on a whim, and it turned out pretty well! I was inspired by a new (to me) cheese that I found at the markets. It’s called Stracchino, and is a soft cows milk cheese. It has a lovely delicate flavour with a hint of sweetness combined with a little tangy-ness. It melts amazingly, turning into a soft, sticky and creamy puddle.
I wanted to match this up with some ingredients that would complement the sweet cheese as well as something to contrast with the sweet flavours. This is what I came up with. The sweetness of cooked leeks is nice with this cheese and the contrasting texture of slightly crunchy/slippery leek with the smooth melted Stracchino worked well. Pieces of tomato and mushroom are little bursts of intense flavour to contrast with the smooth sweetness of the cheese and leek.
Ingredients
Pizza dough (I made one massive pizza with a 500g dough ball, you could also make 2 smaller ones with these quantities of toppings)
300g or so Stracchino. You could use mozzarella if you absolutely can’t find this, it will still work well with these toppings
Method
Cut the green tops off the leeks and discard. Wash the leeks well. Dice and saute in olive oil with one crushed clove of garlic until translucent.
Tip the mushrooms into a hot pan, and leave them to cook until starting to brown, shaking to stop them burning.
Shape your pizza base and spread with a thin layer of sauce.
Scatter a few pinches of paprika over the tomato sauce. It’s amazing how much of a difference there is between a good quality paprika versus the ones I have tried from supermarkets!
Scatter the leek mixture evenly over the base.
Slice the cheese and tear each slice into chunks. Scatter evenly over the pizza. Make sure to leave some gaps so that the crust doesn’t get too moist.
Now scatter over the mushrooms and diced tomatoes. Don’t overdo it – a good guide is to end up with around 2 pieces of each per slice, on average.
Last night I planned to fire up the wood fired oven for a pizza party. I had my dough balls and ingredients ready and laid out, and even made a new peel for the occasion! The only problem was that when it came time to cook pizzas, my oven was too wet from all of the rain we’ve been having (I should really stop procrastinating and render the oven so that it doesn’t get waterlogged in the rain, but that’s another story).
Wondering how I could feed the hungry hordes without even having a pizza stone preheated in my inside oven, I remembered something else I read on the net a while back and thought I’d give it a try. It worked so well that I wanted to share it so that you too can have a backup plan if you need to cook some emergency pizzas one day!
You will need
Pizza dough, sauce, other toppings (obviously)
A cast iron skillet (frying pan with a metal handle)
An oven with a grill (broiler)
How it works
Put your skillet on your stovetop burner and preheat it on high heat for 15 minutes
Turn on your grill and leave it long enough that you can see it glowing (if using an electric grill, gas versions won’t need to preheat)
Prepare your pizza on a floured peel, making sure that your base is not larger than the base of the skillet
Using oven mitts or a tea towel, take your skillet off the burner and turn it upside down. Slide your pizza onto the skillet.
Quickly place the pizza + skillet on an oven rack below the grill. The top of the pizza should be 2-3 inches below the grill.
Watch the pizza as it cooks, you can easily overcook if you aren’t careful. The pizza should take 2-3 minutes to cook. You may need to rotate your pizza 180 degrees half way through cooking.
Before cooking your next pizza, return the skillet to the hotplate for a few minutes to reheat the base. Or use 2 skillets, alternating so that you don’t have to wait between pizzas.
This method works because the pizza is cooked evenly at a very high heat from above and below, similar to a wood fired oven. The pizzas were actually quite close in appearance to those from my wood oven, although the sides of the crust did not cook quite so evenly. But this trick is absolutely worth adding to your home made pizza arsenal!
NOTE: be very careful as the handle of the skillet will be very hot. Wear oven mitts and use a tea towel when lifting te pizza. This should only be done under adult supervision.
This pizza recipe is a bit of a different combination. You wouldn’t quite call it a dessert pizza, but is quite light and sweet and can definitely finish off a meal. I make my own plum sauce from our trees, and my sauce is quite light and tangy. If you can’t make your own, try an asian style plum sauce.
Ingredients
Plum Sauce
A small handful of Walnuts (freshly shelled makes a difference)
Mascarpone
Dried Figs
Honey (optional)
Thin slices of fresh Pear
Sugar
Lime juice
Method
Drizzle plum sauce over your prepared pizza base. You don’t want the base totally covered.
Drizzle some honey if using – just some thin swirls.
Scatter the pizza with halved figs and halved walnut pieces.
Finish with chunks of mascarpone – I use teaspoon sized pieces.
Carefully slide into the preheated oven using your peel and bake until the crust is golden. Be careful with this one as the nuts can burn easily.
While the pizza is cooking, slice your pear thinly and put the pieces in a bowl with the juice of one lime, and a teaspoon of sugar. Toss together to coat. When the pizza is cooked, finish by dressing with the slices of fresh pear and serve!
This is a new version of a gluten free pizza base that I have been working on and I think it’s finally ready to share! I’m quite excited about this base – you would be hard pressed to pick it as gluten free and it tastes delicious. The key is to give the shaped base time to rise before topping and baking.
Full credit to the talented Dan Lepard who wrote a recipe for gluten free bread using psyllium husks. I had never used these before and they work amazingly well in gluten free doughs, helping the dough to rise naturally and giving a nice chew to the cooked base. I use both yeast and baking powder in this recipe to get as much lightness in the dough as possible without overloading on the taste of either ingredient. Another interesting addition can be to add some herbs and spices to the dough as in this gluten free pizza recipe. Maybe not for the purists but worth considering.
I have included links to some of the more unusual ingredients on Amazon, but you should be able to find them in your local health food store.
Add the oil, vinegar and water and stir well for about 30 seconds. The dough should be a stiff, sticky paste.
Lay out 2 squares of oiled baking paper. Oil your hands to prevent sticking, and separate the dough into equal sized lumps.
Following the shaping technique from my previous gluten free dough recipe, press the dough into a disc shape. Drizzle with as much olive oil as needed to make the dough workable. Aim for a base about 4mm thick with a slightly raised edge.
Lay a piece of plastic wrap or baking paper over each base to stop it drying out and leave to rise for about 1 hour. You should also start preheating your pizza stone at this point.
Once the bases have risen for an hour and the oven is properly hot, add cheese, sauce and ingredients according to your recipe and slide the pizza along with its sheet of baking paper into the oven. Cook until the crust is starting to brown, rotating in the oven halfway through cooking if necessary. You can also finish it off under the grill for a minute to really get the top browned well.
NOTES: If you don’t have all of these ingredients, you could substitute the rice flour, corn flour & tapioca for a commercial gluten free flour mix. The soy flour could be replaced by millet flour, fine polenta or maize flour as it is used to add flavour and colour. If reducing the sugar at all, add a pinch more baking powder as the sugar helps the yeast leaven the bread. Salt can be reduced or eliminated completely; it is mostly for flavour.
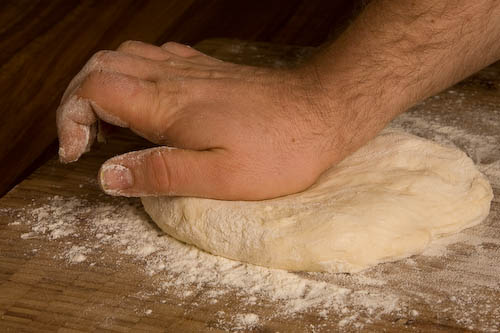
Kneading is the process of working dough to help proteins join together and form gluten, which gives dough its strength and elasticity. The most common method of kneading is to press the dough flat, fold it over itself, squash flat again, and repeat.
Method
Prepare your pizza dough according to the recipe you are using.
When the recipe calls for kneading, proceed as follows steps. If the dough becomes too sticky to handle at any point, sprinkle a little flour as needed.
Press the dough into a flattish lump, pushing forwards with the heel of your hand so that the dough is longer than it is wide.
Pick up one of the long ends, and fold the dough back over itself.
Rotate the folded dough a quarter turn.
The dough is now ready to press flat with the heel of your palm again. Repeat these steps as many times as called for in the recipe.
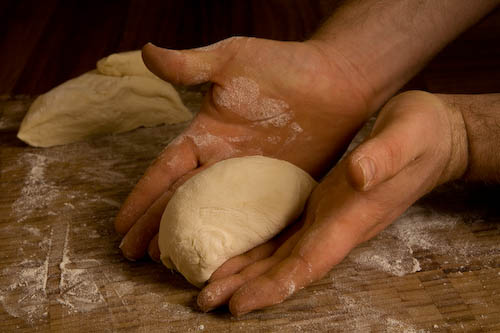
Shaping your pizza dough into balls before use is an important step. If shaped correctly the balls will tend to expand evenly as they rise, rather than slumping into puddles and sticking together in your tray. They will also be easier to stretch into a nice round pizza base. There are several good methods of making a dough ball but the key principle is to stretch the ‘skin’ of the dough around the ball to create surface tension. This surface tension is what helps the dough ball to hold its shape. This method works well but you can use any method which creates a tight ball.
Method
Once you have finished preparing your dough according to your pizza dough recipe of choice, take a lump of dough weighed out to make one base.
Sprinkle a little flour on the dough and your working surface to prevent sticking if necessary. Don’t overdo the flour at this point though, as you want the dough to stick to itself as you form the ball.
Flatten the dough with the palm of your hand.
Fold the dough in half.
Fold the dough again, so that it is now folded into quarters.
Turn the dough so that the folds are underneath, and you have a flat surface on top. Make a ‘karate chop’ shape with each hand, and press the bottom of each hand against the top of the dough, on the left and right sides.
Applying pressure, squeeze the top of the dough over itself with the sides and bottoms of your hands and pinch together underneath.
Keeping the bottom of the dough ball squeezed together, move one hand forwards and the other backwards. The dough ball should rotate in your hands while it squeezes together underneath.
If necessary, you can pinch together the bottom a little to neaten up, or repeat the previous step. You should end up with a nice round dough ball! Dust the dough ball well with flour and set aside while you roll up the rest of your batch of dough.
It’s sometimes easy to get carried away and cover your pizza with every topping you like. And fair enough, everyone has a good memory of the supreme from their favourite takeaway.
The problem with using a lot of toppings on a thin style base is that the base doesn’t support a lot of weight. It can also get soggy if overloaded. Using just a few toppings lets you play off different flavours against each other – you can really come up with some unique combos of just a few good ingredients.
A good rule of thumb is to use no more than 3 separate toppings, as well as cheese and/or sauce. Try to think of interesting flavours that will work well together. A good way to come up with a new idea for a pizza is to use some of the key ingredients in a favourite non pizza dish!
Whatever toppings you decide on, make sure not to lay them on too thickly. Aim for a single layer of all of the ingredients combined, on top of your cheese/sauce layer – this means that you might have to leave space between each ingredient.
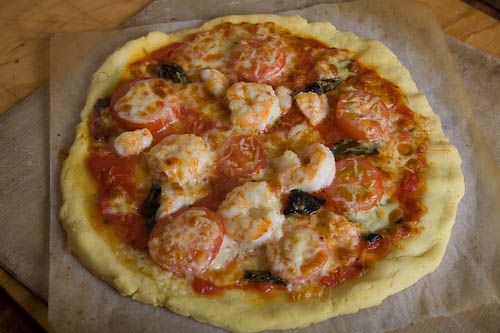
This is a quick series showing a the process of putting together a simple prawn, tomato and basil pizza made on a gluten free base. The prawns were marinated in olive oil with a clove of mashed garlic whisked in. Delicious vine ripened cherry tomatoes were used – good quality tomatoes make a big difference and are worth the extra cost.
A layer of sauce is spread over the base. Leave a rim around the edge for visual appeal and so you have a good place to hold the slices. When applying sauce, try to leave a few spaces with less or no sauce, so that the base doesn’t get too soggy when it cooks.
Scatter a sparse layer of mozzarella over the sauce. The purpose of this layer is really just to help hold the toppings to the base. Using grated cheese is also perfectly fine but I like using slices torn into pieces to vary the appearance and texture a little.
If you are using fresh herbs, it is best to put them underneath the other ingredients to stop them overcooking and drying out. Here, a handful of torn basil leaves are pressed into the dough.
Finally, an even layer of the prawns and sliced tomato are added, and a garnish of some extra whole prawns followed by another sprinkle of chunks of mozzarella and a little fresh grated parmesan.
And here’s how it looked straight out of the oven. The tangy garlic and prawns were wonderful together with the acidic sweetness of the tomatoes. A winning combo!
The strength of this pizza is it’s simplicity and the combination of a small amount of powerful ingredients. The subtle sweetness and texture of the onions is lovely against the bitey blue cheese and the rosemary.
Use your favourite blue cheese here but don’t be afraid to experiment. A nice gorgonzola would be wonderful.
This is a good introduction to the pizza bianca, or white pizza, for those who have always used tomato sauce before!
Ingredients
1 Small brown onion, sliced finely into rings
Mozzarella, finely sliced
Blue cheese
Pecorino (or Parmesan if preferred)
2-3 tsp of fresh Rosemary leaves, chopped but not too finely.
A pizza peel is a kind of wood or metal paddle, used to slide a pizza into the oven, move and turn it while cooking, and take it out again when it’s done. Pizza peels allow you to make a pizza in advance, then slide it directly onto a pizza stone to cook, without damaging the base or disturbing the toppings. This is a critical skill to master for wood fired ovens, where pizzas are placed deep in a very hot oven. Peels are very useful for home pizza cooking as well, but a shorter handled peel like this one will do the job.
The best peel for home use is a wooden one. A wooden pizza peel will help slide you pizzas without sticking, as the wood absorbs some of the moisture from the base and stops it from sticking. The worst disaster is when your pizza sticks to the peel, changing its graceful slide into a messy cartwheel. This may well be how calzone was invented!
Before using a wood pizza peel, sprinkle some flour over it and then rub the flour into the wood. Over time, your peel becomes even more slippery as it builds up a coat of flour.
Once you have floured your peel, you simply place a prepared pizza base on it, add your toppings, and slide it into the oven!
TIPS:
It can be useful to keep several peels, so you can prepare a few pizzas at once and put each into the oven as soon as the last is cooked.
Instead of using wheat flour on your peel, try using white rice flour. This is less prone to absorb moisture and become sticky, and it is also less likely to burn on the pizza stone. I keep a small shaker of rice flour handy for this purpose.
If your pizza sticks to the peel, try quickly but carefully shaking the peel back and forth. If this doesn’t work, try lifting the spot where it is sticking and brushing some flour underneath.
If you don’t have a peel, you can use a flat cookie tray, turned upside down. If you do, don’t leave the pizza sitting on it for too long as it may stick! Or, try making your own.
This is a simple veggie pizza that packs a flavour punch. The earthy mushrooms work nicely with the sweet zucchini, and the smoky cheese is complemented by a little squeeze of fresh lemon.
Ingredients
Half a cup of your favourite mushrooms, roughly diced
Half a cup of zucchini (courgette), diced to the same size as the mushroom
1 Clove of finely chopped or mashed garlic
Olive oil
1 Good pinch fresh or dried Oregano
1 Tbsp Lemon juice
Smoked cheese
Mozzarella
Method
In a hot pan, add 1 Tbsp of olive oil and then the zucchini and oregano. Saute for 1-2 minutes until just starting to soften. Add the mushrooms and sautee for another minute.
Pour over the lemon juice, and stir well. Season with salt and a little freshly cracked black pepper and put the mixture aside until ready to use.
Top your prepared base with sauce and a thin layer of torn or grated mozzarella.
Scatter a layer of the zucchini and mushroom mixture over the pizza. If any juices have collected, avoid transferring them to the pizza with the rest of the mixture so the base doesn’t get too soggy.
Crumble or dice the smoked cheese and scatter the pieces over the pizza.
Finally, top with a little more mozzarella before baking.
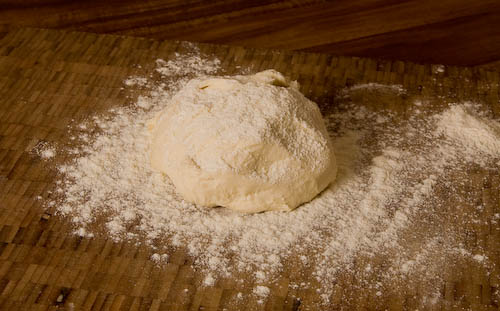
Sometimes the need for a pizza just comes out of nowhere and you need to whip up a dough at short notice. All is not lost, the dough will not have such a complex flavour as one that has rested overnight, but you can still make a perfectly serviceable dough and go from mixing it to baking it in an hour.
Ingredients (makes 2 pizzas)
300gm White flour (1.5 cups)
200ml Water (4/5 of a cup)
6g Sea salt (1 heaped tsp)
8g Instant dried yeast (2 heaped tsp)
8g Sugar (2 tsp)
15ml Olive oil (1 tbsp)
Method
In a large mixing bowl, stir all of the dry ingredients together.
Add the water and stir briefly.
Add the oil and continue to stir until the ingredients are well mixed.
Cover the bowl and allow to rest for 10 minutes
Turn out the dough onto a floured work surface. Knead the dough for around 5 minutes. As you knead, you will notice the dough losing its stickiness and becoming smooth and supple.
Separate the dough into two equal parts and shape into dough balls. Sprinkle with flour and cover with plastic wrap. Leave in a warm place to rise for one hour.
NOTE: Because the dough has not had much time to relax since being kneaded, these bases might spring back a bit when being shaped. If this happens, shape the base half way, then let it rest for 5 minutes before finishing.
It’s always a good idea to use the best ingredients you can get your hands on, but for pizza dough, the most important ingredient is free – time! When dough is left to rest or ‘age’ for long enough the difference in flavour compared to a standard dough is incredible. The cooked base has a sweet, nutty/buttery flavour, so good that you’d be happy to eat it with no toppings at all. In this recipe, we start by making a simple dough and then leaving it to rest in the fridge overnight or up to a few days. It sounds a little complicated but the besides the great taste, the benefit is having dough ready to go at a moments notice – you can just pull your premade dough out of the fridge and start making pizza!
For those interested in the science, the flavour develops in this way because enzymes in the flour start to break down the starch molecules, converting them to complex sugars. These sugars give the dough a natural sweetness and help the crust caramelise to a golden brown when cooked. Incidentally, this is why there is no sugar in this dough – when other recipes call for added sugar they are looking for the effect that we get by just leaving the dough be. The dough is kept in the fridge because the low temperatures slow down the activity of the yeast, preventing the dough from raising so much that it collapses. The low temperatures also keep the yeast from consuming all of the sugars in the dough! It is a complex topic – if you would like to read more about this, author and baker Peter Reinhart has a lot of excellent, detailed information in his book The Bread Baker’s Apprentice. Peter also has a great blog about his books for those interested in bread and other baking.
There is one other benefit from the overnight rest, which is less need to knead. In a standard recipe the dough must be kneaded for up to 10 minutes to develop the gluten, which gives the dough strength and allows it to be shaped without tearing. But when dough is left to rest for longer, the gluten starts to develop on its own and just a short period of kneading is enough to shape a useable dough. The reduced handling improves flavour and colour by reducing oxidation (caused by increased exposure to air ).
HOWEVER – you don’t have to know any of this to make the dough, so let’s jump in and get started!
This recipe makes enough dough for 2 medium-thin crust pizzas. You can scale up the quantities to make as many or few as you like. It’s important to use good quality flour, but you can experiment with different brands to find one that works for you. Look for an unbleached flour with around 11% protein and you can’t go wrong, although you may have to use a tiny bit more or less water as every flour absorbs water a little differently. If you can find a good one, the traditional flour used in Italian pizza is ’00’ grade flour. 00 flour is a little finer than normal flour, and the texture and flavour is wonderful.
It’s important to weigh the ingredients when making dough, and weights are given here in grams. Kitchen scales that measure grams are ok for the yeast and salt if you don’t mind guesstimating a bit, but scales that measure fractions of a gram are a nice luxury as well. However, I have given approximate measurements in volume for those who don’t have scales.
Ingredients
300gm White flour (2 1/4 cups)
200ml Water (4/5 of a cup)
6g Sea salt (1 heaped tsp)
3 g Instant dried yeast (1 slightly heaped tsp)
15ml Olive oil (1 tbsp)*
*The olive oil is not truly traditional but it is added here to make the base more tender. If making this dough for a wood fired oven, you can omit the oil as the faster cooking time in a WFO gives a tender base without it.
Method
Mix the flour, yeast and salt together in a large mixing bowl.
Add 3/4 of the water and stir with a spoon. Slowly add as much of the rest of the water is needed for the mixture to form a rough lump. If there are stray crumbs of flour left in the bottom of the bowl, add a little more water half a tablespoon at a time and continue mixing.
Pour the olive oil over the dough.
Cover the bowl with a clean tea towel and leave to stand for 10 minutes.
Sprinkle some flour on a large board or clean bench top, and turn out the dough. Sprinkle a little flour over the top, just enough to make it easy to handle without sticking to your hands.
Knead the dough for 8-10 strokes, just until the olive oil is mixed in and the dough feels silky and smooth.
Put the dough back in your mixing bowl, cover, and leave to rest for another 10 minutes.
The dough is now ready to divide into pieces. This recipe makes 2 x 250g pizza bases, so use your scales to make 2 even lumps.
Shape each piece into a dough ball, roll each ball in flour to coat well, and put them in the fridge overnight or for at least 6-8 hours. You can put them in a baking tray or plate covered loosely with glad wrap, or a large sealable plastic container. Make sure you leave room for the balls to expand – they may grow up to double in size while in the fridge.
Remove the dough balls from the fridge about 1 hour before you want to start cooking, around the same time you start preheating your pizza stone in the oven. Once the oven is ready, shape your base, add toppings of your choice, and use your peel to slide the pizza into the oven! A thin crust pizza cooked in a properly preheated oven should be browned and bubbling in 5-7 minutes.

")