Chicken & Sage Sausages

It is satisfying to make fresh homemade sausages and I have resolved to make them more often. The whole thing takes less than an hour, and it would be easy to make double the amount and freeze some for later. The best thing is coming up with your own fillings – they can be as crazy or as normal as you like. I have plans for a mega chilli sausage but tonight I did a chicken + fresh herb version. Most recipes call for extra fat for a juicier sausage but if you want a few less calories you can go without – the sausage will be less juicy but still nice.

A few quick tips – Michael Ruhlman in Charcuterie and Paul Bertolli in Cooking By Hand both say a sausage stuffer should be used to fill sausage casings instead of a funnel on a grinder. The problem with the grinder is that chunks of fat can break down too much and then leak out when cooked instead of hanging around to add juicy flavour. This version is the cheapest sausage stuffer on Amazon that gets OK reviews while these ones cost nearly 3 times as much but get much better reviews all round. I’m sold, not that it takes much to make me want a new kitchen gadget, but until I can track one down the old funnel on the mincer is all I have. If using a grinder with funnel, Ruhlman suggests chilling the mince mixture before sending it through the grinder the second time to fill the sausages.

I used to find that fat and sinew got caught on the grinding plate of my grinder, eventually blocking it up and spoiling the texture. It seems like this happens to even the experts sometimes but making sure the die and cutting blade in my grinder were sharp made a big difference. I just rub the flat side of each on a fine diamond stone now and then. Storing the dies and cutter in a zip lock bag with a drop of oil rubbed over stops them from rusting. The other thing that helps is to dice the meat and then pop it in the freezer 30 minutes before starting.

chicken sage sausages (1 of 8)
Sage, rosemary, garlic powder, oregano, pepper, pimento

Ingredients

  • 750g/1.5lb Chicken thighs
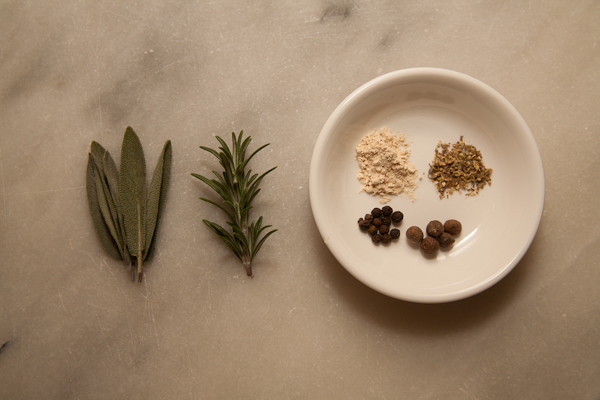
  • 4-5 small sage leaves
  • 1 small sprig rosemary – about 1 tsp chopped
  • 1/2 tsp cracked black pepper
  • 1/2 tsp ground allspice (pimento)
  • 1 tsp garlic powder
  • 1 tsp dried oregano
  • 1 generous tsp cooking salt
  • Sausage casings – natural casings need to be soaked in water before use, then flushed through with more water. Synthetic casings can be used dry.
chicken sage sausages (2 of 8)
If you notice the mine isn’t coming out cleanly, stop and take out the cutting die – it’s probably clogged with sinew

Making The Sausages

1. Chop fresh spices finely. Grind any dry spices that need it.

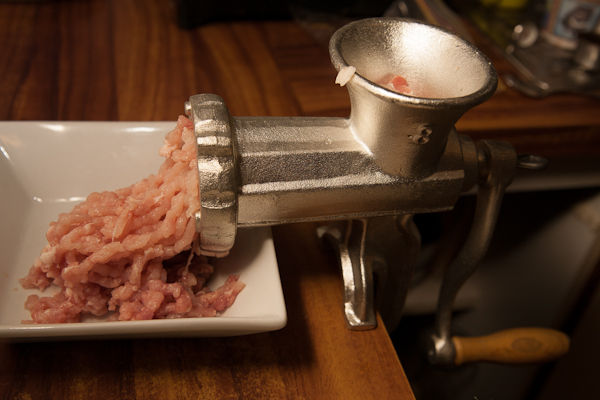
2. Cut chicken into rough chunks and spread out on a tray. Put it in the freezer about 30 minutes before grinding.

3. Pass chicken through the grinder – I used the finest die. When no more is coming out take half a slice of bread and send it through the grinder to push out the last bits. Stop when the bread starts to come through. It’s surprising how muc more this gets you, at least another sausage worth.

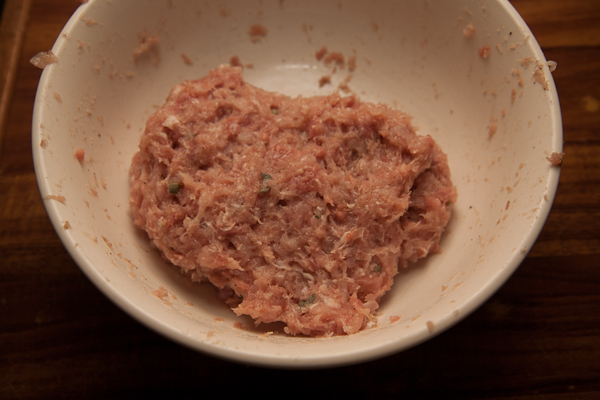
4. Time to get messy: Put the mince in a mixing bowl with all other ingredients and knead until well mixed and the meat feels sticky – a minute or two.

chicken sage sausages (3 of 8)

5. When filling I have been using the largest cutting die on my grinder so it doesn’t clog as much. I fit a length of casing over the funnel, working it right down until no more fits and tie a knot in the end.

6. I can just manage this next bit on my own but it’s more fun with an extra person helping – the meat mixture is fed into the grinder or stuffer and cranked or pressed through the funnel. The person on the casing end lets the casing slip off fast enough for the sausage to be plump but not stuffed tight so that it has room to cook.

chicken sage sausages (4 of 8)

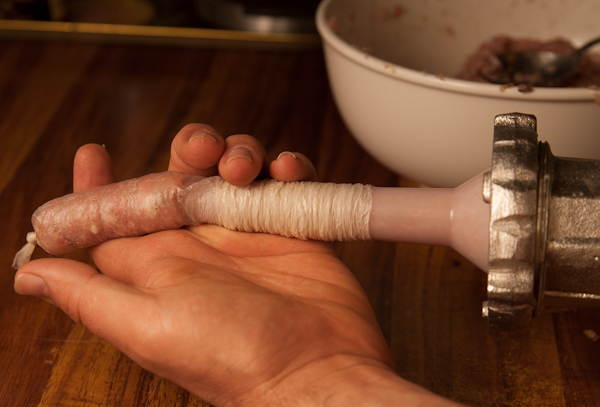
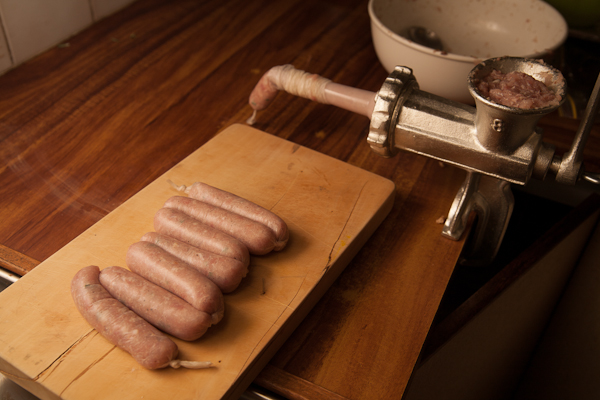
7. I fill the whole length of the casing before twisting into sausages. When twisting , adjust the pressure in each link so that it isn’t too tight – keep in mind that twisting will make each sausage a bit tighter too. Alternate which way each link is twisted or else they’ll come undone – eg twist clockwise, then anti clockwise in order.

chicken sage sausages (5 of 8)

chicken sage sausages (6 of 8)
These were just a bit too tight – a couple split when cooking

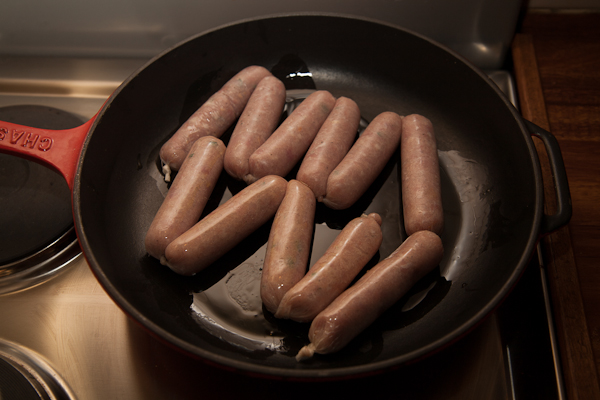
I think sausages are best cooked over a moderate heat so they cook through and get nice and brown without burning. I tried par-cooking before I cut the links so the mix didn’t spill out the ends. Seemed to work.

chicken sage sausages (7 of 8)

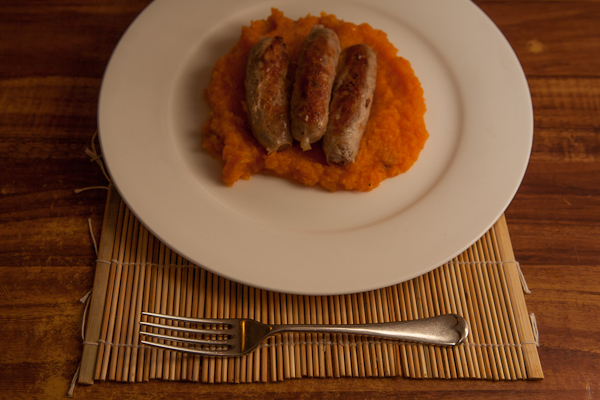
Bangers and mash are a classic so we ate our sausages with buttery, garlicky pumpkin+sweet potato mash and gravy.

chicken sage sausages (8 of 8)

How To Make Mozzarella

Shaping the balls

Making your own Mozzarella might seem like overkill, but it is surprisingly easy to do with great results! You will need a few tools and ingredients but nothing too complicated, and the smooth, creamy taste and texture of fresh homemade Mozzarella on your pizzas will have you hooked – I recommend making a double or triple batch and freezing some for later.

Note: The first step of making mozzarella is to acidify the milk. This method uses food acid to speed up the process, but if you prefer you can use a little yoghurt instead of the food acid. If using yoghurt, you would add it to the milk and allow it to sit overnight until fermented.

Tools and Ingredients

pH tester

I’m using a digital pH meter but if you don’t want to spring for a meter, pH strips will do the job just fine, but get some like these – they are more accurate than the type with just one or two colour squares. To be honest, you can probably skip the pH testing completely if you aren’t scientifically minded or don’t mind taking a chance. I don’t like my cheese to be more acidic than necessary as I feel that it affects the taste, so I do check the pH of the milk while adding acid and stop as soon as I’ve reached my target.

Tartaric Acid

In the past, I have followed recipes that called for citric acid. I have decided to use tartaric acid as I found that the citric acid left a slightly more pronounced bitterness in the finished cheese. You can substitute the tartaric for citric acid if necessary or preferred though.

Rennet

Being a little squeamish, I use this non-animal rennet and have not had any problems with it. If you prefer, traditional rennet is just fine too.

Milk

It’s important to use non homogenised milk to make mozzarella – homogenised milk does not work well if at all. Interestingly though, it is possible to use milk powder. I’ve done it, and while the cheese wasn’t as good as with fresh milk, it was better than not having any Mozzarella at all. Source your milk from a local dairy if possible, the taste of the finished cheese will reflect the quality of the milk you use.

Thermometer

You will need an accurate probe thermometer. I use an analogue one out of habit but I also have a digital version that is more accurate.

Mozzarella Recipe

Makes around 400g/1lb

Milk 4 litres 4 pints
Tartaric Acid 7g 1 level tsp
Rennet Per instructions
Salt 6g 1 tsp
  1. Pour the milk into a large saucepan or stock pot. Dissolve the tartaric acid in half a cup of water, then add to the milk. If using a pH tester, make up more acid solution than needed and add a tablespoon at a time while stirring well, until the milk reaches pH 5.6.

    Making Mozzarella
    Checking pH with a meter
  2. Heat the milk to 32C/90F. I find the best way to do this is to put it over the lowest heat possible while stirring, and monitor the temperature. If it isn’t warm enough after 10 minutes or so, increase the heat slightly and continue to monitor. Once at 32C/90F, turn off the heat.
  3. Check the instructions for your chosen rennet and add the appropriate amount. With the one I used, I added 5 drops per litre of milk to a tablespoon of water, which was then stirred into the milk.
  4. Cover the pan and leave to sit for several hours. You are looking for the milk to set to the point that the curd breaks cleanly when pressed or cut.

    clean break
    Clean break, the curd is ready to cut
  5. Cut the curd into cubes about 1cm (½  inch) apart.

    Cut curds
    Cutting the curd
  6. Return the pan to the heat, and slowly increase the heat to 105C. Leave at this temperature for half an hour, stirring occasionally.
  7. Line a colander or large sieve with cheesecloth. My guilty secret is that I never have cheesecloth handy in my kitchen – I use a clean tea towel. Don’t tell my missus! Pour the curds and whey into your lined sieve, and allow the whey to drain out for 10 minutes. Turning over the curds halfway through lets a little more whey drain out, but there’s no need to squeeze or press them. TIP: save the whey and you can make ricotta later!

    straining the curd
    Straining the curd
  8. Tip your strained curds into a mixing bowl, and add the salt. Work it through, breaking up the curd as you mix.
  9. At this point you will have salted curd, ready to be stretched!

Stretching Mozzarella

Before it can be stretched, the curd needs to be melted. I have seen two different methods of doing this. One is to take one cup of curd at a time and microwave it for 45 seconds. The other is to tip the curd into a large bowl of hot water. Both have the potential to cause owies, but I think the hot water method is safer as the microwave can sometimes heat things more quickly and hotter than you might realise, which makes the curd dangerous to handle.

For the hot water method, boil a pan full of water, remove from the heat, and let it cool slightly. 70C/160F is enough to melt curd for stretching, but if it is a little hotter you won’t have to work so fast before it cools too much. Tip the curd into the hot water. Use tongs or a slotted spoon to pull out some curd ready to shape. It will be hot, so keep a bowl or sink full of cool water handy to dip your fingers into. If it’s too hot to handle, wear rubber gloves.

Stretch the curd out and fold it over itself a few times. You will see it start to look shiny as you work it.

Stretching the curd
Stretching the curd

Shape it into a ball by making a ring with your thumb and forefinger and holding the piece in between. Continuously tuck the curd up inside itself until you have a neat ball, Squeeze your thumb and forefinger together to seal the end.  You can shape either big or small balls as desired. When shaped, drop each ball into a bowl of cold salt water – I use 1 tbsp per litre of water.

Shaping the balls
Shaping the balls

Finished! You can store your mozzarella balls in the salt water, or remove them when cool and store in a bowl or bag. For pizza use it’s probably more sensible to store dry, to avoid soggy bases. Fresh mozzarella should keep for a few days in the fridge, or longer frozen.

To Make Ricotta

Boil the strained whey vigorously for a few minutes. Pour into a cheesecloth lined sieve. Tie the ends of the cloth with string and hang from something overnight.